Brass Drain Install

Andrew93

GreatGrady Captain
Joined
Sep 30, 2012
Messages
329
Reaction score
48
Points
28
Location
Massachusetts
Model
Express 305
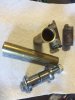
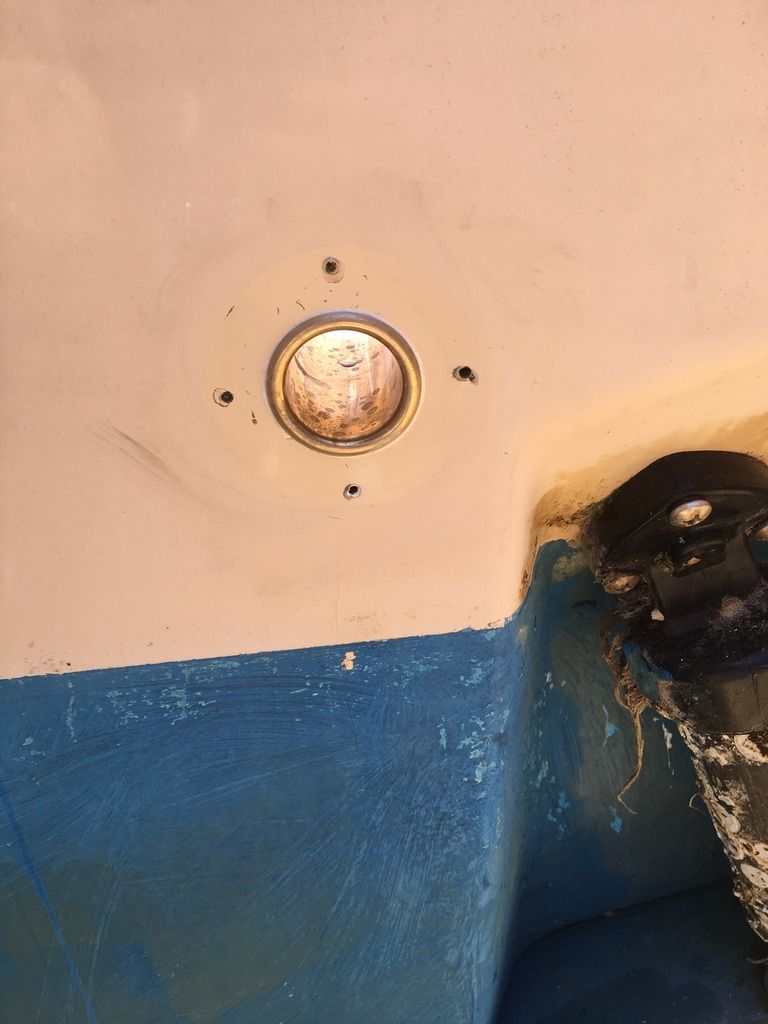
The brass drains on my 272 Sailfish were looking suspect. After some reading here I decided to give it a try. One was damp but still solid. I coated the hole with 5200 and the tube. 1/4" extra was perfect for a nice flange. I bought 3" tubes and 3 7/8". The 3" was just too short for my boat, so I cut down the longer ones with a pipe cutter.

I am glad I tackled the project, these are worth checking and not being afraid of doing yourself. It's almost a shame the outside got covered up with the rubber flap!


Willy-C

Well-Known Member
Joined
Nov 5, 2012
Messages
189
Reaction score
66
Points
28
Age
67
Location
Hooksett, NH
I did the same for my scupper drains and splashwell drains. It's a good feeling when they look new again
 

Attachments

  • IMG_2892.JPG
    IMG_2892.JPG
    66.3 KB · Views: 1,258

Tucker

GreatGrady Captain
Joined
May 22, 2009
Messages
799
Reaction score
3
Points
18
Location
Port Deposit, Maryland
Same here. I wish I would have checked ebay before buying the flaring tool new. I got rid of the Grady flap and got a generic that fit right up.
 

DennisG01

GreatGrady Captain
Joined
Sep 1, 2013
Messages
6,805
Reaction score
1,203
Points
113
Location
Allentown, PA & Friendship, ME
Model
Offshore
Nice job!

I went a slightly different route with my garboard drain. To be honest, I was surprised that a 24' fiberglass boat still used a rubber stopper for the garboard drain. But I suppose the thought process in building was a little different in 1982. I removed the brass tube, drilled-out the hole slightly oversize, then filled it completely back in with strengthened epoxy, along with fiberglass mat on the inside and outside. Then I redrilled the proper sized hole for a bronze garboard drain and sealed/installed that. With the hole entirely epoxied, there is zero chance of water intrusion. I felt this was a more permanent solution for the garboard drain, at least for me.


Tucker

GreatGrady Captain
Joined
May 22, 2009
Messages
799
Reaction score
3
Points
18
Location
Port Deposit, Maryland
Mine came with the bronze flared drains and I did exactly like the OP and had to buy the long ones and cut them down. They corrode right at the flare and if they weren't caulked in good you have the chance of water in the wood. Actually I was thinking the plastic drains would be better if they didn't crack.
 

DennisG01

GreatGrady Captain
Joined
Sep 1, 2013
Messages
6,805
Reaction score
1,203
Points
113
Location
Allentown, PA & Friendship, ME
Model
Offshore
Tucker said:
Mine came with the bronze flared drains and I did exactly like the OP and had to buy the long ones and cut them down. They corrode right at the flare and if they weren't caulked in good you have the chance of water in the wood. Actually I was thinking the plastic drains would be better if they didn't crack.

FYI, anything that is below the waterline (if this is the one you're talking about), MUST be bronze or Marelon. SS is not allowed, either. Above the waterline, it could be anything. I don't think I've ever seen Marelon drain tubes, but that would solve both the corrosion and the plastic cracking issue that you brought up.
 

DennisG01

GreatGrady Captain
Joined
Sep 1, 2013
Messages
6,805
Reaction score
1,203
Points
113
Location
Allentown, PA & Friendship, ME
Model
Offshore
Tucker said:
Engine well garboard drains are above the waterline.

Hopefully... :D

But, technically, "garboard" refers to the lowest section of the keel. The ones you guys are talking about are not "garboard" drains. I was referring to my garboard drain since mine (from '82) was a brass drain tube, and just to show a different way to deal with that one.
 

nerd

Member
Joined
Mar 27, 2012
Messages
24
Reaction score
0
Points
1
Location
North fork of Long Island
How hard was it to remove the old drains? I'm looking at doing this after the season, not looking forward to pulling drains that have been there for 25 years.
 

DennisG01

GreatGrady Captain
Joined
Sep 1, 2013
Messages
6,805
Reaction score
1,203
Points
113
Location
Allentown, PA & Friendship, ME
Model
Offshore
nerd said:
How hard was it to remove the old drains? I'm looking at doing this after the season, not looking forward to pulling drains that have been there for 25 years.

The longer they've been there probably makes it easier and easier.

For me, it was pretty easy. I just used a large twist bit the same size as the drain. Brass is soft.
 

nerd

Member
Joined
Mar 27, 2012
Messages
24
Reaction score
0
Points
1
Location
North fork of Long Island
DennisG01 said:
nerd said:
How hard was it to remove the old drains? I'm looking at doing this after the season, not looking forward to pulling drains that have been there for 25 years.

The longer they've been there probably makes it easier and easier.

For me, it was pretty easy. I just used a large twist bit the same size as the drain. Brass is soft.

Didn't have to do anything to the flanged end first, just insert the bit and have it chew it up?
 

DennisG01

GreatGrady Captain
Joined
Sep 1, 2013
Messages
6,805
Reaction score
1,203
Points
113
Location
Allentown, PA & Friendship, ME
Model
Offshore
Go slow, but yes, just drill through and don't worry about the outer flange. Once you drill through, if it doesn't just pop off by itself, you can pull it off.
 

Andrew93

GreatGrady Captain
Joined
Sep 30, 2012
Messages
329
Reaction score
48
Points
28
Location
Massachusetts
Model
Express 305
nerd said:
DennisG01 said:
nerd said:
How hard was it to remove the old drains? I'm looking at doing this after the season, not looking forward to pulling drains that have been there for 25 years.

The longer they've been there probably makes it easier and easier.

For me, it was pretty easy. I just used a large twist bit the same size as the drain. Brass is soft.

Didn't have to do anything to the flanged end first, just insert the bit and have it chew it up?


I used and hammer with an old chisel and screwdriver and folded the drain in on itself and worked my way around it and pushed it through to the inside. It was real easy.

That would be an expensive bit if you don't have one that big kicking around, although I am sure it would work good. The tube that was slightly compromised pushed out with ease in almost 1 whole piece. The other side I had to fold in on itself about halfway through and then it popped right out.
 

DennisG01

GreatGrady Captain
Joined
Sep 1, 2013
Messages
6,805
Reaction score
1,203
Points
113
Location
Allentown, PA & Friendship, ME
Model
Offshore
Fire93Medic said:
I used and hammer with an old chisel and screwdriver and folded the drain in on itself and worked my way around it and pushed it through to the inside. It was real easy.

That would be an expensive bit if you don't have one that big kicking around, although I am sure it would work good. The tube that was slightly compromised pushed out with ease in almost 1 whole piece. The other side I had to fold in on itself about halfway through and then it popped right out.

That's roughly how it went for me, too. I didn't have to drill through the whole thing and it started to pop/push out. Obviously, after X-number of years, these should probably be removed and resealed... before it get's to the point that they are easy to remove. What's that term that we are supposed to follow? Oh yea, "preventative" maintenance. :mrgreen:
 

Fishtales

Well-Known Member
Joined
Jan 31, 2005
Messages
7,558
Reaction score
1,177
Points
113
I agree on the PM comment. A little of that goes a long way with boats. Thanks for the posts, shows how easy it is.....