Bow Pulpit Upgrade

ROBERTH

GreatGrady Captain
Joined
Jun 10, 2006
Messages
1,304
Reaction score
119
Points
63
Location
Raleigh, NC
Model
Sailfish
Hey folks, we have been talking about our pulpits and anchor retrieval issues over time in many posts. I think I am ready to make an upgrade to my fitup.

As we know/have learned, the original pulpit anchor roller is very narrow and was suited perfectly for the Danforth type anchors. However, for those of us using the Delta plow type anchors, they need a wider roller assembly.

I have done a lot of research on this and so far, it seems my best option to allow the anchor to have room to rotate when coming over the roller is to give it the width it needs.

I am looking at the double roller assembly from Lewmar as they list it specifically for the Plow type anchor from 14 to 35#'s.

To be able to install this, I need to fill in the cutout section where the existing anchor roller is mounted.

So down to the question, what is the best method/approach to do this? What I am thinking so far is to use the long strand polyester filler (found some at Jamestown Distributors that looks really good), fill in the cutout area and then cover with the polyester putty to take care of the pinholes, etc.
Once I get this filled and shaped, I will sand down a lot of the gelcoat, fix some of the cracks and paint with the Interlux Perfection, same as I did with my swim platform.

Here is a link to the filler: https://www.jamestowndistributors.com/userportal/product.do?process=wishlist&part=513423
Here is a link to the glazing putty: https://www.jamestowndistributors.com/userportal/product.do?process=wishlist&part=42779

What say you about this?

By the way, I restored my pulpit about 5 years ago (or so) and the Gelcoat has a few cracks. Basically where the bow rail stantions are, I think from the screw holes, which I did taper, but apparently not enough. I used the duratec with the gelcoat from Grady and think that the flexibility with the duratec might not be good for the flexing of a pulpit, thus why I want to sad down the thickness of most of the gelcoat where it flexes the most. The paint has much more flexibility than the gelgoat.
I have also since learned that thinning gelcoat with duratec does not allow the gelcoat to hold up in the sun as well as it thins out the pigments. That is why it dulls so quickly. The Perfection is amazing so far on my swim platform.

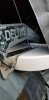
Attached pic shows the existing channel I will need to fill in.
 

Attachments

  • Bow Pulpit channel.jpg
    Bow Pulpit channel.jpg
    64.3 KB · Views: 241

DennisG01

GreatGrady Captain
Joined
Sep 1, 2013
Messages
6,805
Reaction score
1,203
Points
113
Location
Allentown, PA & Friendship, ME
Model
Offshore
Question... you're talking about using an anchor roller that sits completely on top of the pulpit? Is it wider than your cutout? If so, you could just put it right on top if it would span the gap/cutout. If you're thinking of the same type of anchor roller that I am (I had one of those on my Sea Ray), then I believe it would completely cover that cutout and no one would be the wiser.
 

ROBERTH

GreatGrady Captain
Joined
Jun 10, 2006
Messages
1,304
Reaction score
119
Points
63
Location
Raleigh, NC
Model
Sailfish
Hi Dennis, agree with what you are saying and yes, it is wider to accommodate the different type anchor and will need to sit on the top of the pulpit. If I don't fill it in, then the mounting bolts will be exposed. I also don't think it would be good to have the open gap underneath, so ok with filling it. Lots of dirt and stuff will get up underneath, including mud dobber nests, etc .

I forgot to mention, when I got this boat, the pulpit was in pretty bad shape. Lots of huge chunks out of it and a large crack that went very deep. I repaired using the Marine type filler from Evercoat. Seemed that is very close if not the same as what Grady used on the inside as well . So far, those repairs have held up great. I have put some serious stress on the pulpit a few times in rough seas!

Likely, the structural filler is overkill since the anchor roller unit is heavy guage Stainless Steel and does not actually flex. The flexing seems to happen just aft of the actual roller assembly, so filler underneath is just filler. I just think that the structural glass fiber filler is a better filler with less potential issues down the road. I am hoping to make this the last restoration effort on this pulpit. :cool:
 

DennisG01

GreatGrady Captain
Joined
Sep 1, 2013
Messages
6,805
Reaction score
1,203
Points
113
Location
Allentown, PA & Friendship, ME
Model
Offshore
I forgot to mention, when I got this boat, the pulpit was in pretty bad shape. Lots of huge chunks out of it and a large crack that went very deep. I repaired using the Marine type filler from Evercoat. Seemed that is very close if not the same as what Grady used on the inside as well . So far, those repairs have held up great. I have put some serious stress on the pulpit a few times in rough seas!
Well, from what I can see, the repair you did looks good, Robert. The bottom edge is nice and clean and straight.

Obviously it's your gig so certainly do as you feel best. But... the mounting bolts being exposed is a non-issue - they won't be harmed in any way and it won't change the structural integrity of anything. And there are much easier ways of filling the hole that serve the same purpose to keep dirt and critters out. For example... just fill it with white caulk.

For attaching the pulpit, I assume you're doing something like oversize drilling the holes/fill with epoxy/redrill holes for through bolt hardware/large finder washers on the bottom side... or an aluminum or SS plate for a backer? Not this needs a huge amount of backing, but it's easy enough to do.

But, back your filler idea. I like the idea of the glass-filled bondo - I've used the same stuff you are referencing and I like it. I would worry about regular bondo by itself in such a large chunk that it might get brittle. The glass should hold it together, better. However, I think I would still worry about that. Instead, I would probably cut a "plug" out of wood to loosely fit in the hole, then encapsulate it in place with the bondo - say a 1/4" gap all the way around the wood, for example. This area is not structural, but you wouldn't want a crack developing that lets in water that then possibly freezes.
 

steveditt

Well-Known Member
Joined
Nov 11, 2012
Messages
146
Reaction score
23
Points
18
I have a 98 208 with the same issue and considering the same upgrade most likely 2020 spring , not sure the size your filling but is it possible to have a metal shop use your existing roller frame customized it to have the new Lewmar fit within the old one cutting off the roller assembly ,or prefabricate something just a thought >
 

ROBERTH

GreatGrady Captain
Joined
Jun 10, 2006
Messages
1,304
Reaction score
119
Points
63
Location
Raleigh, NC
Model
Sailfish
Thanks Dennis, exactly the area of thought I was looking for, it maybe fabricate a wood piece to fill in the majority instead of so much filler. Maybe a good piece of dry oak will expand/contract less and near same as the bondo glass filler. Once I get into the project, I will see what I have laying around to use for this.
In regards to a backing plate, I have a huge aluminum plate I put on under the deck when I installed the windlass. Wasn't sure on your meaning about filling the holes, etc .since I will be using the same holes that the pulpit mounts with today. Likely of course the holes for the anchor roller assy. will be different so will need to fill them and redrill for the new one .

Steve, that is another method, but out of convenience and time plus the new roller is not that expensive, it should be a simple transition. I need to remove the pulpit anyhow to do the repairs on the gel coat areas and also to paint it properly. Also have to do this indoors due to temps.

I will post the results of the job once completed, but not just yet ready to do this. I might start sometime in December, as I want to make sure the fishing season is over before I start the work.
 

DennisG01

GreatGrady Captain
Joined
Sep 1, 2013
Messages
6,805
Reaction score
1,203
Points
113
Location
Allentown, PA & Friendship, ME
Model
Offshore
Oak would be good - plywood is fine, too. You could always glue a couple pieces of ply together to get the thickness you need. For good measure, you could put a few coats of epoxy on the wood.

Filling/drilling holes... So, most manufacturers don't go to this extent, but it's definitely something you can do that will make the core inside the pulpit (I'm assuming it has one) 100% impervious to possible water intrusion down the road... ummm... water ;) through the bolt holes.

Let's assume you're using typical 1/4-20 hardware here. Normally, you would drill your hole 1/4". In this case, drill it 3/8". Then fill the holes with epoxy (or polyester, either is fine). Once cured, come back and redrill your 1/4" hole. Now the core is completely sealed from water intrusion. Should water ever make it's way into the bolt hole, it will not contact wood. 100%, completely sealed.
 

ROBERTH

GreatGrady Captain
Joined
Jun 10, 2006
Messages
1,304
Reaction score
119
Points
63
Location
Raleigh, NC
Model
Sailfish
Thanks Dennis. Got it. For the bolt holes, that is what I did actually on my Swim Platform. I will do same on the pulpit when I re-install it this time. I don't recall if I did it before or not, but if not, I will for sure!
I think I have some old oak stair treads I can cut up and laminate, then shape. Should do the job.
 

Fishtales

Well-Known Member
Joined
Jan 31, 2005
Messages
7,559
Reaction score
1,177
Points
113
If you could take some pics post mod and post that would be great. Having a little trouble following you all.

tx
 

ROBERTH

GreatGrady Captain
Joined
Jun 10, 2006
Messages
1,304
Reaction score
119
Points
63
Location
Raleigh, NC
Model
Sailfish
If you could take some pics post mod and post that would be great. Having a little trouble following you all.

tx

To clarify my intentions here and try to explain better in this post, is that the existing Bow Roller installed by Grady was made for the fluke type anchors which don't need to upright themselves. The width of the roller is just 1-3/4". This narrow width does not allow the Delta style anchors to right themselves (rotate in the roller) when they are retrieved and come in upside down.
The replacement Bow Roller I will be installing is 2-5/8" wide and designed to allow the Delta anchor shanks to rotate in the roller and right themselves as they come over the rollers.

Retrieval of my Delta anchor has always been very frustrating and time consuming, as well as dangerous sometimes if in rough seas and having to extend out over the pulpit, pull up on the anchor manually while trying to rotate a swinging anchor, and pushing a button with my foot to pull it over the roller, etc.

So I am going to fill in the slot that the existing Bow Roller is installed within, and mount the wider Bow Roller on the top of a flat surface bow pulpit.
 

Fishtales

Well-Known Member
Joined
Jan 31, 2005
Messages
7,559
Reaction score
1,177
Points
113
Interesting. I have the Delta fast set on the Marlin and don't have an issue. I may have a different size though.
 

SkunkBoat

Well-Known Member
Joined
Oct 12, 2017
Messages
4,204
Reaction score
1,456
Points
113
Location
Manasquan Inlet NJ
Website
www.youtube.com
Model
Express 265
I agree with NOT using only filler. I would use plywood or even better, build up glass to take up most of the thickness. Then use high density adhesive/filler.
Personally, I would paint it white not gelcoat. The pulpit is a separate piece so matching isn't necessary. Its going to take a beating. Sanding and repairing in the future is easy. Paint is cheap.


Just great! Now you got me thinking about doing the same project!
 
Last edited:

ROBERTH

GreatGrady Captain
Joined
Jun 10, 2006
Messages
1,304
Reaction score
119
Points
63
Location
Raleigh, NC
Model
Sailfish
Hi folks, finally finished the Bow Pulpit roller upgrade. It came out great, better than expected. The only issue I did not compensate for correctly was the anchor touching the bottom of the pulpit. Even though I tested this in the garage with the anchor, simulating coming onto the roller and resting, it did not touch, but once mounted and windlass hooked up, it touches. I can't figure why it is different, but not too worried about it as the fiberglass will likely just crush a bit an anchor will rest in this position. Not sure what else I can do as I do not want to grind out an area and repaint, etc.
Adding some pics. See the comparison is size of the new vs old roller. By the way, first time retrieving the anchor, it came up and was upside down. As it came over the rollers, it righted itself and came on like it should! Success! Finally! This was the major issue before.
 

Attachments

  • Bow Pulpit Anchor Roller comparison.jpg
    Bow Pulpit Anchor Roller comparison.jpg
    490.2 KB · Views: 174
  • Bow Pulpit Filled and Painted.jpg
    Bow Pulpit Filled and Painted.jpg
    513.3 KB · Views: 170
  • Bow Pulpit with new Anchor roller Bottom view.jpg
    Bow Pulpit with new Anchor roller Bottom view.jpg
    468.8 KB · Views: 174
  • Bow Pulpit with new Anchor Roller and Interlux Perfection.jpg
    Bow Pulpit with new Anchor Roller and Interlux Perfection.jpg
    1.1 MB · Views: 177
  • Anchor Roller Touching Pulpit2.jpg
    Anchor Roller Touching Pulpit2.jpg
    611.8 KB · Views: 174
  • Love
Reactions: SkunkBoat

DennisG01

GreatGrady Captain
Joined
Sep 1, 2013
Messages
6,805
Reaction score
1,203
Points
113
Location
Allentown, PA & Friendship, ME
Model
Offshore
Looks great - almost too shiny to use!

Hindsight is 20/20, but yeah, the anchor roller should have been mounted further forward so it hung off the front more. Oh well. It really wouldn't be all that much work - especially compared to what you've already done - to just grind/sand the front portion of the pulpit thinner. A belt sander would make quick work of it, whether it was to make it thinner or even use the rounded end of the sander to create an upside down, very shallow, "U" shape to allow for clearance.

Yes, the amount that it's touching won't cause any real, structural, damage. But it will most likely lead to an ugly looking area on a nicely done job. It WILL contact it more than you have so far experienced... whether it's from the boat boucing around in the waves while retrieving or just the normal flex that happens on boats on the road and the water.
 
Last edited:

Fishtales

Well-Known Member
Joined
Jan 31, 2005
Messages
7,559
Reaction score
1,177
Points
113
Looks very good. The only question I have is in the last pic. Does the anchor interface with the edge of the pulpit bottom edge? May want to attach some rubber of something there to eliminate chaffing.
 

ROBERTH

GreatGrady Captain
Joined
Jun 10, 2006
Messages
1,304
Reaction score
119
Points
63
Location
Raleigh, NC
Model
Sailfish
Fishtales, if you zoom in that last pic, you can see where the anchor is carving out it's new niche into the bottom edge of the pulpit.:(

I thought of a piece of some type of rubber but think it will be hard to find something to work there and not just get torn off.

Also, maybe for a bit I will just watch it and let it just work that area and then see what I need to carve out later and repaint that spot. Problem is I am out of the primer and not sure I can make up enough of the paint to touch it up.

Skunk, I assume you mean removal of the pulpit?

Well that is another story....lol. Actually if you are skinnier than I am, on my boat, I remove the bulkhead panel forward in the cabin and can somewhat squeeze up in the anchor locker. It stops me at the top of my chest and I can't reach the furthest forward nuts for removal, so I make up a long extension to do that work for me .

One I was able to remove all the bolts, the caulk is left to cut loose. Once I cut the caulk, (used a long filet knife and carpet razor knife) I was able to get it released.

However, a word of CAUTION here! The pulpit if forward heavy....I found out once I freed the caulk and off the boat the pulpit goes, crashing down into the trailer and then on the ground! Oh well, more body work/filler work to do...:confused:. It is best if you can find someone to help remove and replace it. The pulpit is a beast!

To replace the nuts, I fill the deep socket with extra nylon locknuts until full and then use the 4000UV to stick the washer to the socket, then gingerly reach up in there and thread the nut onto the bolt.
Then, to tighten up all the nuts on the underside, I used 4 pairs of vise grips, (saved me from going topside so many times) the needle nose work well for the smaller nuts and set them so they will jam against another bolt hanging down or the hull itself, then go topside and tighten up. It all worked out well this way.

All in all, it was a job to do. Painting process the most complex. I really would rather Gelcoat than use the paint as it is much easier, but I wanted the durability of this Perfection paint which is amazing to look at! The Gloss is killer and it is very durable. The nonskid texture came out perfect as well and is very tough.
I was using the blue painters masking tape on the nonskid to do the caulking, and the tape would not stick well. I found this interesting that the characteristic of this paint is repelling the tape. Must be why my swim platform stays so clean......
 

Fishtales

Well-Known Member
Joined
Jan 31, 2005
Messages
7,559
Reaction score
1,177
Points
113
It definitely came out great. I think the right size hard rubber bonded might just do the trick for you. Your option isn't bad either, see what happens, touch up after.
 

ROBERTH

GreatGrady Captain
Joined
Jun 10, 2006
Messages
1,304
Reaction score
119
Points
63
Location
Raleigh, NC
Model
Sailfish
Thought I would give an update after first time anchoring at sea while reef fishing. First retrieval in over 100' the anchor came up and righted itself and came over the roller perfectly. My son-in-law turned and smiled as if, why didn't we do this fix years ago!
Finally, the solution to resolve the constant pita upside down anchor issue!

If anyone is contemplating this upgrade, go for it. You won't be sorry!

So far the groove is just a small V and not an issue at this point.
 

KaseyC

New Member
Joined
Jun 12, 2020
Messages
1
Reaction score
0
Points
1
Age
36
Model
Escape
ROBERTH, Beautiful work! Perhaps a small piece of stainless steel angle approximately one inch wide (kept narrow doesn't need to be bent) at the point of contact would relieve the area contacted by the anchor. Could be mounted with countersunk flat head screws and then high polished to sort of look like it belongs.

In any case, I'm impressed and will do something similar to my Escape in the future! Well done.