New 1996 Grady White Islander 268 with twin 200 V6 Mercs

Paul_A

Well-Known Member
Joined
Feb 25, 2019
Messages
144
Reaction score
43
Points
28
Model
Adventure
My boat had that same pushbutton breaker as the one next to your battery switch.

Be sure to check it, I ended up replacing mine. Was sticky.

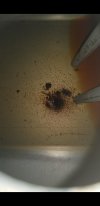
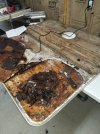
Regarding your fuel tanks I can only tell you what I saw when I removed the then 25 year old tank out of my boat. The top had obvious pitting and a couple of pits were deep enough that the tip of a screwdriver went through easily.

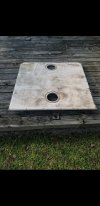
But the sides and bottom were the real problem. Grady laid rubber strips between the tank and the false floor and had rubber strips on the sides and top where the raw wood was screwed into the stringers to create straps of sorts.

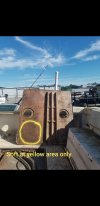
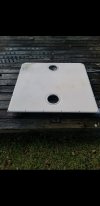
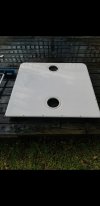
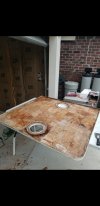
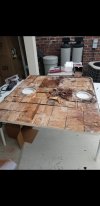
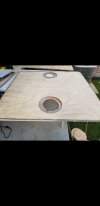
Take that board off the top of the rear tank. That's where you can get a quick look at what might be hiding underneath. If it were mine if I saw any deep pits on top I would pull and inspect the sides and bottoms. Last thing I ever want is my automatic bilge pump pumping raw gas when I'm 30 miles offshore.
 
  • Like
Reactions: PointedRose

greauxpete

Well-Known Member
Joined
Sep 14, 2021
Messages
114
Reaction score
103
Points
43
Age
50
Location
Tha Bayou (Youngsville, LA)
Model
Islander
Floor panel has delamination causing it to deflect in area at the yellow circle in picture. Thinking about investigating coring in this area and if wood is dry, just recoring the bad area or should I just recore the whole panel. Thoughts?
 

Attachments

  • Screenshot_20210924-125342_Gallery.jpg
    Screenshot_20210924-125342_Gallery.jpg
    1,014.3 KB · Views: 60

PointedRose

Well-Known Member
Joined
Feb 11, 2021
Messages
646
Reaction score
196
Points
43
Location
San Francisco
Model
Overnighter
Floor panel has delamination causing it to deflect in area at the yellow circle in picture. Thinking about investigating coring in this area and if wood is dry, just recoring the bad area or should I just recore the whole panel. Thoughts?
An easy fix would be drilling some holes about every 3-4 inches just through the bottom skin to the core. Can use a bent nail or Allen wrench in a drill to remove some rotten core material. Then refill with penetrating epoxy and cover the drilled holes with epoxy. wouldnt have to take it all apart.

see ‘repair rotted core method 2’


greauxpete

Well-Known Member
Joined
Sep 14, 2021
Messages
114
Reaction score
103
Points
43
Age
50
Location
Tha Bayou (Youngsville, LA)
Model
Islander
Where is the toilet waste holding tank located?

Also where is the valve which needs to be opened to allow the waste to be pumped overboard?
 

greauxpete

Well-Known Member
Joined
Sep 14, 2021
Messages
114
Reaction score
103
Points
43
Age
50
Location
Tha Bayou (Youngsville, LA)
Model
Islander
Fuel deck panel cleaned up well:
 

Attachments

  • Screenshot_20210928-205901_Gallery.jpg
    Screenshot_20210928-205901_Gallery.jpg
    1.2 MB · Views: 51
  • Screenshot_20210928-205908_Gallery.jpg
    Screenshot_20210928-205908_Gallery.jpg
    1 MB · Views: 51
  • Screenshot_20210928-205913_Gallery.jpg
    Screenshot_20210928-205913_Gallery.jpg
    957.6 KB · Views: 51
  • Like
Reactions: PointedRose

greauxpete

Well-Known Member
Joined
Sep 14, 2021
Messages
114
Reaction score
103
Points
43
Age
50
Location
Tha Bayou (Youngsville, LA)
Model
Islander
Tore into the hatch.. the wood is mush.
I took as built dimensions of the hatch and stiffeners and will rebuild.

See pics of carnage:
 

Attachments

  • 20210930_183038.jpg
    20210930_183038.jpg
    2.4 MB · Views: 87
  • 20210930_201613.jpg
    20210930_201613.jpg
    1.3 MB · Views: 85
  • Like
Reactions: PointedRose

greauxpete

Well-Known Member
Joined
Sep 14, 2021
Messages
114
Reaction score
103
Points
43
Age
50
Location
Tha Bayou (Youngsville, LA)
Model
Islander
Plywood Core and inner skin removed:
 

Attachments

  • Screenshot_20211002-050435_Gallery.jpg
    Screenshot_20211002-050435_Gallery.jpg
    1 MB · Views: 48
  • Screenshot_20211002-050427_Gallery.jpg
    Screenshot_20211002-050427_Gallery.jpg
    1.1 MB · Views: 48

Hookup1

GreatGrady Captain
Joined
Oct 16, 2007
Messages
2,597
Reaction score
714
Points
113
Age
69
Location
Cape May, NJ
Model
Islander
I used 1/2" Coosa board for the core and West System epoxy. If you use plywood protect the core. Drill out the screw holes oversized from the underside, epoxy fill and re-drill. This photo is prior to encapsulating the coring. Coosa board lifted up, epoxy poured underneath, covered with glass and vacuum bagged.

Dech Hatch Coosa.jpeg

If you do pull your fuel tanks let me know how the forward tank comes out. I'm planning on replacing mine. Not sure how difficult it will be to get the forward tank out.
 
Last edited:

greauxpete

Well-Known Member
Joined
Sep 14, 2021
Messages
114
Reaction score
103
Points
43
Age
50
Location
Tha Bayou (Youngsville, LA)
Model
Islander
Hookup..nice work.
I plan on cutting the plywood up in smaller pieces. (Not as small as the factory pieces though, probably 4 times larger).

I cleaned up all the wood remnants this morning, shes ready to fresh glass and bonding the plywood. See pics below..

I'm going to try to coat all sides of the plywood pieces and bed onto the panel with thickened epoxy in one shot. Do you think all have enough pot life? Or should I coat the plywood, let it cure, then bed with thicker epoxy. Seems like it would get a better bond when its all wet.
Thoughts?
 

Attachments

  • Screenshot_20211002-124430_Gallery.jpg
    Screenshot_20211002-124430_Gallery.jpg
    661.8 KB · Views: 23

Hookup1

GreatGrady Captain
Joined
Oct 16, 2007
Messages
2,597
Reaction score
714
Points
113
Age
69
Location
Cape May, NJ
Model
Islander
Hookup..nice work.
I plan on cutting the plywood up in smaller pieces. (Not as small as the factory pieces though, probably 4 times larger).

I cleaned up all the wood remnants this morning, shes ready to fresh glass and bonding the plywood. See pics below..

I'm going to try to coat all sides of the plywood pieces and bed onto the panel with thickened epoxy in one shot. Do you think all have enough pot life? Or should I coat the plywood, let it cure, then bed with thicker epoxy. Seems like it would get a better bond when its all wet.
Thoughts?
I would use West System 105 resin and 206 Slow hardener (its not that slow!). You may not be familiar with vacuum bagging but you can hack something together if you have a vacuum pump. All you need is 6 mill poly plastic and some gooey tape. Test beforehand. The vacuum bagging pulls everything together and gets the air out. its not that difficult and results in a significantly better part. You paint everything up with epoxy, assemble and turn on the pump. Just make sure you have some elevation on the hose (piece of Styrofoam) so you don't suck up the epoxy into the pump.

Epoxy is more expensive than polyester but is a better choice for a repair like this.

Let me know what you are doing with your fuel tanks. I'm close to replacing mine.
 
Last edited:

greauxpete

Well-Known Member
Joined
Sep 14, 2021
Messages
114
Reaction score
103
Points
43
Age
50
Location
Tha Bayou (Youngsville, LA)
Model
Islander
I'm probably going to let the tanks ride, they look pretty good.

I plan on cutting up the plywood into smaller sections as there is a slight bend in the plywood sheet. See pic below. Thoughts?
 

Attachments

  • Screenshot_20211002-185748_Gallery.jpg
    Screenshot_20211002-185748_Gallery.jpg
    594.3 KB · Views: 22

Hookup1

GreatGrady Captain
Joined
Oct 16, 2007
Messages
2,597
Reaction score
714
Points
113
Age
69
Location
Cape May, NJ
Model
Islander
I would do 6"x6" or 8"x8" squares and plenty of epoxy. Chopped glass underneath and woven glass fabric over the top. Leave 1/4" edge to tuck top layer in.
 
  • Like
Reactions: SkunkBoat

efx

Well-Known Member
Joined
Jun 19, 2018
Messages
263
Reaction score
87
Points
28
Location
Los Angeles
Model
Islander
Oh boy. Just looking at this thread scares me. I’ve redone three gradys and the islander was by far the toughest. I’ve had to stand on my head at times for hours. I’m not kidding. Keep going and plan it out well. Nice sketch. I think planning and doing things right the first time makes it manageable. Kind of. Let’s talk in 12 months. If you repower, stick with twins and watch the engine weight. And scuppers and hoses. Break out the hammer chisel sawzall heat gun rust remover grease wd40 and fiberglass in the forearms for weeks.
 

Attachments

  • 30A9E4F0-0C0B-46BE-9C2A-DB74DC3A07B4.jpeg
    30A9E4F0-0C0B-46BE-9C2A-DB74DC3A07B4.jpeg
    337.9 KB · Views: 51

ScottyCee

Well-Known Member
Joined
Feb 11, 2020
Messages
456
Reaction score
86
Points
28
Location
Samish Island, WA
Model
Sailfish
Use a single piece of foam. Super strong, super light. This one was done 18 months ago and pulled up last week.

foam hatch.jpg
 
  • Like
Reactions: efx

family affair

Well-Known Member
Joined
Jul 31, 2010
Messages
1,295
Reaction score
291
Points
83
Location
Ohio
Model
Islander
Oh boy. Just looking at this thread scares me. I’ve redone three gradys and the islander was by far the toughest. I’ve had to stand on my head at times for hours. I’m not kidding. Keep going and plan it out well.
I have experienced some of your pain. They packed a lot of features in the Islander, and the price is serviceability. I was starting to wonder if I was losing my skills or if the boat was just that tough to work on! Once everything is ironed out, I won't care, but there will be plenty of cussing till then!
 
  • Like
Reactions: efx