Advise on floor panel rework...

ScottyCee

Well-Known Member
Joined
Feb 11, 2020
Messages
456
Reaction score
86
Points
28
Location
Samish Island, WA
Model
Sailfish
My soon to arrive 272 has a soft spot in the main tank deck panel, so I wonder if anyone can provide advice on the repair. I'll check it out and decide if it needs to be done immediately or not, but I guess it's a fairly common repair? Anything to watch out for?

Thanks in advance, Scott
 

DennisG01

GreatGrady Captain
Joined
Sep 1, 2013
Messages
6,805
Reaction score
1,203
Points
113
Location
Allentown, PA & Friendship, ME
Model
Offshore
If you're comfortable with this type of work, it's pretty straight forward. There have a been a few of us, at least, on this forum that have done it - if you try searching for threads, you can probably find them. There's also tons of info on the net that you can find with some searching - it doesn't really matter what brand of boat it is - it's all the same. But, no, nothing really to it and nothing to really to watch out for.
 
  • Like
Reactions: ScottyCee

DennisG01

GreatGrady Captain
Joined
Sep 1, 2013
Messages
6,805
Reaction score
1,203
Points
113
Location
Allentown, PA & Friendship, ME
Model
Offshore
Your welcome. There's so much information out there that you'll probably easily answer your questions. But if you still get stuck/confused, don't hesitate to ask.
 
  • Like
Reactions: ScottyCee

ScottyCee

Well-Known Member
Joined
Feb 11, 2020
Messages
456
Reaction score
86
Points
28
Location
Samish Island, WA
Model
Sailfish
Thanks. Seems straightforward now. I just love to hear Input from the guys that Have been on this forum for a long time and that have done it themselves...
 

Doberman

Member
Joined
Feb 12, 2013
Messages
23
Reaction score
3
Points
3
Location
Wilmington, NC
Model
Express 305
some lessons I learned doing main deck hatch on GW Islander. Had moisture being wicked into original plywood deck as hatch would bleed when removed and stood on edge, weighed a ton, and was getting softer. Those caulk gaps are magnets for water. Initial lab was to go with Coosa board for light weight, did 1/2” and glasses in. Hargdest part was grinding out the old GW plywood to keep the original shell. Net is, the 1/2” Coosa was nowhere thick enough and after several trips I noticed it flexing. I was also told by a builder that I did not properly radius the perimeter underside seam (between original shell to the new decking) that small concave radius has a lot to do with stiffening the perimeter. Net is I ripped out Coosa, went back to Marine plywood and did better job encasing. It worked great, super stiff, and though not as lighter Than the prior waterlogged version. On that Islander it’s a big wide hatch and not sure unless I went with 1” Coosa it would ever feel good under foot. Anyway just some thoughts
 

ScottyCee

Well-Known Member
Joined
Feb 11, 2020
Messages
456
Reaction score
86
Points
28
Location
Samish Island, WA
Model
Sailfish
It will be interesting to see how stiff it is once the rot is removed. It's a big hatch, and it sounds like a very flat surface is necessary for the rework. Lots to think about...
 

ScottyCee

Well-Known Member
Joined
Feb 11, 2020
Messages
456
Reaction score
86
Points
28
Location
Samish Island, WA
Model
Sailfish
I am most of the way through rebuilding the live well hatch. It was a surprisingly poor quality - Maybe 1/16 inch thick after all of the burlap/cardboard type crap was removed from the interior. Why didn’t they use wood? LOL.

Those of you that explained a flat work surface is important were right on the money. Thank you for that. I’m going to have to figure out the right place to do the one for the main deck. I sure hope it’s a better quality shell than this one I just worked on.
 

DennisG01

GreatGrady Captain
Joined
Sep 1, 2013
Messages
6,805
Reaction score
1,203
Points
113
Location
Allentown, PA & Friendship, ME
Model
Offshore
The main deck hatch was built differently than the little livewell hatches. That one will be a solid fiberglass shell - more like what we've been discussing on this thread and the other one. You can make the livewell hatch more like the main one by adding some glass to the shell before adding the core.
 

ScottyCee

Well-Known Member
Joined
Feb 11, 2020
Messages
456
Reaction score
86
Points
28
Location
Samish Island, WA
Model
Sailfish
Thank you Dennis. I used half inch ply with about a dozen holes drilled in it and it came out pretty well. Still a whole lot lighter than it was when soaking wet. I don’t think my live well was a Grady white original. I think it was an aftermarket since the gelcoat was white.

all in all, it wasn’t that bad. I always struggle with having the right amount of patience to invest to get the outcome that I desire. I will make sure I do a very careful and meticulous job on the main deck panel. I may even wait a few weeks till it stops raining quite so much....

Does the main deck panel have a gelcoat finish on the underside?
 

ScottyCee

Well-Known Member
Joined
Feb 11, 2020
Messages
456
Reaction score
86
Points
28
Location
Samish Island, WA
Model
Sailfish
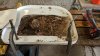
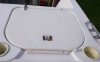
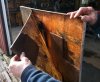
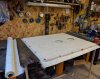
I thought I should take a second to update this thread with project progress. Going well so far, I think. The livewell hatch was paper thin, and as the photos show, I learned a lesson about running through it from the back. 8^) In the end it looks good with two coats of factory gelcoat and some wet sanding. I'll polish it up when I do the rest of the upper...

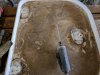
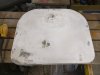
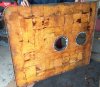
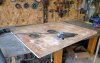
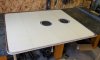
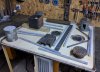
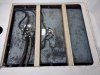
Deck hatch was amazing. SO heavy, and once pulled up it pretty much fell apart in my hands. To clean up the big one took 10% of the time it did to clean up the small one. I got lucky at the fiberglass supply place, as they hooked me up with a layup of 5/8 tan foam with 10 lb glass that they did for a demo. Perfect material that would have cost a lot otherwise. I spent enough time to make sure that the steel work surface was flat, so tonight I'll put a mesh and a rove on the underside and call it done.

Thanks for all the advice so far. Much appreciated.

So, next question is what techniques have you used to reestablish the screw backing? I removed the lightweight members that cross the fuel tanks, and will dial in panel elevation with the replacements (foam and glass, no more wood). But what did you install to catch the screws?
 

Attachments

  • IMG_20200222_105247.jpg
    IMG_20200222_105247.jpg
    284.5 KB · Views: 74
  • IMG_20200222_113228.jpg
    IMG_20200222_113228.jpg
    342.2 KB · Views: 73
  • IMG_20200223_133907.jpg
    IMG_20200223_133907.jpg
    2 MB · Views: 72
  • IMG_20200301_115714.jpg
    IMG_20200301_115714.jpg
    117.7 KB · Views: 74
  • IMG_20200301_115213.jpg
    IMG_20200301_115213.jpg
    241.1 KB · Views: 73
  • IMG_20200301_121033.jpg
    IMG_20200301_121033.jpg
    314.6 KB · Views: 69
  • IMG_20200303_171229.jpg
    IMG_20200303_171229.jpg
    243.7 KB · Views: 72
  • IMG_20200303_174539.jpg
    IMG_20200303_174539.jpg
    187.9 KB · Views: 70
  • IMG_20200303_175109.jpg
    IMG_20200303_175109.jpg
    299.3 KB · Views: 74
  • IMG_20200303_183150.jpg
    IMG_20200303_183150.jpg
    317.1 KB · Views: 70

ScottyCee

Well-Known Member
Joined
Feb 11, 2020
Messages
456
Reaction score
86
Points
28
Location
Samish Island, WA
Model
Sailfish
And another...

Some of you said to use silicone to seal the seams once it's reinstalled, but I'm pretty sure that mine was done with 5200. Any more wisdom to share there?

TIA!!
 

PNW_Drifter

Well-Known Member
Joined
Oct 20, 2019
Messages
407
Reaction score
158
Points
43
Location
Seattle, Washington USA
Model
Seafarer
Great work. As a guy who just spent a month redoing the topsides of 4 hatches, I salute you. It looks like a nice shop you got there.

I'm also curious as to what should be used to re-seal floor hatches but I don't like SillyCone on my boat. If I had to guess I'd use 3M 4200 UV Fast Cure on the floors so It's removable but long-lasting and UV stable.
 

DennisG01

GreatGrady Captain
Joined
Sep 1, 2013
Messages
6,805
Reaction score
1,203
Points
113
Location
Allentown, PA & Friendship, ME
Model
Offshore
K2 - my panels weren't gelcoated on the underside. I don't see a reason or need to do so.

What do you mean by "screw backing"? Do you mean the holes in the "boat side" where the screws screw into? Use the same holes. If they're stripped out, dribble some thickened epoxy in there. But, the sealant will actually hold the panel in place quite well by itself - you don't need to go crazy securing it with screws.

Don't forget to bevel the edges of the foam before laying the glass on.

5200 or 4200 are both the wrong product for this application For one, their primary purpose is "glue" - we don't need super strength here. Also, they not UV stable. BoatLife LifeSeal is excellent - 4000UV is another good option. But, really, any halfway decent sealant is good here - including the inexpensive GE silicone from HD. Especially if you're planning on removing to inspect on a regular basis. Otherwise, the BoatLife or 3M stuff will last longer.
 
  • Like
Reactions: ScottyCee

ScottyCee

Well-Known Member
Joined
Feb 11, 2020
Messages
456
Reaction score
86
Points
28
Location
Samish Island, WA
Model
Sailfish
Thanks Dennis. I asked about gelcoat on the underside out of curiosity - clearly before I pulled them. 8^)

Good info on the sealant. What I pulled off was quite rubbery, but unlike any silicone that I have ever seen. I'll probably use Silicon this time, as the amount of money that I have spent is starting to become daunting...

Tell me about beveling the edges. What's the goal?

Screws - yes - the holes that they came out of are in poor shape. I guess there is a ton of support between the perimeter and the cross members, isn't there - it's not like it's going to try to fly up. Maybe I'll just put another layer of matte on the bottom of them and fill in the holes so that the screws can grab. About half of them spun freely when I took it up...

The hatch sat a bit low, so I'll build up the perimeter so that I can shape it to sit flush. There were crushed pieces of rubber that probably supported it it properly 22 years ago, but no mas.

Thanks again guys.
 
Last edited:

Fishtales

Well-Known Member
Joined
Jan 31, 2005
Messages
7,559
Reaction score
1,177
Points
113
I agree, those panels are looking very nice. I'm sure it is a ton of work....
 
  • Like
Reactions: ScottyCee

ScottyCee

Well-Known Member
Joined
Feb 11, 2020
Messages
456
Reaction score
86
Points
28
Location
Samish Island, WA
Model
Sailfish
As a newb at this, my impression is that as long as you don't trash the exposed side of the panel it isn't too bad. The main panel was stripped and left to dry since last weekend, but grinding, patterning and cutting, layup, and weighting it took about 2 hours total last night. I spent at least 4 on the little one since it needed so much cabosil on the top side, and 2 layers of gelcoat. And sanding. And drilling. And waterproofing the holes. And installation. yeah, the big (deck) panel one seems a lot easier.
 

ScottyCee

Well-Known Member
Joined
Feb 11, 2020
Messages
456
Reaction score
86
Points
28
Location
Samish Island, WA
Model
Sailfish
I used the same foam with heavy mesh between the layers as "sleepers" for support (or whatever they're called in the marine world). They were glassed on 4 sides with 8 oz. cloth prior to installation. The marine ply that is under the edge of the two panels has 4 coats of resin on it, and was "pre-filled" where the holes went. I laminated 1/8" glass layup everywhere that there were unsupported holes (aft of the small panel mostly), and screwed the panels back down. ROCK solid, still pretty light. All in all, seems OK...
 

Attachments

  • IMG_20200314_090140.jpg
    IMG_20200314_090140.jpg
    313.1 KB · Views: 37

DennisG01

GreatGrady Captain
Joined
Sep 1, 2013
Messages
6,805
Reaction score
1,203
Points
113
Location
Allentown, PA & Friendship, ME
Model
Offshore
I think you can call that "good enough"! :)

One question... do either of those crossbeams come in contact with the tank? There should be an air gap to prevent corrosion to the tank.