Fuel Tank Discovery (20' Dolphin'77)

awnuld

GreatGrady Captain
Joined
Jul 22, 2008
Messages
54
Reaction score
0
Points
0
Location
Millersville, MD
Hello,
Glad to be here with other grady owners- first time owning a boat :) first time posting.. this is on a 1977 20' dolphin.

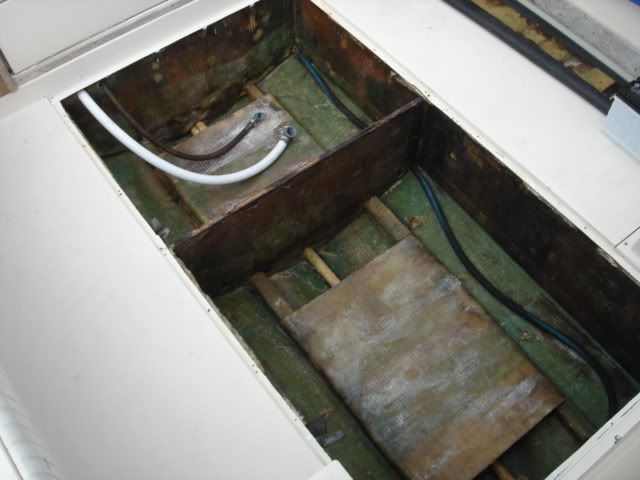
I've had this boat for about month and taken it out about 3 times- the first time tank was half full (didn't smell anything). Since the gage/sender didn't work once I got it I wanted to keep it full- that's when I smelled the gas. I changed the loose sender, but didn't help. I'm posting some pics and was wanting to get opinions.

tank1.jpg

pic1
tank2.jpg

pic2
tank3.jpg

pic3
tank4.jpg

pic4

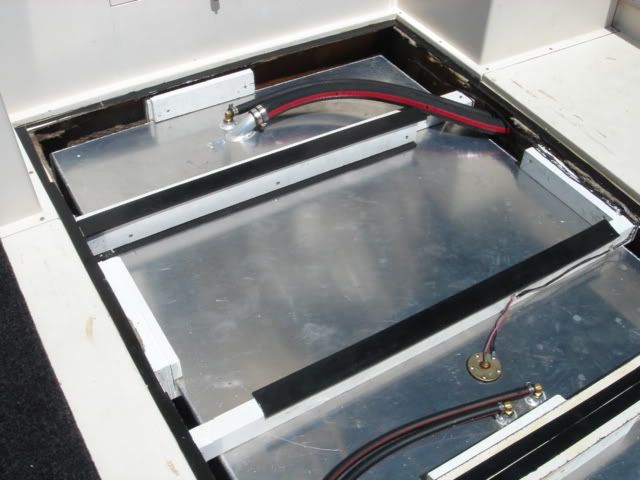
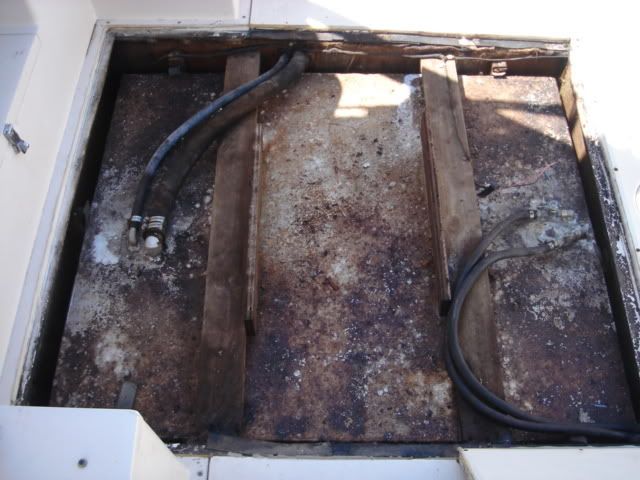
When I put the new sender in, I removed some foam just to the left of it, and I think it released what was slowing/soaking the leak. So I'm thinking the leak was coming up from that side. The tank itself was covered with some epoxied cloth or something, so I removed that to find the three screwed on panels.

I found a tank repair/fabricator locally that I'm going to take it to for diagnosis.

Would anyone like to share what the heck is going on in these pics.

thanks
 

gw204

Well-Known Member
Joined
Jan 31, 2005
Messages
2,481
Reaction score
22
Points
38
Location
St. Leonard, MD
You have an old tank that someone has already put multiple bandaids on. Pull it out and replace it with a new one. That is the ONLY option.
 

awnuld

GreatGrady Captain
Joined
Jul 22, 2008
Messages
54
Reaction score
0
Points
0
Location
Millersville, MD
looks to be so..

I'm hoping they can make a new tank to the same specs once I give them the old. they have some sealant the use to extend the life. 'renu' is what it's called.
 

Grog

GreatGrady Captain
Joined
Sep 27, 2006
Messages
2,008
Reaction score
1
Points
38
gw204 said:
You have an old tank that someone has already put multiple bandaids on. Pull it out and replace it with a new one. That is the ONLY option.

Ditto unless you want to blow yourself up. They have coatings for tanks, but the ones you have are 30 years old but probably lasted 25 which isn't too bad.
 

BobP

GreatGrady Captain
Joined
Apr 27, 2005
Messages
4,746
Reaction score
6
Points
38
Location
Long Island, NY
Model
Sailfish
Good time to replace fuel lines too.

Didn't know Grady ever foamed in tank, I prefer top edge wedges cut from 2 x 4 fir and neoprene. Foam can act like sponge after time.

Replace the deck plate too, no water at all should hang out on top of tank.

Never seen a tank repaired before, no prefessional is to likely have done it, future liability is insurance nightmare.

Alum alloy tank should be at minimum primed, don't mess with plastic tanks nor stainless.
 

awnuld

GreatGrady Captain
Joined
Jul 22, 2008
Messages
54
Reaction score
0
Points
0
Location
Millersville, MD
Thanks bobP I am/was torn on this issue (plastic vs. metal)..I'm leaning on the metal.

There were two wooden 2x3's holding it down, I'm wondering now if originally there were 3 at the locations of these repairs.

There's foam around and it's pretty much saturated with gas/water. The deck board is pretty sound and was caulked around; however, the screws were sort of embedded. The deck plate (sender access) was loose though.
 

awnuld

GreatGrady Captain
Joined
Jul 22, 2008
Messages
54
Reaction score
0
Points
0
Location
Millersville, MD
Thanks all for replying, I'm still not sure what the outcome will be. Still cleaning and airing out the tank, before trying to take it out. Not sure how that's gonna happen... I'm real curious what the fabricators recommend.

I was looking around and found this guy who made 'access panels' like appear on my tank. Apparently they serve a purpose for cleaning crud from the inside.

http://www.pearson40.org/fuel_tank_repair.htm

On mine, I took the panels off and some fuel was trapped between each of the rubber square gaskets and the aluminum panels.

If I replace the tank, I supposing these panels won't be necessary since no one has said they've seen it before or knew of a reason for them?
 

BobP

GreatGrady Captain
Joined
Apr 27, 2005
Messages
4,746
Reaction score
6
Points
38
Location
Long Island, NY
Model
Sailfish
Consult with a marine tank fabricator in your area who does Grady tanks, ask if the hatches you call them were part of original approved design Grady installed, and what is current Coast Guard design requirements.

It has been reported in THT, owners with plastic tanks have smelled faint odors of gas, but no gas found, some further testing revealed the tanks were sweating due to ethanol fuel. Sweating just means the plastic has some proposity to the alcohol, not enough to cause liquid leaks, but enough to pick up the odor if you sat a rag there for a time.

On deck portable plastic tanks are open to ventilation, not so with in hull tanks. So even the amount of wetting the head of a pencil with gas, can stink up a boat below decks enough to smell it. May not be enough to cause a blow-up, but who wants to smell gas below decks? One should never smell any gas at all in cabin or bilge even while fueling.
Fully investigate plastic tanks before investing in them for in hull use. Aluminum is impervious to vapors and liquids and is not suspeptable to stress corrosion cracking, as stainless is, in the presence of chlorides.

The gas tank will become very light when it is drained, jack the bow up and little will be left via normal withdrawel tube.
 

awnuld

GreatGrady Captain
Joined
Jul 22, 2008
Messages
54
Reaction score
0
Points
0
Location
Millersville, MD
Just talked with a Marine tank fabricator this a.m. the 'access' panels that are on my tank are illegal.

I'll be sending in my measurements and getting a quote for a new tank etc. Once I'm ready to install they'll provide installation instructions cuz, the guy said they/he didn't like how GW did their tank installations. :?
 

BobP

GreatGrady Captain
Joined
Apr 27, 2005
Messages
4,746
Reaction score
6
Points
38
Location
Long Island, NY
Model
Sailfish
Contact Grady White, they may already have the fabrication drawing for your tank and can email it to you.
 

gw204

Well-Known Member
Joined
Jan 31, 2005
Messages
2,481
Reaction score
22
Points
38
Location
St. Leonard, MD
awnuld said:
Just talked with a Marine tank fabricator this a.m. the 'access' panels that are on my tank are illegal.

I'll be sending in my measurements and getting a quote for a new tank etc. Once I'm ready to install they'll provide installation instructions cuz, the guy said they/he didn't like how GW did their tank installations. :?

Be sure you get some sort of coating on that tank prior to installation to protect if from corrosion. Some common acceptable solutions are coal-tar epoxy or Interprotect 2000E.

I am also not real fond of the way Grady puts tanks in. I would much rather see them foamed in (which I also have my own ideas about)...but that does require the owners be more consciencus about prevening deckplates and caulked seams from leaking.
 

BobP

GreatGrady Captain
Joined
Apr 27, 2005
Messages
4,746
Reaction score
6
Points
38
Location
Long Island, NY
Model
Sailfish
And Brian, they can't be washing down the tanks like Grady is reportedly recommending these days.
 

awnuld

GreatGrady Captain
Joined
Jul 22, 2008
Messages
54
Reaction score
0
Points
0
Location
Millersville, MD
The guy I talked to at speedytanks.com said they'll build it to specs, pressure check, epoxy coat the outside, install fittings, provide hoses etc. whatever I ask.. All following USCG regs
 

awnuld

GreatGrady Captain
Joined
Jul 22, 2008
Messages
54
Reaction score
0
Points
0
Location
Millersville, MD
I took out the tank last night and saw that it was totally foamed in. I sent in my measurements/drawings and should be getting a new tank in about a week.

here are some pics.

tank5.jpg

Someone on the net used a jack to get their tank out and it worked great!
tank6.jpg

Time to clean it out and get rid of the fuel residue/smell. Oh joy!
tank7.jpg

tank8.jpg
 

Pez Vela

Well-Known Member
Joined
May 7, 2008
Messages
218
Reaction score
1
Points
18
Location
San Diego
Tank replacement

Here are the "Before - During - After" images of a 1987 Grady Sailfish which may give you some ideas on how to button it up properly. Good luck!

DSC00657.jpg

DSC00632.jpg

DSC00609.jpg
 

awnuld

GreatGrady Captain
Joined
Jul 22, 2008
Messages
54
Reaction score
0
Points
0
Location
Millersville, MD
awesome, thanks...

The wood placed on the stringers were glassed? And what were they fastened with, were they caulked?
 

Pez Vela

Well-Known Member
Joined
May 7, 2008
Messages
218
Reaction score
1
Points
18
Location
San Diego
Framing your new tank

The "clear" wood is simply painted (before installing) and fastened with screws. Rubber cement was then used to fasten the rubber strips to the wooden framework, creating a "perfect fit" between the framework and the fiberglass hatch. Before fastening the hatch over the tank and caulking it, test the fit so that the hatch does not flex when you stand on it. The hatch should lay snuggly on top of the rubber strips. Thinner rubber strips were also cemented along the edges of opening to provide a "gasket" for the hatch.
 

awnuld

GreatGrady Captain
Joined
Jul 22, 2008
Messages
54
Reaction score
0
Points
0
Location
Millersville, MD
hmn, guess what I was asking is what was done to prepare for the tank.. Under it. I'm having a hard time seeing what happened in the 'during' (middle) picture- it almost looks like two different boats.
 

Pez Vela

Well-Known Member
Joined
May 7, 2008
Messages
218
Reaction score
1
Points
18
Location
San Diego
Well, I don't have pictures of the compartments immediately before the tanks were dropped in ... but rubber strips were cemented to the bottom of the compartment for the tanks to rest upon ... thereby preventing direct contact between the aluminum tank and the fiberglass bed. With the wood frame/rubber strip "sandwich" on top of the tanks ... the whole thing is snug and chafe resistant. Hope this helps.
 

Pez Vela

Well-Known Member
Joined
May 7, 2008
Messages
218
Reaction score
1
Points
18
Location
San Diego
This may help you understand the pictures. The "during" photo shows 2 comparments for the main and the auxiliary fuel tanks which are separated by a vertical plywood bulkhead. The "before" and "after" photos are both close-ups of the main tank only.