Bought a 1987 226 Seafarer!

UCPA111

Well-Known Member
Joined
Jul 24, 2017
Messages
325
Reaction score
103
Points
43
Location
Erie, PA
I looked for poly as well. I think you'll be fine with AL. I figured since my boat is from 1983 and had the original tank, the new AL one would last a long time. I don't intend to store in the water and I used 5200 sealant to mount neoprene pads to the bottom and keep the tank from having crevice corrosion. It's obvious a previous owner had water in the fuel tank compartment and didn't drain it. The tank was pitted and had water stains a couple inches up on it. It wasn't leaking...and I wasn't taking chances.

Your restoration should yield a nice ride. I am installing a new Coosa board transom this weekend. I am enclosing the transom. I'll post a new video of updates. It's a fun (and expensive) project...LOL. But, the new ones...wow! $100K+ for a 22 footer!
 

SirGrady226

Well-Known Member
Joined
Nov 7, 2017
Messages
229
Reaction score
95
Points
28
While waiting on the fuel tank to be built, I am resealing the lower units and replacing the water pumps on the Johnson 140's. I also tackled the lower motor mounts, wow what a job getting the old ones out. Soon the lowers and mid sections will have new paint and be back together, rebuilt both starters already too. Progress is a good thing! :goodjob
 

SirGrady226

Well-Known Member
Joined
Nov 7, 2017
Messages
229
Reaction score
95
Points
28
Finished the lower motor mount replacement, hardest part of the restoration so far, but love it when I have progress.
 

Attachments

  • 20180112_145448.jpg
    20180112_145448.jpg
    141.5 KB · Views: 1,229

SirGrady226

Well-Known Member
Joined
Nov 7, 2017
Messages
229
Reaction score
95
Points
28
Quite a change!
 

Attachments

  • 20180114_150222.jpg
    20180114_150222.jpg
    115.5 KB · Views: 1,220

SirGrady226

Well-Known Member
Joined
Nov 7, 2017
Messages
229
Reaction score
95
Points
28
New tank ready for epoxy primer, then installation. :goodjob
 

Attachments

  • 20180207_145252.jpg
    20180207_145252.jpg
    126.6 KB · Views: 1,096

SirGrady226

Well-Known Member
Joined
Nov 7, 2017
Messages
229
Reaction score
95
Points
28
New tank is installed, and lower units completed, now on to going through the carbs.
 

Attachments

  • 20180211_163349.jpg
    20180211_163349.jpg
    90.2 KB · Views: 1,024

SirGrady226

Well-Known Member
Joined
Nov 7, 2017
Messages
229
Reaction score
95
Points
28
Lower units looking good.
 

Attachments

  • 1518903905975.jpg
    1518903905975.jpg
    15.8 KB · Views: 1,013

SirGrady226

Well-Known Member
Joined
Nov 7, 2017
Messages
229
Reaction score
95
Points
28
A little detailing and wax sure brought out some shine.


20180203_123503.jpg
 
Last edited:

SirGrady226

Well-Known Member
Joined
Nov 7, 2017
Messages
229
Reaction score
95
Points
28
More progress lately, checked all electrical circuits which revealed corroded engine harnesses, balky main breaker, and rotten bilge wiring. Repaired most of these issues and was able to start up both outboards. Noticed poor water flow from the counter rotating engine, replaced thermostats on both which cleared up the problem. So now I move on to adding new electronics, R&R hydraulic steering, and hardware replacement. It's nice to hear these old Johnson looper 140's run, getting closer to my goal of being on the water by summer. Our beautiful South Florida Ocean is calling!

20180218_101224.jpg
 
Last edited:

Jody

Well-Known Member
Joined
Mar 31, 2018
Messages
62
Reaction score
2
Points
0
Good luck with it. I picked up a 89 228 in the beginning of last summer and have been improving it ever since. Have it setup for hard fishing and family fun. Waiting for the bottom to be blasted, should be interesting to see what it looks like after all the years of use. I've been all through out it and have been happy with the quality of it. No surprises. Mine has the extension and a Merc efi 250 on it now up from a tired 200. Curious to see what your numbers are with twins versus mine. Now I'm cruising at 34 4200 and top out at 50
 

SirGrady226

Well-Known Member
Joined
Nov 7, 2017
Messages
229
Reaction score
95
Points
28
More progress and right on schedule for a summer launch. New control cables, new hydraulic steering hoses, and new wheels and tires installed. Also have most of the teak wood trim cleaned and oiled, pretty much small details left to go. Getting excited as the ole girl has really come a long way!

20180507_193144.jpg
20180502_134852_HDR.jpg
 
Last edited:

CJ7Rob

Well-Known Member
Joined
May 13, 2018
Messages
157
Reaction score
23
Points
18
Nice work on the teak and tank. Looking for a 226 myself.
 

Fishtales

Well-Known Member
Joined
Jan 31, 2005
Messages
7,559
Reaction score
1,177
Points
113
Sounds like you are progressing well. Keep up the work and ask any questions you have. Good luck!
 

Gamecock99

Member
Joined
May 20, 2018
Messages
7
Reaction score
0
Points
1
those real wood teak replacements look awesome! I have a 1994 and hate those fake wood ones I have. I'm going to do that. thanks for sharing.
 

SirGrady226

Well-Known Member
Joined
Nov 7, 2017
Messages
229
Reaction score
95
Points
28
Refinishing the teak really makes the boat look very dated, you certainly don't see this much wood on more modern boats. This picture shows the replaced cabin bulkheads and refinished doors, not sure if I want to install new blue carpet in the two areas where it used to be. Maybe some star board or something would be a better solution. I removed the door off of the electronics cabinet, plan on putting a piece of star board there so I can flush mount my Gamin and VHF radio. My old 140 loopers are looking like new now, hard to believe they are 30 years old and still running strong.
 

Attachments

  • 20180507_193210.jpg
    20180507_193210.jpg
    89 KB · Views: 460
  • 20180523_155223.jpg
    20180523_155223.jpg
    135.4 KB · Views: 459

SirGrady226

Well-Known Member
Joined
Nov 7, 2017
Messages
229
Reaction score
95
Points
28
UCPA111 said:
Keep up the good work. I've made a couple videos of my progress. Will be making one soon when I get it back from having the 300 Verado rigged onto it. https://www.youtube.com/channel/UCATvLu ... RX0gH9FiMQ

Nice to see others taking an older model and breathing new life into them.

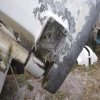
It is really hard to believe this boat is 30 years old and has spent its whole life in South Florida. The hull condition truly shows how well they were built, there has been very little repair needed on the fiberglass. Just a bit of gel coat on the keel and what looked like a run in with a dock pole under the rub rail were fixed. I have all the original paper work with the boat, and it shows I am the third owner. The list below is what I have done so far, only front bunk installation on the trailer, and mounting the electronics are left before doing our first trials on the water.

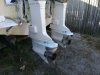
The original twin Johnson 140's are pretty amazing also, compression is between 132-135 on all cylinders, and with new plugs installed, new wires, and carbs rebuilt, fire right up and sound great. 30 year old out dated power is the most iffy thing about this boat, but with new fuel system, resealed lower units, new steering hoses, they should do fine for now. Having two spare 140's sitting in my garage will help if anything goes bad, maybe in 5 years I can afford a re power. I imagine twin looper 140's will make this boat jump up and fly, I have considered naming the boat OLD SCHOOL! :mrgreen:

Doing all the work myself has meant me and the ole girl have really gotten to know each other, I've really enjoyed this project even though some of the work has been a challenge.

Work so far
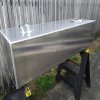
1- New fuel tank and sending unit installed
2- New fuel fill and vent lines installed
3- New fuel supply lines installed
4- New twin water separators installed
5- disabled VRO oil injection (oil mixed in fuel tank now)
6- re sealed steering ram
7- New steering hoses installed
8- New HD control cables installed
9- New engine wire harnesses installed
10- New front / rear bilge pumps and wiring installed
11- New water pressure gauges and lines installed
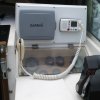
12- New thru hull Garmin transducer installed
13- New circuit breaker installed
15- New wash down / live well pump and wiring installed
16- VHF radio / Garmin plotter fish finder installed (in process)
17- R&R lights and wiring
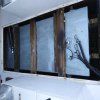
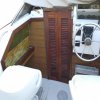
18- replace cabin bulkheads
19- remove, clean, and oil all teak
20- polish / wax hull
21- minor gel coat repairs
22- lower units resealed / stripped and painted
23- lower motor mounts replaced (very challenging!)
24- engine covers / cowlings repainted
25- carburetor rebuild kits installed
26- New spark plugs / wires installed
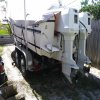
27- New trailer wheels and tires installed
28- Front trailer bunks installed (in process)
 

SirGrady226

Well-Known Member
Joined
Nov 7, 2017
Messages
229
Reaction score
95
Points
28
Progress has been stalled the past few weeks because of flooding rains, but I was able to get the transom splash panel mounted with new hardware. Still working on upgrading the trailer with front bunks and mounting my electronics.

20180614_100443.jpg
 
Last edited:

SirGrady226

Well-Known Member
Joined
Nov 7, 2017
Messages
229
Reaction score
95
Points
28
Mounted the electronics as flush mount units to give it a more modern and cleaner look. Only a week or two away from splashing the ole girl. 8)
 

Attachments

  • 20180606_143854.jpg
    20180606_143854.jpg
    78.1 KB · Views: 371

SirGrady226

Well-Known Member
Joined
Nov 7, 2017
Messages
229
Reaction score
95
Points
28
Finally decided on what to do with the two niches on the sides of the helm. Originally carpeted with rubber backed aqua blue, decided a deep navy blue that matches my Bimini top would look better.

20180613_155327.jpg
 
Last edited: