Sailfish scupper hoses

Boosted1

Well-Known Member
Joined
Feb 11, 2020
Messages
50
Reaction score
4
Points
8
Age
39
I finally got some time to start the brutal task of changing the scupper hoses out on my 1999 272 sailfish. As everyone pretty much knows the starboard side is fairly easy. The port is where the fun is. I took a few pictures along the way in hopes it helps save someone some time and frustration.
The first picture is where I decided to cut the access port in. I hated the idea of cutting the deck so I took some measurements and realized the side would work. The second pic shows the hoses and how much room there is to work. It’s a little tight but I was able to get right in and take the clamps off. There was a peice of wire exposed on both hose ends so I used pliers to peel the wire out and the hoses came right off. Surprised how easy this was.
8D85134D-1BB7-47F3-BA52-DBD78D7B8E8D.jpeg3F9B4B03-3FD5-4295-95BC-496EEB78ECCC.jpegA11A8FC3-A632-49BF-B3A8-C03D00947F20.jpeg
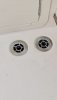
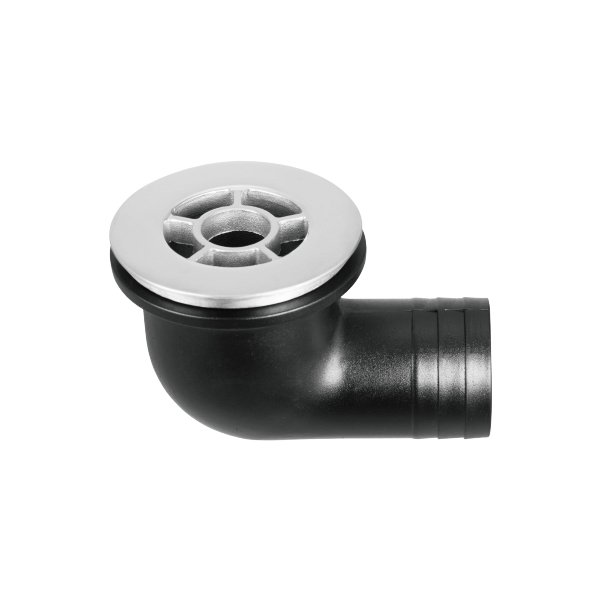
I bought new deck drains from marine town so I didn’t have to worry about saving the old ones. I used a hole saw to drill out the center of the drain. With a screwdriver and a few taps of the hammer the drains came out thru the bottom. I feel this saved me hours. The last couple pictures shows what I did.
D271C32E-D389-4AA4-B25F-6409BAA6E604.jpeg5F436383-75E2-47B4-B4D2-E7B80EC667FD.jpeg

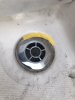
To install the one hard to reach drain I used my large pick set to hold the drain to the bottom of the deck while I threaded the metal grate in. Took a few tries and some patients but it worked.
0C02F687-7B0F-4C0E-82C9-0D8484F3AC05.jpeg


P.s.If anyone has any tips on how to remove 4200 or whatever adhesive/sealant Grady uses to set the factory drains, I would greatly appreciate it.
 

Blaugrana

Well-Known Member
Joined
Sep 16, 2019
Messages
703
Reaction score
107
Points
43
Age
40
Location
Bayville, New Jersey
Model
Seafarer
Thanks for sharing...and easing my mind!!!

I just replaced my cockpit drains last month and they sit just like yours. That sealant was a pain to get out but I did my best with a razor to remove it. It’s definitely not your everyday silicone as a new razor would barely cut through it.

Now, I am debating on just filling that gap with a little almond silicone. The other option is to use a dremel to change the surface that our drains sit on. On mine water is sitting in that gap between where the floor curves down and then meets the drain.

In the attached, it looks like my opening has a curve going down, then a little hump which is where the new drain sits on. That drain doesn’t sit right on our years like the one in a pic of someone recently swapping them.
 

Attachments

  • 0D1F5C97-7A42-4E23-8E90-03DAD51AF782.jpeg
    0D1F5C97-7A42-4E23-8E90-03DAD51AF782.jpeg
    1.3 MB · Views: 54
  • 8D70D9E5-758B-4CBA-8C88-B78182BDF2AE.jpeg
    8D70D9E5-758B-4CBA-8C88-B78182BDF2AE.jpeg
    100.8 KB · Views: 55

Boosted1

Well-Known Member
Joined
Feb 11, 2020
Messages
50
Reaction score
4
Points
8
Age
39
Mine sit pretty flush. The picture was just showing how I was able to pull the elbow up to the bottom of the deck using a pick while I threaded the strainer in. The threads were barely started there.
 

seasick

Well-Known Member
Joined
Aug 19, 2008
Messages
9,116
Reaction score
1,305
Points
113
Location
NYC
  • Like
Reactions: Boosted1

Blaugrana

Well-Known Member
Joined
Sep 16, 2019
Messages
703
Reaction score
107
Points
43
Age
40
Location
Bayville, New Jersey
Model
Seafarer
Mine is flush but there is a gap around the perimeter. The drain is lower than the floor but because it’s not wide enough there is a small gap that water will just sit in.

Attached is a photo prior to cleaning it all up....the highlighted is what I am referring to. Not sure if yours is like that or not. Ill double check mine to see if I can twist anymore but don’t think I could...
 

Attachments

  • AF9274DF-FE99-4FD5-B27A-55031108DB67.jpeg
    AF9274DF-FE99-4FD5-B27A-55031108DB67.jpeg
    495.4 KB · Views: 41

Boosted1

Well-Known Member
Joined
Feb 11, 2020
Messages
50
Reaction score
4
Points
8
Age
39
Mine did leave a little gap as well. I plan on using some almond silicone to fill the gap so it blends in better.
A6C1F972-9EAB-42BC-8035-158C09DB7773.jpeg
Changing the hoses wasn’t fun but I’m glad I did. Not sure how much longer they would have lasted. The starboard side was much worse then the port.
C5167D8B-37C8-471E-A29A-7904439738AE.jpeg
 

Salmon_Seeker

New Member
Joined
Sep 2, 2020
Messages
2
Reaction score
1
Points
3
Location
Toronto, Ontario
Model
Gulfstream
Mine did leave a little gap as well. I plan on using some almond silicone to fill the gap so it blends in better.
View attachment 18424
Changing the hoses wasn’t fun but I’m glad I did. Not sure how much longer they would have lasted. The starboard side was much worse then the port.
View attachment 18429

Did you use any sealant / adhesive (4200) under the flange on the stainless piece topside or just tighten it till sealed?
 

Boosted1

Well-Known Member
Joined
Feb 11, 2020
Messages
50
Reaction score
4
Points
8
Age
39
I used 4200. Put a nice bead under the strainer then screwed it into the elbow. I also used Teflon tape on the threads. Not really for sealing purposes but I figured if the 4200 got into the threads it would be extremely hard to unscrew the strainer if I ever needed to take it apart. The Teflon I’m hoping would keep it from sticking forever together?
 

Blaugrana

Well-Known Member
Joined
Sep 16, 2019
Messages
703
Reaction score
107
Points
43
Age
40
Location
Bayville, New Jersey
Model
Seafarer
Was wondering if you did the hoses as well. Dealing with brand new hoses while trying to get the threads to meet was painful.

I like how yours came out. I went a little light on the sealant but going to do the almond silicone also.
 

Fishtales

Well-Known Member
Joined
Jan 31, 2005
Messages
7,559
Reaction score
1,177
Points
113
Nice job. Those hoses looked to be on their last legs.
 

Richard1572

GreatGrady Captain
Joined
Apr 26, 2008
Messages
59
Reaction score
9
Points
8
Location
Homestead, FL
Model
Sailfish
Hi Boosted1,


Your post and pictures are going to be very helpful as I’m getting ready to undertake this project as well on my ’97 272 Sailfish. Not that I’m so concerned about the hoses, those things are tough, but the plastic thru hulls are a concern. About three weeks ago one of the plastics thru hulls for one of the fish box drains further forward actually snapped in two while I was out fishing leaving effectively a one-inch hole in the side of the boat just above the waterline. If one of those rear ones snaps it could be a big issue as they are sometimes underwater depending on how loaded the boat is. From the pics it looks like thru thru hulls on yours are bronze, correct? Mine a plastic.

I have a few questions maybe you can answer for me. For the port side, I think you got your port and starboard backwards in your post, you went through the live well to access the hoses and also through the cover where the washdown is? The access hole you cut on the starboard side behind the door. Is a 6-inch access port?


Lastly, would you happen to have a link to where you bought the deck drains? Thanks for the assistance
 

Boosted1

Well-Known Member
Joined
Feb 11, 2020
Messages
50
Reaction score
4
Points
8
Age
39
Yes sorry I see that now I got the port and starboard swapped. Not sure how I made that mistake but I’ll edit that shortly.

Yes the port side I went thru the livewell. Once removed u have all the room in the world. I assume your wash down pump is in the same location s mine under the smaller deck hatch? If so, u don’t need to open that up. With the livewell removed u can reach everything and actually opening the deck up does nothing as there’s solid stringers on either side. I suggest starting with this side to get a feel for how everything comes apart and goes back together.

The deck plate I used is 6”. It was enough room for me. I’m not the biggest guy at 5’7 but I can easily reach everything. If needed you could go up to an 8” for alittle more room for the biceps to fit thru.

I don’t have a link for the drain but I got them thru marine town. This is the part number for them
#0403436 90° DECK DRAIN 1-1/2" SPOKE

All my thru holes are bronze so I didn’t have to mess with them.
 

Richard1572

GreatGrady Captain
Joined
Apr 26, 2008
Messages
59
Reaction score
9
Points
8
Location
Homestead, FL
Model
Sailfish
Thank You, great info! Im hunting for parts now so I will be sure to have all the parts before I start taking things apart. Dont want to get the boat torn apart only to have to wait months on parts.
 

Richard1572

GreatGrady Captain
Joined
Apr 26, 2008
Messages
59
Reaction score
9
Points
8
Location
Homestead, FL
Model
Sailfish
My project is going to encompass replacing every one of the plastic thru hulls with stainless. I've started making a list and trying to figure out sizes. The scuppers seem to be pretty obvious that they are 1 1/2 hose. What hose did you use as the replacement hose? Now I’m trying to figure out the other thru hulls. it appears the live well overflow is 1 1/2 the same as the scuppers. The live well drain appears to be 1 inch the same as the drain for the other two fish\ice boxes that are behind the helm. Both of the Rule 1500 lines are 7/8 I believe. The ones I haven’t figured out are the 2 thru hulls for the sinks, one in the galley area and one in the head and then the thru hull for the sump pump. It looks the same as the sinks but I’m not 100% sure. I found a page in the original owner’s manual that lists all the thru hulls and what they are for but not the hose size.


20220110_100515.jpg
 

seasick

Well-Known Member
Joined
Aug 19, 2008
Messages
9,116
Reaction score
1,305
Points
113
Location
NYC
Do not use stainless for below the water line applications. It will rust. That includes most really close to the water line thrus that may at times be submerged. Use bronze , chrome plated bronze, or Marelon composite ( How did I do Dennis?)
 

dstarok

GreatGrady Captain
Joined
Jul 13, 2013
Messages
124
Reaction score
5
Points
18
My project is going to encompass replacing every one of the plastic thru hulls with stainless. I've started making a list and trying to figure out sizes. The scuppers seem to be pretty obvious that they are 1 1/2 hose. What hose did you use as the replacement hose? Now I’m trying to figure out the other thru hulls. it appears the live well overflow is 1 1/2 the same as the scuppers. The live well drain appears to be 1 inch the same as the drain for the other two fish\ice boxes that are behind the helm. Both of the Rule 1500 lines are 7/8 I believe. The ones I haven’t figured out are the 2 thru hulls for the sinks, one in the galley area and one in the head and then the thru hull for the sump pump. It looks the same as the sinks but I’m not 100% sure. I found a page in the original owner’s manual that lists all the thru hulls and what they are for but not the hose size.


View attachment 24230
Try contacting customer service, I believe they were able to clarify the sizes on all mine on my ‘89 Sailfish
 

ROBERTH

GreatGrady Captain
Joined
Jun 10, 2006
Messages
1,304
Reaction score
119
Points
63
Location
Raleigh, NC
Model
Sailfish
Boosted, that part number seems to be for the grate removal key? All the other part numbers start with a 9, but not sure how to tell which is the actual spoke drain?

#0403436 90° DECK DRAIN 1-1/2" SPOKE
 

ROBERTH

GreatGrady Captain
Joined
Jun 10, 2006
Messages
1,304
Reaction score
119
Points
63
Location
Raleigh, NC
Model
Sailfish
Nevermind, I did a search within their website and a different page came up with clear part numbers. Here is the updated webpage:
 

Richard1572

GreatGrady Captain
Joined
Apr 26, 2008
Messages
59
Reaction score
9
Points
8
Location
Homestead, FL
Model
Sailfish
I started my thru hull replacement project today by pulling the livewell and removing the thru hulls for the livewell and aft bilge. The 1" livewell drain thru hull snapped off in my hand just like the other 1" thru hulls did. It seems these are the weakest of all the thru hulls. They appear to be a different brand, I'm not 100% sure, and have a larger exterior head than the other thru hulls. Anyway, I realized once I got the livewell out, there were 4 more thru hulls I hadn’t accounted for that I’m going to need to replace as well. These are the vents for the trim tab pockets. I always knew they were there but I guess it’s one of those out of sight out of mind things. There is a thru hull in each pocket connected to a hose that goes to a thru hull in the transom. My understanding is the purpose of these vents is to prevent the trim tab pockets from acting like suction cups by allowing air into them. This is my question, does anyone know are these factory or were they installed when my boat was repowered with 4 strokes? I’ve heard of people having to install these due to the added weight of 4 strokes resulting in the trim tab pockets being fully submerged, but the thru hull, hoses and hose clamps on these looks exactly like the other 1 1/8 thru hulls from the factory. The reason I ask is they are plastic thru hulls that are clearly below the waterline. Did Grady really put plastic thruhulls below the waterline? All my other below the waterline thru hulls are bronze with valves. Even with a valve there would be no way to access these if they busted so it seems that much more important that they be of a much stronger material than plastic or PVC.
 

TopsulTime

Well-Known Member
Joined
Sep 4, 2021
Messages
65
Reaction score
30
Points
18
Location
Surf City
Model
Sailfish
Thanks for posting. Mine is a 2005 and I need to inspect mine. I suspect I'll have to address this maintenance item in the not too distant future.