Gas Tank Hatch Recore

ROBERTH

GreatGrady Captain
Joined
Jun 10, 2006
Messages
1,304
Reaction score
120
Points
63
Location
Raleigh, NC
Model
Sailfish
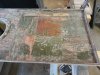
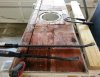
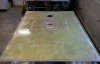
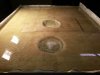
Agree on the confusion to why Grady used small squares as that can't be as strong as a solid sheet.
I think once the balsa is wetted out and layered, it will not allow movement and will be very strong.
I am adding a 4th battery, so maybe I should strongly consider reducing the weight. The plywood is 49# for a sheet. I would not use the entire sheet, but guessing I would come near the 40# mark with what I would use.
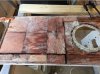
I can't find the weight of the balsa, but when holding the entire stack of pieces I have that is enough to do the smaller hatch, I am guessing it would weigh 5#'s.
So, back to the weight savings, I might end up saving about 30#'s if I went with the Balsa, and add the weight of the wet wood, might gain more.
I will weigh the panels before and after to see what I end up with, whichever way I go. Now, leaning on the Pro Balsa.
 

DennisG01

GreatGrady Captain
Joined
Sep 1, 2013
Messages
6,818
Reaction score
1,210
Points
113
Location
Allentown, PA & Friendship, ME
Model
Offshore
My guess, as far as the full length swim platform goes, is they used Balsa for the weight savings at the back end of the boat to avoid hurting your hole shot too much. I also wonder (and I am not an engineer, either)... I'm not so sure that having one, solid piece of wood is really any better. After all, the glass is giving the primary structure (granted, the wood adds structure, too) -- the wood supports the top and bottom piece of glass and allows the structure to be a composite, instead of a single layer of something. Either the glass by itself or the wood by itself (even if they were thicker) would not be as strong as the combination of the two materials together. Besides, maybe some flexing is good?

Cost savings is probably the primary reason to use plywood... at least in a flat, non-contoured structure. If the balsa was not "end grain", that would be a problem - but end-grain balsa a very strong and there won't be any problem with flexing since it's sandwiched between the two glass layers.

I've got to do some floor repair this winter and will likely settle on plywood -- primarily for cost and that I can get it locally. But if I had easy access to inexpensive balsa, I absolutely wouldn't shy away from it. I do think that the plywood is a little easier to work with since you don't have to worry as much about significant resin absorption, although the pre-resined balsa pretty much takes care of that issue.

Now, if cost were NOT an issue, then I would be looking at using something like Divinycell. Never worked with it, but very cool stuff.
 

ROBERTH

GreatGrady Captain
Joined
Jun 10, 2006
Messages
1,304
Reaction score
120
Points
63
Location
Raleigh, NC
Model
Sailfish
All makes sense for sure.

I think I will go for the Pro Balsa for the weight savings. 30#'s give or take is 1/2 of the extra battery I am adding, so every bit helps. Even though, this boat seems to carry a heavy load very well. Same mpg whether full of fuel/ice and gear vs 100 gallons less on the way back in from offshore. Doesn't seem to matter much, so not so sure 30#'s is a big deal, but every where I can strip weight, perhaps I should.

The price difference I am figuring out here is approx. $30 to $40 more for the Pro Balsa over the Ply, so not that big of a jump like it would be with Divinycell. :)
 

JeffN

Well-Known Member
Joined
Jan 16, 2007
Messages
584
Reaction score
7
Points
18
Location
Nantucket, Ma.
When I did my projects I did a lot of reading and looked at many different products for the deck core and material for the stern cockpit panel. I went with the ply over a cored material or Starboard for that panel. I was not sure how structural the stern panel needed to be, balsa core I thought might be too light and not strong enough. With Starboard I was concerned about expansion and contraction and it was heavy compared to glass coated ply for my application. The OEM panel was ply so off I went. As to the deck I almost went plywood but was kind of curious about working with balsa. Just wanted to try it. If it does not hold up I know how to do it now and I can do it again. Compared with the more exotic core material the balsa was a good combination of strength, reasonable cost, availability and ease of use. Time will tell.

Back when I first had the boat, an I/O, the top of the motor box would flex more than I liked. To remedy this I took 1" PVC conduit and cut in half lengthwise (sp?) then I glassed two lengths port to starboard about a foot apart to the underside of the motor box. Could not believe how much it strengthened the top of that box, that simple fix eliminated the flex entirely. I kept that in the back of my mind and figured I could do the same if the deck had any flex as there is room enough under the deck panel, but so far no issues. Food for thought though.

Dennis what part of the deck are you replacing? How big a job do you think that will be?

Dennis and Robert enjoy your projects and keep us updated.
 

ROBERTH

GreatGrady Captain
Joined
Jun 10, 2006
Messages
1,304
Reaction score
120
Points
63
Location
Raleigh, NC
Model
Sailfish
Will keep you posted for sure in the coming weeks.
When I pull up the larger deck panel, I am going to re-examine the cross structure and might just add some additional cross beams if I can work it out. Something I had not formerly thought about.

Thanks everyone for all their ideas and methods. I am sure the Balsa will hold up as mine did in the swim platform for over 20 years and keep in mind, that is always in the water a lot every time it was launched. The only failure to the balsa was due to the drilled out holes and not caulked or protected in any way from the water.

How it lasted that many years is amazing actually and when I stripped it down, it was not all bad. So I do have a lot of faith in the balsa. I did drill the holes larger and filled with epoxy and then redrilled, so not worried that I will ever have wet balsa in the swim platform. Even if I did, likely it will last another 20 years....
 

DennisG01

GreatGrady Captain
Joined
Sep 1, 2013
Messages
6,818
Reaction score
1,210
Points
113
Location
Allentown, PA & Friendship, ME
Model
Offshore
I'm doing the aux gas tank hatch and good amount of the floor (although I'll probably do the main fuel tank hatch "just because"). This boat was originally a stern drive and from the various stern drive models I've seen from this era, it appears the cut-out for the stern drive never had the wood edge sealed well. So water seeped in over time.

Like Robert just mentioned, I think I'll use a longitudinal and probably two lateral "I-beams" for the hatch. I'll just rip some plywood into 2" strips and put two of them together to make the I-beam. At least, that's my general plan right now. We'll see what happens once I cut it up. I'll be doing the cutting soon, but will likely wait till the Spring to do the new layup - partly for weather concerns and partly to let things dry out real well.
 

ROBERTH

GreatGrady Captain
Joined
Jun 10, 2006
Messages
1,304
Reaction score
120
Points
63
Location
Raleigh, NC
Model
Sailfish
Found a pic of the cross members on how Grady did it before I recoated the tanks last year.
2x4 across and tied to stringers. Then edge board screwed into 2x4. I see room for improvement here for sure. Simple idea, but one that can be improved by going all the way across and just relieving for hoses, etc.
 

Attachments

  • Fuel Tank Cross Beams.jpg
    Fuel Tank Cross Beams.jpg
    46.8 KB · Views: 1,806

JeffN

Well-Known Member
Joined
Jan 16, 2007
Messages
584
Reaction score
7
Points
18
Location
Nantucket, Ma.
Robert I replaced those pieces with pressure treated wood when I did mine. On my 25' the hoses do not cross any of the supports. They emerge from the tank and exit to the fill and vent in the same section. Yes I'm sure you can do better. I was going to get fancy with the supports but the just plain old wood used in 1983 was still in OK shape. I just had to adjust the height of the new deck support strip. Today I was assembling the PVC frame for my winter cover and while I was up there I took a minute and really check out the deck I redid. Happy to say there is no give or spring at all. No dips, high spots, low spots etc. So two seasons in things appear to be holding up well.

Dennis the I/O removal must afford you a very nice storage space. How will you, or did the previous already, design and construct the hatch for that new space. I agree checking the main tank cover is a good idea. Even if the core is still sound addressing the screw through the core problem and checking the holes where the screws go into the stringers. Better sooner than later right.
 

DennisG01

GreatGrady Captain
Joined
Sep 1, 2013
Messages
6,818
Reaction score
1,210
Points
113
Location
Allentown, PA & Friendship, ME
Model
Offshore
I actually don't have an aux tank, Jeff, so between that huge storage area and the lack of a big hunk of iron below the floor - yes, LOT'S of storage! Almost too much to know what to do with!

In the picture, the "rod holder" setup (and surrounding fiberglass... about 6" deep) was originally mounted to the front of the dogbox. It's now being used to cover up a large hole. The access hatch was installed in the floor, but that needs to be redone, as well. My initial thought is to get rid of the rod holder setup, which would allow easier sitting back there. Then, either glass the floor in solid and install a large, waterproof hatch or just rebuild something similar to what's already there. It'd be great if I could build the aux tank area hatch and this other hatch to be waterproof (thereby making the entire cockpit completely self bailing), but hey, that's what bilge pumps are for! Besides, it would probably turn out to be more work than I want to do for that little reason.


ROBERTH

GreatGrady Captain
Joined
Jun 10, 2006
Messages
1,304
Reaction score
120
Points
63
Location
Raleigh, NC
Model
Sailfish
Jeff, agree that the original wood was still in excellent condition. Not sure, but it might be douglas fir, but I am no wood expert. Whatever it is, it was dry and strong. Will reuse for sure, just add some extra reinforcement where needed. Seems the wood you get nowdays is nowhere near as good as the old stuff.
When I restored my 20' Renken many years ago, I used Kiln Dried Treated and saturated with additional CPES resin, then covered in glass. That wood will never rot, or even retain water. But for this, I don't see the need to go to that extent based upon the condition of these cross supports after 20+ years. :D
 

JeffN

Well-Known Member
Joined
Jan 16, 2007
Messages
584
Reaction score
7
Points
18
Location
Nantucket, Ma.
Dennis - interesting how the previous owner cut back the motor box. Not bad, still have the rod holders and some storage in the center section. If you can neaten up that deck hatch it will be really nice. Waterproof would be nice, how would you do it so you think? Somebody must make a waterproof hatch that would fit the hole.

Robert - the braces under my hatch were good but while I was in there I thought I would freshen them up and I had some pressure treated already. Funny how the deck was so wet and the untreated braces were fine. The water must just not get trapped on the braces and drains away.
 

DennisG01

GreatGrady Captain
Joined
Sep 1, 2013
Messages
6,818
Reaction score
1,210
Points
113
Location
Allentown, PA & Friendship, ME
Model
Offshore
JeffN said:
Dennis - interesting how the previous owner cut back the motor box. Not bad, still have the rod holders and some storage in the center section. If you can neaten up that deck hatch it will be really nice. Waterproof would be nice, how would you do it so you think? Somebody must make a waterproof hatch that would fit the hole.

Robert - the braces under my hatch were good but while I was in there I thought I would freshen them up and I had some pressure treated already. Funny how the deck was so wet and the untreated braces were fine. The water must just not get trapped on the braces and drains away.

The motor box mod was actually pretty easy. Throw out the old dog box and just move that rod holder section aft. I actually think I might get rid of it and then cover the the hole that will be left. Maybe just a solid cover, maybe a door that opens to some shelved storage, or something. I've already removed the plastic rod holders on the port/starboard side seats. There's already more than enough rod storage for our needs and without that extra section (rod holder thingy) sticking out on the center section, it will be easier to sit there.

There's plenty of waterproof deck hatches available, but unless I spend a ton of money, they're not very big. After having such a huge access to the storage area down there, I don't want a small hole. If I could somehow make a new hatch (still the same size) that would be waterproof, that would be good. But I think about the only way to do that is to create a drip ledge on the underside of the opening and then drain the drip ledge to the main deck (overboard) drains.

It's funny you guys mention how the wood reinforcing brace under the hatches are good. I thought it was odd that the one under my aux tank hatch was good, too. I'll look at it closer, but I may just throw a coat of epoxy over it (and in the screw holes) for good measure.
 

JeffN

Well-Known Member
Joined
Jan 16, 2007
Messages
584
Reaction score
7
Points
18
Location
Nantucket, Ma.
[quote} It's funny you guys mention how the wood reinforcing brace under the hatches are good. I thought it was odd that the one under my aux tank hatch was good, too. I'll look at it closer, but I may just throw a coat of epoxy over it (and in the screw holes) for good measure.[/quote]


I figure the any moisture just runs off the braces and the water that gets into the core stays there. I was surprised the core was not rotted but it sure was wet.
 

ROBERTH

GreatGrady Captain
Joined
Jun 10, 2006
Messages
1,304
Reaction score
120
Points
63
Location
Raleigh, NC
Model
Sailfish
Adding my 2 cents and results:
First time using Epoxy on a project like this. Always been a polyester guy. I have to say, it is easy to work with and much cleaner. I did not have stuff stuck to my hands and all over everwhere which was quite pleasant. It is definately different though in how it handles and behaves.
Using medium hardener from US Composites (Good Price), I cranked up the temp to 80 in garage after finishing last layer so it can go ahead and cure.
I weighed this part before and after. Before, the weight was 17.5lbs. Now it is 12lbs finished. So looks like I saved about 5lbs, so happy with that using the Pro Balsa. The original wood was wet which made it heavy. Was tough to get it unbonded, but the old grinder took care of it for me really quickly. Those pry bars you see in the pic are the ticket to doing this job though! Use the small one to get under and then just use the larger ones to help slide under and gently break the bond.
I put one layer of 1708 with stitch mat on the bottom, then balsa, then 2 layers of 1708 with stitch on top. I cut out the areas where screws would go in and tapered all around to a 45 degree angle to allow the glass to form well. Used a scraper to push 1708 around the edge.
I think once it cures, it should be very strong. Will see. Not going to try flexing on it for a few days to make sure it is cured throughout.
What I really appreciated about the epoxy is the smell is nothing compared to Polyester. The family is not yelling at me so far! :<><
Not that I got my teeth on this one, time for the big panel next! That one will be a job! This one is only 4' X 15". The big panel is near 4X4 in size!
 

Attachments

  • ReCore8.jpg
    ReCore8.jpg
    133.1 KB · Views: 1,752
  • ReCore7.jpg
    ReCore7.jpg
    145.9 KB · Views: 1,752
  • ReCore6.jpg
    ReCore6.jpg
    156.3 KB · Views: 1,750
  • ReCore5.jpg
    ReCore5.jpg
    133.9 KB · Views: 1,752
  • ReCore4.jpg
    ReCore4.jpg
    209.2 KB · Views: 1,751
  • ReCore3.jpg
    ReCore3.jpg
    252.1 KB · Views: 1,751
  • ReCore2.jpg
    ReCore2.jpg
    191.3 KB · Views: 1,750
  • ReCore1.jpg
    ReCore1.jpg
    235.4 KB · Views: 1,750

JeffN

Well-Known Member
Joined
Jan 16, 2007
Messages
584
Reaction score
7
Points
18
Location
Nantucket, Ma.
Nice job Robert! The epoxy is nice to work with, lack of odor was a good thing.
 

DennisG01

GreatGrady Captain
Joined
Sep 1, 2013
Messages
6,818
Reaction score
1,210
Points
113
Location
Allentown, PA & Friendship, ME
Model
Offshore
Looks great! And I agree with the thoughts on epoxy vs poly. I've been contemplating using poly simply for the cost factor (doing about 2/3 of my cockpit floor). But I've gotten so used to the epoxy that I guess I don't want to go back to poly again.

Robert, I may have asked this, but I forget. What was your reasoning for putting down a layer of glass between the balsa and the hatch? I was just planning on troweling some thickened resin on there (which I've done it this way before).

Did you use a flapper wheel on your grinder?
 

ROBERTH

GreatGrady Captain
Joined
Jun 10, 2006
Messages
1,304
Reaction score
120
Points
63
Location
Raleigh, NC
Model
Sailfish
Dennis, check out the price from US Composites. Very reasonable for Epoxy and just a few bucks more than some Poly's.

Yeah, using a flapper on the grinder. Those things are amazing!

The reason I used a layer of cloth on the panel was to help with some buildup of the thin panel, also helps add some thickness to bed the balsa down into and I needed to get more layers to help with strength. I didn't want to put all the layers on the top. In the end, with the 1/2" balsa and 3 layers total of cloth, it came out just shy of flush to the edges which is perfect.
I found that when I was popping the squares off from factory, the panel was very thin, so think it is good to have another layer of cloth there.
I checked today to see how rigid the panel is, and it is impressive so far, knowing that it will continue to harden over the next few days as it completes full cure.

My son in law and I pulled the large panel out today and started on it. Took both of us just over an hour to cut the skin off and pry all the squares up. Was pretty hard work to get this done. Glad I had him around to help on this one today. Got the balsa all cut/trimmed up and ready. Will take panel outside tomorrow and grind it and then cut the glass to fit. Getting close to having this one behind me also!
 

lime4x4

Well-Known Member
Joined
Mar 24, 2011
Messages
339
Reaction score
2
Points
16
Location
Palmerton, Pa
I recomend using uscomposite as well. when i redid the searay i got 10 gallons of epoxy, 9 gallons of pourable foam and 60 yards of 7018 glass mat. There prices couldn;t be beat.
 

ROBERTH

GreatGrady Captain
Joined
Jun 10, 2006
Messages
1,304
Reaction score
120
Points
63
Location
Raleigh, NC
Model
Sailfish
Finished the large hatch now! I have to say it turned out really nice as well! But, this was a job! With 2 of us working on it, mixing up the resin, layers and rolling, etc. Worth it though!
You can see in the middle, raised with 3/4" ProBalsa like Grady did on original to help stiffen the middle area around the cutout, but I extended it out more than original. Also resolved the issue with stripped screws for the cutouts by laying layers of glass and recutting new holes.
Those are not air pockets you see, just where I hit it with a sander to knock off some little nibs.
The next best part is this panel's weight was 60#'s before and after is now 48#'s! Nice to shave a total of 12#'s off her!
 

Attachments

  • ReCore9 Large Panel.jpg
    ReCore9 Large Panel.jpg
    137.3 KB · Views: 1,714

ROBERTH

GreatGrady Captain
Joined
Jun 10, 2006
Messages
1,304
Reaction score
120
Points
63
Location
Raleigh, NC
Model
Sailfish
Found a better closer view of the panel. Shows the raised area better. Now off to the lumber store to get some Doug Fir 2X4's to replace the existing cross beams for support. Noticed that they are cut off too short and they have a lot of flex since they are not tight to the stringers, so figure I can improve on that issue as well.
 

Attachments

  • ReCore10 Large Panel.jpg
    ReCore10 Large Panel.jpg
    163.6 KB · Views: 1,713