O.K. now I get your question ... the flat surfaces at the bottom of the compartments were part of the original factory construction of the boat and were indeed "glassed-in" plywood boards ... providing a flat surface for the flat bottomed fuel tanks. Rubber strips were cemented to those. No further bonding or caulk was used to fasten the tanks. The snug fit with all the framing does the trick. Remember ... you (or someone else) might want to remove the tanks some day.

You are using an out of date browser. It may not display this or other websites correctly.
You should upgrade or use an alternative browser.
You should upgrade or use an alternative browser.
Fuel Tank Discovery (20' Dolphin'77)
- Thread starter awnuld
- Start date
My tank should be coming by the middle of next week.
It's coming with rubber strips and the guy said to caulk/attach them to the bottom of the tank w/5200 caulking then put the tank in.
Once put in place I'm supposed to foam around the corners then do the wood braces on top like your picture shows. I haven't been able to work on it this week.. and I expect to receive the new tank by mid next week.
whaler1777
Member
- Joined
- Jul 26, 2008
- Messages
- 12
- Reaction score
- 0
- Points
- 0
DONT use wood, Use Azak with vinyl as cushioning (I used that vinyl floor moulding, comes in a roll, flexible..)... It will outlast you, retains ZerO moisture... Interprotect 2000 is the best way to go, coal tar can retain moisture... Also be sure that there is plenty of space for air to circulate around, and below the tank, foam is not a good idea no matter how waterproof people say it is, youre still cutting off the airflow...
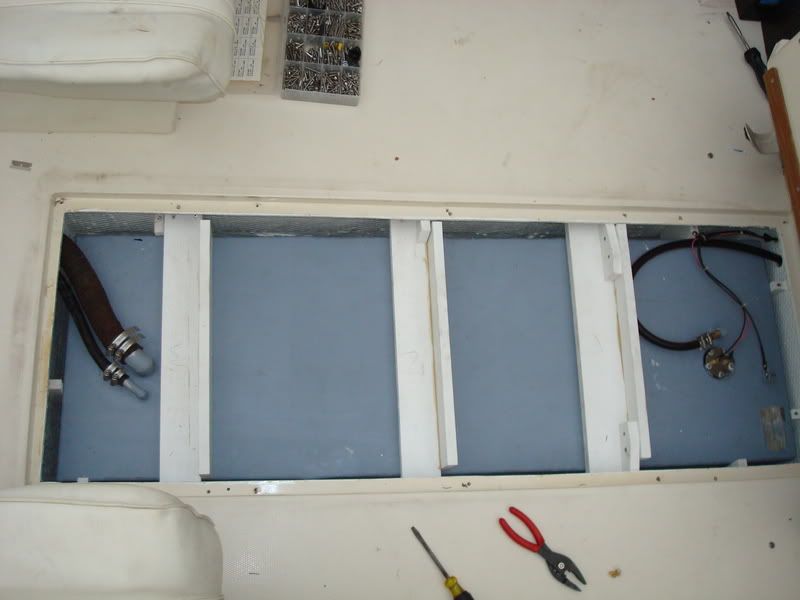
Thanks Whaler, awesome pics, my tank/area looks just like that.
What did you use to wedge the tank in, along the sides and the ends? And how were they fastened? Did you use adhesive?
When you say you used vinyl floor moulding, are you talking about the black stuff that you see along the floor/wall, that's kinda glued on? So where/how did you use this as cushioning?
I'm wondering if, in preparation for the new tank, I should add a couple drain holes/tubes from the gas area?
BobP
GreatGrady Captain
- Joined
- Apr 27, 2005
- Messages
- 4,746
- Reaction score
- 6
- Points
- 38
- Location
- Long Island, NY
- Model
- Sailfish
The only holes in it are for fill, vent, the feed tube and a metal tube (aft) that drains from the top just for drainage. The way the new tank will go in, the area will have space all around the tank.
There's a pipe along the bottom of the 'V' from the front bilge area of the boat to the back but it's totally glassed in.
There's a pipe along the bottom of the 'V' from the front bilge area of the boat to the back but it's totally glassed in.
BobP
GreatGrady Captain
- Joined
- Apr 27, 2005
- Messages
- 4,746
- Reaction score
- 6
- Points
- 38
- Location
- Long Island, NY
- Model
- Sailfish
The tank was in real tight with foam all around. The tube (approx. 1/4") was placed at the top in the very back, and went from the tank area to the bilge area.
Seemed to be good only for the case if water got through the large panel or access hatch (which was loose) whatever. Probably irrelevant at this point, it would drain liquid sitting on top of the tank once the boat was inclined on a trailer etc.
Seemed to be good only for the case if water got through the large panel or access hatch (which was loose) whatever. Probably irrelevant at this point, it would drain liquid sitting on top of the tank once the boat was inclined on a trailer etc.
BobP
GreatGrady Captain
- Joined
- Apr 27, 2005
- Messages
- 4,746
- Reaction score
- 6
- Points
- 38
- Location
- Long Island, NY
- Model
- Sailfish
I guess there are two ways to build tank compartments, totally sealed coffins or not.
I don't think Grady later on ever built a sealed compartment again.
The floor in my tank compartment is flat, where it meets the hull rise is glassed sealed, where it meets a bulkhead to forward or stern is gapped about an inch and a half or so, and it has a drain below the flat floor that passes through the rear bulkhead, and also caries a PVC pipe from the next forward compartment to thehrear, where my FW tank resides.
I don't think what you described is a drain, being so high and just 1/4 inch. If totally sealed, perhaps they were trying to allow equalization of the compartment air pressure since the tank will contract and expand with fuel load and temp.
my tank is a belly type.. \__/ Here's what I"m working with, still have some cleaning to do, give it plenty of time to dry and epoxy coat the whole inside. Question is though if I should add a drain hole from that compartment should water gets in there.


whaler1777
Member
- Joined
- Jul 26, 2008
- Messages
- 12
- Reaction score
- 0
- Points
- 0
DO NOT USE ANY RUBBER... I cut azak into some angles that would wedge the tank in nice and tight and fastened them with some square drive 3" stainless steel deck screws. Yep i mean that black stuff with the adhesive only I used white dont matter what color... On the bottom of the tank I used 5200 to adhere some 2x2 blocks of 1/2 inch azak to the bottom of the tank for some space to allow free air/water circulation below the tank, I glued that floor moulding to the bottom of those blocks to provide some kind of cushion between the azak and the hull... I also used the moulding between the top of the tank and the cross braces (they are 2 pieces of azak joined together to form a 90deg angle providing the deck support as well as the bracing to hold the tank down) that go across the top also for cushioning..... dont hesitate to ask if you have any other questions
whaler1777
Member
- Joined
- Jul 26, 2008
- Messages
- 12
- Reaction score
- 0
- Points
- 0
I would add a drain tube from the fuel tank area to the rear bilge area but make it so a rubber drain plug can be put into that tube from the bilge compartment as to not let any water back into the fuel tank area... Thats how mine is set up... - John
So basically I'll want to drill a hole, coat it and put one of those copper tubes in there with adhesive and plug it from the outside. Then if/when water gets in I can release it?
Depending on how dry your bilge is either cut a hole and seal it with resin (so water stays out of the wood) and leave it open or put a plug in it and drain it when you haul the boat out (use bronze or stainles).
BobP
GreatGrady Captain
- Joined
- Apr 27, 2005
- Messages
- 4,746
- Reaction score
- 6
- Points
- 38
- Location
- Long Island, NY
- Model
- Sailfish
If you have an outboard and don't use a plug, the bilge water level will become just about same level in tank compartment, so maintaining low bilge water level is imperative.
So you keep it plugged and periodically remove plug to check for water buildup and drain any off, then put it back.
If you have an I/O, plug must remain in place normally or otherwise compartment must remain sealed as it is now.
You can use neoprene strips, just need to fully Lifeseal it to the tank where ever it makes contact. I like neoprene - its grippy so the tank doesn't tend to want to slide around, its hard enough not to reshape itself, but soft enough to absorb any imperfections in glass against tank. Neoprene doesn't age in the bilge. I'd use 3/16in. against the bottom, 1/2 in. against the forward face, have no problem using 2 by lumber for cross braces, just make sure you let them dry a few days in sun before cutting to fit. Don't let wood or neoprene touch tank, only via caulk like lifeseal.
If your neoprene is shinny, lay it down on a piece of wood and take the belt sander with 80 grit to it, makes it renewed and grippy, clean residue with brush and denatured alcohol, do both sides.
How you wedge the side gaps and rear is up to you, foam is fast and easy, I would tend to want to cut my own wedges from 2x 4 fir on edge, and 1/8 in neoprene against tank, via full face lifeseal.
Did the tank fabricator locate full height sitiffeners/baffles inside, the same place as existing tank? I bet where the cross braces on top are located.
I like the idea of a plug for draining, I have OB.
I have to digest these options for under tank attaching of cushion etc. The fabricator is providing strips of some kind for me to use under the tank, and their website has a link to this surveyor site for installation instructions: http://marinesurvey.com/yacht/fueltank.htm
Hmn, I sent the measurements to the fabricator and didn't mention baffles, but their website says they put them every 30 inches and that it follows USCG standards.
I haven't heard from them and it's been almost two weeks. :?
BobP
GreatGrady Captain
- Joined
- Apr 27, 2005
- Messages
- 4,746
- Reaction score
- 6
- Points
- 38
- Location
- Long Island, NY
- Model
- Sailfish
Step on your existing tank top where the cross braces would have been, is it rigid or more flexible ? Grady is using the tank to partially support the floor weight, don't tell fabricator.
The reason whey I say to fully caulk seal the neoprene is to avoid collecting moisture in between, it promotes galvanic corrosion, the worse kind there is, like taking a 1/8 in drill bit to the tank. Neoprene interacts with the aluminum ONLY IN THE PRESENSE OF MOISTURE.
I'm not saying it's my way or the highway, I'll leave that to the playground sand pit bully types to promote.
Good thing about these sites is the alternatives methods offered, not so good the member has to make a decision !
whaler1777
Member
- Joined
- Jul 26, 2008
- Messages
- 12
- Reaction score
- 0
- Points
- 0
Best bet would be to use a piece of PVC pipe glassed in, 5200 will work as well, i wouldnt use copper. As far as using neoprene goes... Why bother taking a chance, just go the route i told you and you will never have any problems..