Transom Repair - South Jersey

Workdog

Well-Known Member
Joined
Feb 25, 2005
Messages
242
Reaction score
0
Points
0
Location
NE Ohio
I bet you'll be glad to see her back together again...

That fighting chair pedestal in the cockpit; I wonder if that was original equipment? Mine had one just like it when I bought my boat (used). Got rid of it, not really necessary to fight Walleyes on the North coast of America (Lake Erie). :mrgreen:
 

cgmiller

Well-Known Member
Joined
Oct 16, 2005
Messages
311
Reaction score
0
Points
0
Workdog,

I think it is original equipment. My chair has been sitting in the sun a long time. The guys at the plant did a piss-poor job of sealing the base as my hatch core is so wet it sounded like I was walking across a frozen lake when I was walking around the boat last month shoveling out the snow..the core was completely frozen now my fighting chair is like a "hobby horse"..I am going to have to replace the core in that hatch before I reinstall it.
 

jellyfish

Well-Known Member
Joined
Jan 5, 2010
Messages
203
Reaction score
1
Points
0
awesome pictures Chris, was the wood all wet and rotten? Was it all soft? It looks bad from pictures. :sorry
 

cgmiller

Well-Known Member
Joined
Oct 16, 2005
Messages
311
Reaction score
0
Points
0
Jellyfish,

Most of it was wet, even up on the sides. The guy doing the work said that there was not much actual rot..I guess the water intrusion was a failry recent thing. There were cracks in the top of the transom and the brass drain tubes were corroded and letting water into the core. It actually looked like it froze and expended out the top, which was out past the edge of the aluminum bracket. I really got a good idea of how grady mated the hull and deck. Scott said that they cut out the motor well from a full transom mold to fit the deck cap. They then used a piece of aluminum as a stiffiner across the transom and filled the uneven gaps with putty, which can see in the closeup picture. That coupled with the wet wood and the weight and torque of the 4-strokes is probably what contributed to the transom breaking. The new transom will be much stronger than what they put together and it will be impervious to the effects of water...
 

gw204

Well-Known Member
Joined
Jan 31, 2005
Messages
2,481
Reaction score
22
Points
38
Location
St. Leonard, MD
That aluminum trim is just there to hide the joint. It is not a structural component.
 

cgmiller

Well-Known Member
Joined
Oct 16, 2005
Messages
311
Reaction score
0
Points
0
Brian,

Look at the picture closer. There is a piece of aluminum INSIDE of the transom that runs across the top of the transom under the upper skin. The holes that were drilled to attach the trim angle allowed water to enter the transom and caused corrosion on the internal metal....
 

gw204

Well-Known Member
Joined
Jan 31, 2005
Messages
2,481
Reaction score
22
Points
38
Location
St. Leonard, MD
Oh, I see. Didn't catch that before.

I know my old 204 wasn't like that. When I removed the trim piece, all I saw was a bare plywood...with caulking speared all over it.

I still think they should just glass that stupid joint.
 

cdwood

GreatGrady Captain
Joined
Apr 1, 2006
Messages
578
Reaction score
0
Points
18
Location
Hamilton/LBI N.J.
Have to agree with Brian on glassing that joint but geeeezus how many are out like this, I'm thinkin' all of em'.
 

cgmiller

Well-Known Member
Joined
Oct 16, 2005
Messages
311
Reaction score
0
Points
0
The fiberglass guys says it was much easier for Grady and the other manufacturers that finish off the seam with the trim, but it was a major source of water for my transom. The screw holes into the top of the transom were a bad idea. I was surprised to see soo many new boats at the boat show with a piece of trim on the transom.....big dollar boats too....my 37 year old 17 Mako does not have one and the transom is still good and that boat has lived in the water most of it's life. My 1988 21 Mako had a trim angle on it, but it was caulked on and only had a few screws....but it still have holes through the glass???
 

cdwood

GreatGrady Captain
Joined
Apr 1, 2006
Messages
578
Reaction score
0
Points
18
Location
Hamilton/LBI N.J.
That caulking is only good for so long and yes that is a problem. But so are the bronze drain tubes that corrode away after a few years, these often go overlooked, especially the garboard drain.
 

cgmiller

Well-Known Member
Joined
Oct 16, 2005
Messages
311
Reaction score
0
Points
0
CD,

You could not be more correct. The fiberglass guy showed us what was left of the brass drain tubes...which was not much.They were shot and split and leaking into the transom. Before I replaced the brass bilge plug sleeve on my 88 21 Mako, I was able to turn the sleeve in the hole, which I noticed when I was tightening the drain plug just before putting the boat back in the water after an engine repair...the corroded ones can be removed with a wood paddle bit..I have been able to drill ones out that were set in 5200 real good..the brass sleeve was just about gone but the 5200 was still in the hole, so I have been doing a good job sealing them in....
 

cdwood

GreatGrady Captain
Joined
Apr 1, 2006
Messages
578
Reaction score
0
Points
18
Location
Hamilton/LBI N.J.
When I did my transom what I did was epoxy pvc tubes in those locations. Done right you never haver to worry about them again. pvc can be epoxied, you just need to sand down the outside surface to make it porous.
 

Gw190T

Member
Joined
Oct 8, 2005
Messages
24
Reaction score
0
Points
0
Location
Pasadena, Md
I have a 232 Gulfstream in the shop as we speak having the transmon completely replaced. Judge Yachts in Denton Md is doing the work. The price seems to be fair and have been to the shop a few times to see the progress. I am not a fiberglass guy by no means but they seem to be doing a very good job.
 

cdwood

GreatGrady Captain
Joined
Apr 1, 2006
Messages
578
Reaction score
0
Points
18
Location
Hamilton/LBI N.J.
Do you know what is being done to address the drain tubes issue? Bronze tubes are not the answer if your looking for longevity.
 

gw204

Well-Known Member
Joined
Jan 31, 2005
Messages
2,481
Reaction score
22
Points
38
Location
St. Leonard, MD
I used PVC to sleeve the garboard drain hole in my old Sailfish as well. Worked great! I know there area also places that sell fiberglass socks that you can slip over a piece of waxed tube/pipe and use to laminate your own sleeves.

I've seen others lay wet-out glass on the inside of the hole, stick a balloon in there and then inflate to hold it in place as it cures.

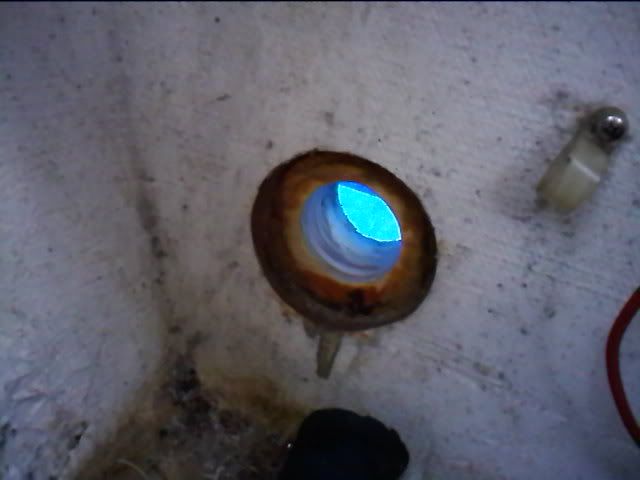
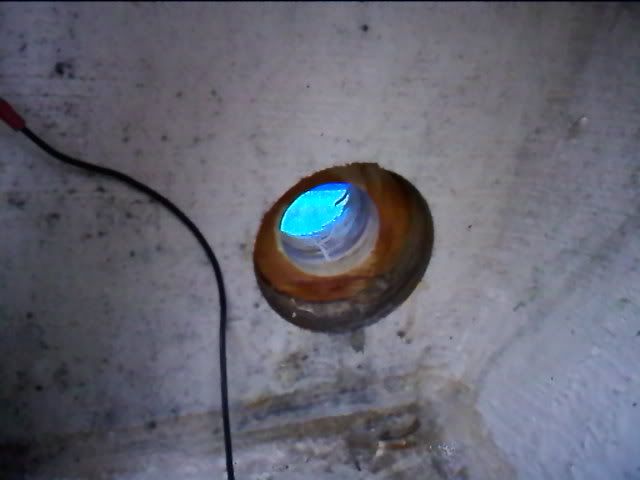
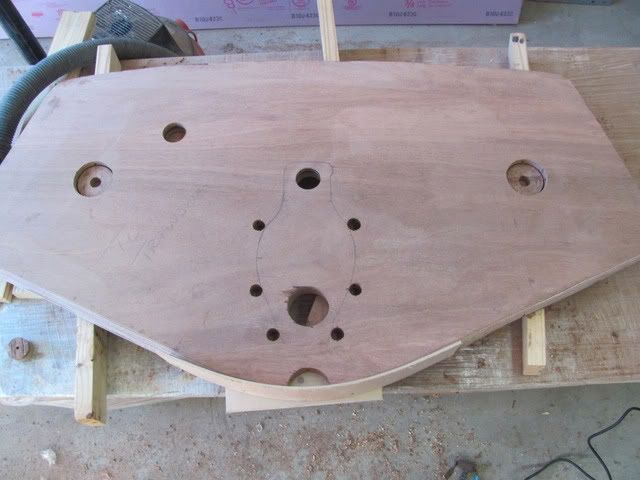
Anothing thing I can tell you is that this is NOT the proper way to install scuppers in a brand new transom... :-|

0301011750.jpg


0301011749c.jpg


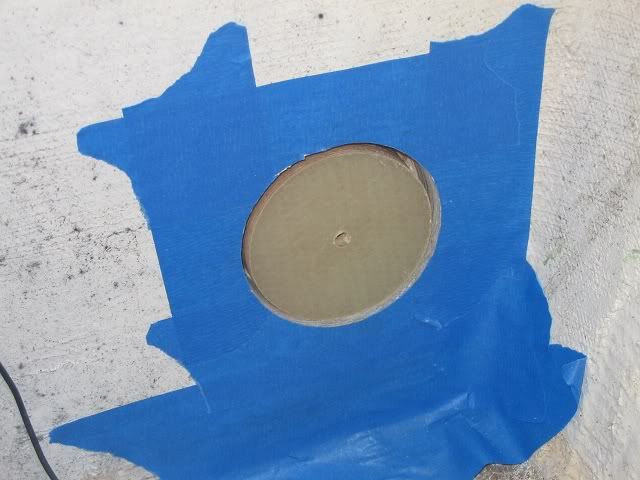
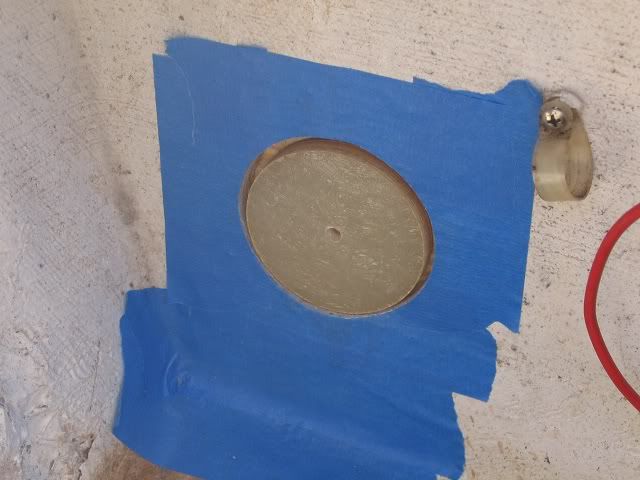
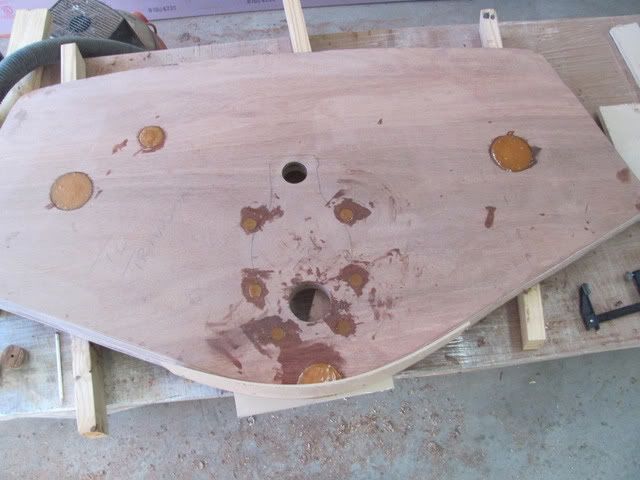
The "professional" shop that installed these bored through a new inner skin and removed part of the new core because they didn't have the proper length scupper. It was then delivered to the owner with the bare wood exposed and the owner had to have the shop come out to at least coat the wood w/ resin. Lazy, sloppy work. I am currently replacing the thru-hulls in this rig and part of that process involves building up the cutout to full thickness.

IMG_8562.jpg


IMG_8563.jpg


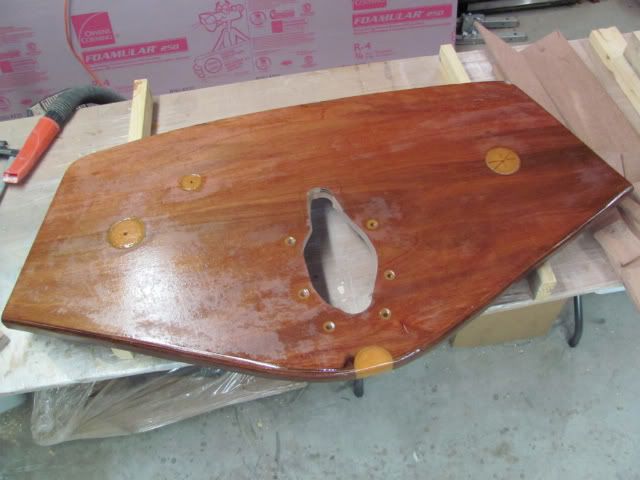
Once these plugs are bonded in, there will be a few layers of glass over them to tie them into the existing structure. The holes will then be redrilled and the core will get painted with several coats of epoxy to protect the wood before the new SS scuppers are bedded in 5200.
 

NOTHING ELSE MATTERS

GreatGrady Captain
Joined
Jun 26, 2006
Messages
1,993
Reaction score
5
Points
38
Age
59
Location
LONG ISLAND NEW YORK
What i did on my Formula when i did the transom was to over drill ALL the thru hull holes, filled them with epoxy putty and then re drill the correct size. No problems EVER.
IMG_0280.jpg

IMG_0281.jpg

IMG_0283.jpg
 

cgmiller

Well-Known Member
Joined
Oct 16, 2005
Messages
311
Reaction score
0
Points
0
The fiberglass guy should have finished the tear out today..the non-rotten wood has been kicking his ass, plus he is working on other stuff at the same time, so just like the rest of us, the more difficult stuff gets put off....he should be starting the rebuild tomorrow. I am going to check on it saturday morning and will post some pics....stay tuned..