Impeller replacement / waterpump service

imjus4u2nv

Well-Known Member
Joined
Jul 1, 2018
Messages
264
Reaction score
33
Points
28
Location
New York
Model
Adventure
I am planning on replacing the impeller for the first time since I bought this grady (the lower unit was brand new when I bought the boat a year and a half ago). The engine is an s150txru.
My question is this- do you always replace the bottom plate or only if needed? I am concerned about getting the key out when the times comes and seems only need to pull the key out of replacing the base plate. Also need this off to put new gasket on so maybe have to do it? Also wasnt sure about part 29.
 

Attachments

  • Screenshot_20200216-141257_Chrome.jpg
    Screenshot_20200216-141257_Chrome.jpg
    290.5 KB · Views: 19

wspitler

GreatGrady Captain
Joined
May 16, 2011
Messages
1,308
Reaction score
289
Points
83
Location
Inglis, FL
Model
Express 330
I'd recommend you try to get the woodruff key out so you can lubricate it. There are lots of videos that show effective methods of removing the key. Try the least destructive first. I then take a piece of sandpaper and shine it up, and cover it with a good marine grease. Shouldn't be too hard given the age of your lower unit. I have found that the stainless steel housing (#29) is usually OK if you haven't run sand through it. It fits inside #28. Make sure to clean all of the threads and put grease on all the bolts and coat the impeller with and O-rings with silicon grease. There may come a day when you have to change the upper seal and keeping corrosion to a minimum helps down the road.
 

SkunkBoat

Well-Known Member
Joined
Oct 12, 2017
Messages
4,139
Reaction score
1,435
Points
113
Location
Manasquan Inlet NJ
Website
www.youtube.com
Model
Express 265
The key(35) holds the impeller from slipping. It is exposed when you remove the impeller.

As for what needs to be changed...unfortunately you never really know until you open it up and look.

I always liked to have at least one of everything onhand. At least o-rings,seals, and those 10-13 little pieces that get trashed
 
  • Like
Reactions: imjus4u2nv

DennisG01

GreatGrady Captain
Joined
Sep 1, 2013
Messages
6,745
Reaction score
1,188
Points
113
Location
Allentown, PA & Friendship, ME
Model
Offshore
Me? Unless you're having an issue or know you have been running in shallow/sandy water a lot... I wouldn't be changing the impeller yet. Those Yamaha impellers seem to last for a long, long time. Actually, I can't say I've ever found the need to replace an impeller (other than anticipated damage, of course) on ANY engine on such a short interval.

However, something that you SHOULD do every year is to drop the lower unit, clean and re-grease the top of the driveshaft (where it inserts into the crank) and reattach. It keeps those splines from seizing up.
 

seasick

Well-Known Member
Joined
Aug 19, 2008
Messages
9,073
Reaction score
1,293
Points
113
Location
NYC
You can open up the pump and look at the wear plate and housing to see if it needs replacement, but what fun is that?
I used to replace the impeller every other season but it always looked so good, I wondered if it was needed. Over time, I found that for my sx150, an impeller can last a long time. I get 5 or 6 seasons easily out of an impeller. My boating areas are fairly deep and I don't suck up a lot of sand. The dirt and sand will wear out the impeller a lot quicker. Since I only rebuild the pump every 5 years or so, each time I do, I get a complete kit including the wear plate, impeller, metal cup AND plastic housing along with bolts, dowels, gaskets and the water tube bushing.
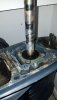
Often ( but not this time for me) the metal slide-on sleeve on the drive shaft won't come off. If that happens, you will probably have to mash it or cut it and will need a new sleeve and bushing. Those parts don't come in the kit.
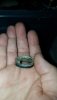
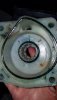
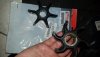
As has always been the case on my motor, the woodruf key wouldn't budge even while trying the chisel and hammer method which I don't like since it can nick the shaft.
My tried and true method to remove the frozen key is to cut a slot lengthwise in the middle of the key using a dremel rotary tool with an abrasive cutting wheel. Cut a slot just about the whole depth of the key. Once the slot is made, use a vice-grip to squeeze the slot closed by pinching the key on its sides. That makes the key a wee bit thinner and it will pop out fairly easily. I do not recommend heating the drive shaft or key with a torch.

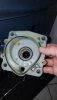
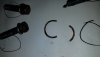
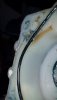
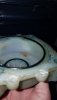
During my pump rebuild, I removed the lower pump housing base (under the wear plate to do a visual on the shaft seals (actually you can only see the topmost of the two seals. In any case, the spring that wraps around the seal was broken into several pieces. So I removed the bearing holder assemble and popped out the two seals. I put in new seal, the old base plate, wear plate, impeller and all the other gaskets and o-rings. Make sure the o-rings stay seated by using some marine grease. Don't forget to grease the metal housing, drive shaft and impeller. To install the impeller slide it all the way down, slide the housing with cup over the shaft and then rotate the drive shaft clockwise looking down while pressing on the housing. It will eventually slide over the impeller. Bolt the housing and install the three washers, flat, wave, flay, the nylon shaft bushing and finally the metal sleeve.
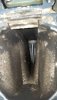
There is a seal or a blob of sealant between the water pump housing area and the exhaust tube. That gasket (actually a strip of some sort of rubber) that shouldn't be removed. I put a smear of blue Permatex Rtv sealant on it to help seal out exhaust gases from the pump. As the lower unit ages, that seal gets less flexible and may not seal as good as when new.
 

imjus4u2nv

Well-Known Member
Joined
Jul 1, 2018
Messages
264
Reaction score
33
Points
28
Location
New York
Model
Adventure
I appreciate all the responses. I may wait until next season, I have no issues with it and have never touched a sand bar with it (mostly deeper water). I will check water pressure come April.
When the times comes I will be ready to go with the great instructiuons above, and I have most of the parts already. Thanks again!
 

RussGW270

GreatGrady Captain
Joined
Mar 5, 2019
Messages
1,761
Reaction score
253
Points
63
Age
57
Model
Islander
60 bucks....replace it all heh.

Make sure to order a replacement set of washers (flat, wavy, flat) just in case one is bad. Not likely with a new model, but you never know. One was cut and another missing when I opened mine.
 
  • Like
Reactions: imjus4u2nv

steveditt

Well-Known Member
Joined
Nov 11, 2012
Messages
144
Reaction score
22
Points
18
Lesson learned the hard way , make sure the woodruff key is seated squarely and completely after 20 trips overheated the incorrectly seated woodruff key added extra pressure on the impeller which then slipped out of the grove reducing water to the engine , then would slip back in the grove and be fine . It was a tricky problem thinking since the pump was completely new and I had experience changing them it most be something else . After some testing at the dock towed it home removing the lower unit to find what I believe was the problem . The Yamaha impeller was split so I could have said it as defective but I remember a problem seating the woodruff or lack of .
 
  • Like
Reactions: imjus4u2nv

imjus4u2nv

Well-Known Member
Joined
Jul 1, 2018
Messages
264
Reaction score
33
Points
28
Location
New York
Model
Adventure
So started the boat today for first time this season, started right up but had a little bit of a high idle around 1400 (usually does then comes back down once warm to around 7) when I heard the dreaded overheat after about 1 or 2minutes.Tell tale took a minute to start working and seemed a little weak. Was not overheating at end of last season. Let it cool a few hours and started up, everything seemed decent, rooms dropped to about 9 after a minited then overheated (did this one more time when I did same sequence again).
Gonna change the water pump and see if that fixed it. Glad I started up before doing the waterpump bc if still overheating after would be thinking it is something I did wrong.
Any other idea before I do the waterpump?
 

wspitler

GreatGrady Captain
Joined
May 16, 2011
Messages
1,308
Reaction score
289
Points
83
Location
Inglis, FL
Model
Express 330
Look at the thermostat, could be stuck closed. If the telll tale is peeing, the water pump is working at least somewhat and it should be enough flow at idle to keep it from overheating. I'd look for clogs in the system, but changing the impeller is probably a good place to start, but I'd definitely check the thermostat.
 
  • Like
Reactions: imjus4u2nv

seasick

Well-Known Member
Joined
Aug 19, 2008
Messages
9,073
Reaction score
1,293
Points
113
Location
NYC
I assume you are using muffs for water. If so, can you tell me if the telltale pees with the water on but the motor not started? Give it some time to see. I ask because if you see a pee stream without the motor running then the pee stream is not a good indication that the pump is actually pumping when the motor is running.
also are you using a decent hose and are you sure you are getting good flow. I have had issues with those hoses that shrink up when you turn off the water. A really long small diameter hose can cause the same issue with flow rate.

In addition, since the water is probably fairly cool, the motor wouldn't overheat that fast with a stuck t-stat (OK, possible but usually takes longer). A stuck open poppet valve on the other hand can cause overheating at low revs. especially if water flow is less than optimal.
That can be checked by running the motor faster after starting but I can't recommend that test unless you have a way to monitor head temps such as a contactless IR thermometer.
You were going to change the impeller at some time, did you work on the motor recently?

One more simple thing.
When you first start the motor, use your hand to feel the t-stats housings ( again an IR thermometer works better but your hand will do). As the motor runs, you can feel the housings get warmer. They should feel similar. It is unlikely that both t-stats would get stuck at the same time. Note that is there is no or low water flow, the motor can get hot quickly but BOTH heads will heat up as opposed to just one side if a t-stats is stuck closed.
 
  • Like
Reactions: imjus4u2nv

imjus4u2nv

Well-Known Member
Joined
Jul 1, 2018
Messages
264
Reaction score
33
Points
28
Location
New York
Model
Adventure
Look at the thermostat, could be stuck closed. If the telll tale is peeing, the water pump is working at least somewhat and it should be enough flow at idle to keep it from overheating. I'd look for clogs in the system, but changing the impeller is probably a good place to start, but I'd definitely check the thermostat.
Will def check, just changed them out last year. Dripped the lower unit and gonna do the waterpump then go back to the drawer board.
Thanks for the reply.
 

imjus4u2nv

Well-Known Member
Joined
Jul 1, 2018
Messages
264
Reaction score
33
Points
28
Location
New York
Model
Adventure
I assume you are using muffs for water. If so, can you tell me if the telltale pees with the water on but the motor not started? Give it some time to see. I ask because if you see a pee stream without the motor running then the pee stream is not a good indication that the pump is actually pumping when the motor is running.
also are you using a decent hose and are you sure you are getting good flow. I have had issues with those hoses that shrink up when you turn off the water. A really long small diameter hose can cause the same issue with flow rate.

In addition, since the water is probably fairly cool, the motor wouldn't overheat that fast with a stuck t-stat (OK, possible but usually takes longer). A stuck open poppet valve on the other hand can cause overheating at low revs. especially if water flow is less than optimal.
That can be checked by running the motor faster after starting but I can't recommend that test unless you have a way to monitor head temps such as a contactless IR thermometer.
You were going to change the impeller at some time, did you work on the motor recently?

One more simple thing.
When you first start the motor, use your hand to feel the t-stats housings ( again an IR thermometer works better but your hand will do). As the motor runs, you can feel the housings get warmer. They should feel similar. It is unlikely that both t-stats would get stuck at the same time. Note that is there is no or low water flow, the motor can get hot quickly but BOTH heads will heat up as opposed to just one side if a t-stats is stuck closed.
No water pees unless engine is started, and it takes a 10 15 second to start once i start it up. Same water set up as always and never an issue (I start up in a tub but it doesn't come up high enough so use muffs and prop just under water so muffle some noise). Actually - now that you say it I may have an added piece of hose - will switch that back.
Havent worked on at all and put to bed last season and all was good. I dropped the lower unit and gonna do the waterpump and then look into the poppet (not sure where this is but will pull out the book). Is a poppet valve cheap and should I just replace it? Thermostats will be next and are cheap at least.
 

imjus4u2nv

Well-Known Member
Joined
Jul 1, 2018
Messages
264
Reaction score
33
Points
28
Location
New York
Model
Adventure
I opened up the water pump, and a few issues (hoping this is it and wont need to mess with poppet or thermos).
Issue 1 - black jacket that goes on bottom of pump housing was missing about an inch (see pictire). Funny thing, is I changed thermostats last year and found a piece of what I thought was wore insulation stuck in the thermostat - thos had to be the gasket.
Issie 2 - plastic collar on top was cracked.
Issue 3 - spring washer, there was only one the shaft, was missing one, and the last had rusted (what the heck) and ended up in two pieces in the side of the lower unit (4th picture).

Good news was the key came out no problem with my hand, but starting to wonder of this lower unit was reallly rebuilt two years ago? Maybe used old parts. Anyone ever have this happen? Gonna use grease to seat my gaskets.
Hoping this is the fix for the overheat (this feels like good news).
 

Attachments

  • 20200323_074313.jpg
    20200323_074313.jpg
    1 MB · Views: 17
  • 20200323_074453.jpg
    20200323_074453.jpg
    722.7 KB · Views: 18
  • 20200323_072906.jpg
    20200323_072906.jpg
    2 MB · Views: 19
  • 20200323_072848.jpg
    20200323_072848.jpg
    1.4 MB · Views: 18
  • 20200323_070836.jpg
    20200323_070836.jpg
    1.3 MB · Views: 17
  • 20200323_070845.jpg
    20200323_070845.jpg
    931.1 KB · Views: 18
Last edited:

imjus4u2nv

Well-Known Member
Joined
Jul 1, 2018
Messages
264
Reaction score
33
Points
28
Location
New York
Model
Adventure
Can anyone tell me if the pump housing should have a channel all the way around. I can see why the gasket got torn, as even with greasy cant get it to stay put. Assuming I will need a new housing but wanted to confirm first.

Another of thing, new impeller has plastic housing where old one was metal? Old one seems better then the new one.
 

Attachments

  • 20200323_083004.jpg
    20200323_083004.jpg
    831.6 KB · Views: 13
  • 20200323_083026.jpg
    20200323_083026.jpg
    776 KB · Views: 13
  • 20200323_083008.jpg
    20200323_083008.jpg
    1.1 MB · Views: 13
  • 20200323_083409.jpg
    20200323_083409.jpg
    1 MB · Views: 13

seasick

Well-Known Member
Joined
Aug 19, 2008
Messages
9,073
Reaction score
1,293
Points
113
Location
NYC
I did some research and found a video of a rebuild. There is no continuous groove in the plastic housing . The edge of the cup serves as a guide for the o-ring in the section of the plastic housing that doesn't have a groove. You install the cup in the housing and then install the oring. You need to put grease on the groove and still be careful that the o-ring doesn't get out of position when seating the housing.
There is a pretty good video at

showing the process.

Also I am nit sure but your drive shaft seems to be pretty worn where the washers would be. Hopefully that's just the way the photo looks and not the shaft
 
Last edited:
  • Like
Reactions: imjus4u2nv

imjus4u2nv

Well-Known Member
Joined
Jul 1, 2018
Messages
264
Reaction score
33
Points
28
Location
New York
Model
Adventure
I did some research and found a video of a rebuild. There is no continuous groove in the plastic housing . The edge of the cup serves as a guide for the o-ring in the section of the plastic housing that doesn't have a groove. You install the cup in the housing and then install the oring. You need to put grease on the groove and still be careful that the o-ring doesn't get out of position when seating the housing.
There is a pretty good video at

showing the process.

Also I am nit sure but your drive shaft seems to be pretty worn where the washers would be. Hopefully that's just the way the photo looks and not the shaft
Thanks, saved me from ordered a housing I didnt need. I am gonna watch the video and go from there (I watched one a month or two ago and thought i would remember... yea so....).
Will wait for the other parts to come in the mail and report back.
 
Last edited:

SkunkBoat

Well-Known Member
Joined
Oct 12, 2017
Messages
4,139
Reaction score
1,435
Points
113
Location
Manasquan Inlet NJ
Website
www.youtube.com
Model
Express 265
Issue 2 - plastic collar on top was cracked.
Issue 3 - spring washer, there was only one the shaft, was missing one, and the last had rusted (what the heck) and ended up in two pieces in the side of the lower unit (4th picture).
like I said "...and those 10-13 little pieces that get trashed"

I hate Yamaha water pumps.
 
  • Like
Reactions: imjus4u2nv

seasick

Well-Known Member
Joined
Aug 19, 2008
Messages
9,073
Reaction score
1,293
Points
113
Location
NYC
[QUOTE="

I hate Yamaha water pumps.

Tell me about it they are crap.
[/QUOTE]
Don't agree. Mine last 5 or 6 seasons easily. Can't say the same for my Mercs. To be fair though, my Yami impeller on my older 2 stroke is a lot larger in diameter than the Merc impellers and I think that the smaller diameter puts more strain on the vanes.