To foam or not to foam

Madhatter0

Active Member
Joined
Jan 10, 2019
Messages
25
Reaction score
4
Points
8
Age
39
Hello,
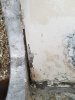
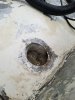
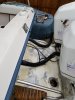
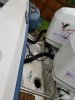
I have a 24 grady white offshore with the engine bracket( transom extender ) not sure what to call it see the pictures anyways. . . I got ambitious and decided since it is constantly getting water in it when i take it out to reseal it. In doing so i have been removing the old paint and sealant. Also a cover or 2 as i could get to them when i noticed that there is a huge block of Styrofoam in the bracket. I couldn't figure out for the life of me how they got that in there until now. So not sure if it was a modification by the previous owner or what but the top of the bracket had been cut off at some point and reattached with jb weld or something. ( I'll have fun dealing with that later) the question is if i remove the top and reseal it do I
1) Remove the foam block and add a bilge pump in there if so where would i run the hose?
2)Leave that big block of styrofoam in it and just say its positive boyancy in case it sinks( Not sure how much that will help)

Also I was thinking of resealing it with life calk from the bottom or should i go back to the JB weld or another similar product
 

Attachments

  • 20190616_195124.jpg
    20190616_195124.jpg
    1.6 MB · Views: 54
  • 20190616_195119.jpg
    20190616_195119.jpg
    1.8 MB · Views: 54

SkunkBoat

Well-Known Member
Joined
Oct 12, 2017
Messages
4,137
Reaction score
1,435
Points
113
Location
Manasquan Inlet NJ
Website
www.youtube.com
Model
Express 265
The styro displaces its volume of water and can't fail at that. I'd stick with it.
The fact that the top of the bracket is not welded is what concerns me. I would be trying to find a welder.
 

DennisG01

GreatGrady Captain
Joined
Sep 1, 2013
Messages
6,744
Reaction score
1,188
Points
113
Location
Allentown, PA & Friendship, ME
Model
Offshore
Can't really tell a whole lot what I'm looking at from those pics - probably need a pic or two from further back. What is that curved area to the right of the inspection plate in the second pic? What does "a cover or 2" mean? Usually there is only one inspection plate and a drain on the bottom.

That doesn't make sense that someone cut the top off. Are you sure that (1) it's an original bracket and (2) it wasn't designed that way? Water displacement "things" can be added through the inspection plate. Speaking of that plate... what I can tell from the pics is that the sealing surface looks rough and that could be the source of water entry. Unless you have already tested and verified this "seam" and tested/verified the plate is NOT leaking?
 

Madhatter0

Active Member
Joined
Jan 10, 2019
Messages
25
Reaction score
4
Points
8
Age
39
Can't really tell a whole lot what I'm looking at from those pics - probably need a pic or two from further back. What is that curved area to the right of the inspection plate in the second pic? What does "a cover or 2" mean? Usually there is only one inspection plate and a drain on the bottom.

That doesn't make sense that someone cut the top off. Are you sure that (1) it's an original bracket and (2) it wasn't designed that way? Water displacement "things" can be added through the inspection plate. Speaking of that plate... what I can tell from the pics is that the sealing surface looks rough and that could be the source of water entry. Unless you have already tested and verified this "seam" and tested/verified the plate is NOT leaking?

So i put up some further pictures. Im not sure if its the oringinal bracket there is some name data on the bottom of it but there is so much paint and corrosion not sure if ill be able to see it once im done. The previous onwer painted over the zinc. So thank goodness that's in great shape lol all the corrosion happened to the aluminum instead. It is definatly one solid block of styrofoam in there as for that inspection plate it had loads of 4200 under it. Took alot of paintence heat gun and de bonding spray to get it out not usre how the others will come off but there are definatly 3 of them you can see them in the further out picture. Those screws are frozen in unfortunately not sure how I'm going to get them out as of yet. It might have been oringally designed as an open bracket and they put a top on it but i can defiantly flex the lid when i pull on it and i can shine a light through it as well where the cracks are. As for welding it im definatly in that area of looking as well but the only thing that concerns me is a fire with the foam from the heat of the welder. It has been raining down here alot so hard to get a good chunk of time to get at it. Hopefully tomorrow will be a dryer day and i can get the JB weld off see what im really working with.
 

Attachments

  • 20190617_184113.jpg
    20190617_184113.jpg
    1.5 MB · Views: 43
  • 20190617_184118.jpg
    20190617_184118.jpg
    1.4 MB · Views: 43

Paul_A

Well-Known Member
Joined
Feb 25, 2019
Messages
144
Reaction score
43
Points
28
Model
Adventure
I would pull the motors and remove the bracket from the transom. Then have it sand or bead blasted to get it clean and see where the leaks are. Plus it wouldn't hurt to reseal the bolts holding the bracket to the transom. I'm anal and a glutton for punishment so you may want to consider another route.
 

Madhatter0

Active Member
Joined
Jan 10, 2019
Messages
25
Reaction score
4
Points
8
Age
39
I would pull the motors and remove the bracket from the transom. Then have it sand or bead blasted to get it clean and see where the leaks are. Plus it wouldn't hurt to reseal the bolts holding the bracket to the transom. I'm anal and a glutton for punishment so you may want to consider another route.
I was just going to say that plan is in the works down the road when the transom get redone but for now was hoping for the easy fix. ( i dont think that exist in boats does it?)
 
Last edited:
  • Like
Reactions: Paul_A

Madhatter0

Active Member
Joined
Jan 10, 2019
Messages
25
Reaction score
4
Points
8
Age
39
So newest update got all the old caulking off wasnt doing much in terms of sealing anyways. Discovered a whole new issue. OS i have scrapped enough paint away to see its a Springfield bracket and, I figured out how the previous onwer got the huge foam block in it. THe cut the top off and used JB Weld to put the top back on. No a problem expect that they only used in every couple of inches so there are these big gaps in the sealing material. Well thats proabbly where the water is getting in. Sooo good new found the problem bad news the jb weld thats there is a mother to get off. from what i have read you have to heat it to over 600 F to get it to break odwn so out he map gas torch comes and i have to heat this aluminum up to temp to break down the jb weld. Plan is to pop the top off and, reseal it using life caulk or life seal from the underside lip so its a water tight bond. At this point is it fair to say i hate the previous owner. Will add some pictures when i get the top off
 

leeccoll

GreatGrady Captain
Joined
May 18, 2019
Messages
1,052
Reaction score
415
Points
83
Age
60
Location
Reno NV
Model
Seafarer
Madhatter,

I went through this whole ordeal 2 years ago with my 228. I only had one engine on the Grady bracket. I decided to pull the engine off the transom. Water and sand from the previous owner gushed out at the transom.
Then i paid a company to sandblast and powdercoat the old bracket.

The foam that was in the bracket shrunk to nothing from the heat :rolleyes:

I used ping pong balls to fill the bracket, then re attached engine (after drilling and epoxy for the mounting holes on the bracket) with 4200.

Used 5200 for the top inspection post on the bracket.

Still waterproof.

Good luck,

Lee
 

Madhatter0

Active Member
Joined
Jan 10, 2019
Messages
25
Reaction score
4
Points
8
Age
39
Update
Well after 2 bottles of map gas and about 6 hours i made all of around 10" of progress. So i'd like to use the boat this summer and, the whole bracket will be removed in a year orr two so i lifted up what i could and resealed it with life caulk all the way around. It should be good for a few year. Also found that one of the 3 pie plates was not sealed at all no caulking no gasket no nothing so im sure that was a huge source of water. GOing to reseal them paint the bracket and install a swim platform i hope in the next week or 2. Ill update pics as it comes along.
 

seasick

Well-Known Member
Joined
Aug 19, 2008
Messages
9,071
Reaction score
1,292
Points
113
Location
NYC
Madhatter,

I went through this whole ordeal 2 years ago with my 228. I only had one engine on the Grady bracket. I decided to pull the engine off the transom. Water and sand from the previous owner gushed out at the transom.
Then i paid a company to sandblast and powdercoat the old bracket.

The foam that was in the bracket shrunk to nothing from the heat :rolleyes:

I used ping pong balls to fill the bracket, then re attached engine (after drilling and epoxy for the mounting holes on the bracket) with 4200.

Used 5200 for the top inspection post on the bracket.

Still waterproof.

Good luck,

Lee
Sounds like you have been watching Mythbusters:)
 
Last edited:
  • Like
Reactions: leeccoll