Installing freshwater tank in a 1996 Adventure 208

imjus4u2nv

Well-Known Member
Joined
Jul 1, 2018
Messages
264
Reaction score
33
Points
28
Location
New York
Model
Adventure
I am purchasing the factory grady water tank to install - part #11-138 TANK WATER 10 GAL 191/208/228/251

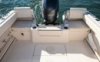
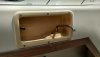
Does any one know if there are Barps to connect hoses on the factory tank, or do I need some of the parts listed below? If anyone has pictures of there freshwater tank and connections would be greatly appreciated. thanks!

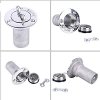
11-145 FITTING ELBOW 3/8" BARB X 3/8" MPT
11-163 FITTING ELBOW 5/8" BARB X 1/2" MPT
11-333 FITTING ELBOW 1 1/2"
 

DennisG01

GreatGrady Captain
Joined
Sep 1, 2013
Messages
6,744
Reaction score
1,188
Points
113
Location
Allentown, PA & Friendship, ME
Model
Offshore
Any particular reason you're buying the "Grady" parts? Nothing against Grady, of course, but there is ABSOLUTELY nothing special to something as basic as a plastic box (tank). Todd makes a lot of tanks - you might want to check into those and save some money - quality will be just as good. It's quite possible that Grady doesn't even make the tank, themselves.

Unless someone has bought the tank kit themselves, they may not know how it comes afterward (kit)... since their boat was built with it. BUT, if you are getting those parts out of your parts manual, then yes, you would also buy the appropriate barbs, etc. Meaning, any pictures you see are going to have the barbs already installed since the whole thing is already installed.

You'd need the pipe end to screw into the tank and the barb to fit the hose. The 1-1/2" would be for the fill. The other two would be the vent and the pickup. Easiest thing, if you're set on spending the extra money for the Grady stuff, just ask you dealer to get you what you need. You're paying them anyways - let them do their job ;)
 

imjus4u2nv

Well-Known Member
Joined
Jul 1, 2018
Messages
264
Reaction score
33
Points
28
Location
New York
Model
Adventure
Any particular reason you're buying the "Grady" parts? Nothing against Grady, of course, but there is ABSOLUTELY nothing special to something as basic as a plastic box (tank). Todd makes a lot of tanks - you might want to check into those and save some money - quality will be just as good. It's quite possible that Grady doesn't even make the tank, themselves.

Unless someone has bought the tank kit themselves, they may not know how it comes afterward (kit)... since their boat was built with it. BUT, if you are getting those parts out of your parts manual, then yes, you would also buy the appropriate barbs, etc. Meaning, any pictures you see are going to have the barbs already installed since the whole thing is already installed.

You'd need the pipe end to screw into the tank and the barb to fit the hose. The 1-1/2" would be for the fill. The other two would be the vent and the pickup. Easiest thing, if you're set on spending the extra money for the Grady stuff, just ask you dealer to get you what you need. You're paying them anyways - let them do their job ;)
Appreciate the response - thank you.
my idea was that I didnt want to leave my floor access panel open longer then needed and difficult to get measurements of the opening until I open it back up. Factory tank (10 gallon) shipped was $150, and looks like a todds 9 gallon is about $120. Dealership gave me those part numbers so will order, wasnt sure if necessary - still figuring out rest of install (have water fill, overfill hose and motor worked out), need to work on tank install and figire out where I want the faucet/hose and which one to use.
 

DennisG01

GreatGrady Captain
Joined
Sep 1, 2013
Messages
6,744
Reaction score
1,188
Points
113
Location
Allentown, PA & Friendship, ME
Model
Offshore
Actually, that's not too bad of a price. Often it's more of a difference than that.

Temporary measures... pull the access panel, take some pics and post them here to get better advice, then just reseal with something like shrink wrap tape for a while. The shrink tape will be totally fine for quite a while, actually.

Ideas, just off the top of my head...
-- PVC L-channel (1-1/2" or 2' legs) at the base of the tank (or along the sides). Inexpensive, never rots and will secure the tank from shifting around. Doesn't have to be installed around the whole length/width of the tank. A couple 4" pieces will do it.
-- Add a piece of aluminum bar as a "strap" up one side, over the top, and down the other. Something like 2"x1/8", also inexpensive. Easy to bend - make "feet" for mounting. Use some insulating material (rubber/nylon, etc) at key points so the aluminum doesn't rub the tank over time. This will serve to lock-down the tank to the floor.
-- Depending on the area, you may be able to use the PVC on the TOP edge of the tank to keep it locked down.
-- Any combination of the above should be easy and cheap and be MORE than sufficient.

Make sure there are no low spots in the vent hose where water can accumulate as it will cause issues with use and filling.
 

imjus4u2nv

Well-Known Member
Joined
Jul 1, 2018
Messages
264
Reaction score
33
Points
28
Location
New York
Model
Adventure
These are terrific ideas - many thanks.
Did not think of that with the vent hose - great point!
 
Joined
Nov 19, 2018
Messages
11
Reaction score
1
Points
3
Age
67
Model
Adventure
I have bothe fresh water tank and fuel tank out of my 208 at the moment. Here’s a photo of where the fittings are installed in the water tank. I would also like to add that the worst oxidation on the exterior of the aluminum fuel tank is where the water tank was installed against the fuel tank with a small rubber insulator “square” . I have just completed a first coat of 2-part epoxy (newer technology than coal tar) on the fuel tank to prevent further oxidation. CT66A74897-CFE1-4F56-9C31-EB7EF0566356.jpegDD16CE64-F649-4C7F-9087-1F09EA44D820.jpeg
 

imjus4u2nv

Well-Known Member
Joined
Jul 1, 2018
Messages
264
Reaction score
33
Points
28
Location
New York
Model
Adventure
Exactly what I needed - many thanks.

The tank looks mint!
 

imjus4u2nv

Well-Known Member
Joined
Jul 1, 2018
Messages
264
Reaction score
33
Points
28
Location
New York
Model
Adventure
Do you happen to have pictures of the water tank hoses (from where the tank was).
I am assuming I will not have access holes for the hoses and will need to determine where to drill.
 
Joined
Nov 19, 2018
Messages
11
Reaction score
1
Points
3
Age
67
Model
Adventure
Sorry, I don’t have a pic of the tank installed. The fill neck is plumbed from the port side along with the line going to the fresh water pump mounted on the transom behind the oil tank.
 
  • Like
Reactions: imjus4u2nv

DennisG01

GreatGrady Captain
Joined
Sep 1, 2013
Messages
6,744
Reaction score
1,188
Points
113
Location
Allentown, PA & Friendship, ME
Model
Offshore
It is probably going to be easier to put the fill and vent in some other location that what was done at the factory. Possibly even a removable deck plate to fill the tank directly.
 

imjus4u2nv

Well-Known Member
Joined
Jul 1, 2018
Messages
264
Reaction score
33
Points
28
Location
New York
Model
Adventure
Sorry, I don’t have a pic of the tank installed. The fill neck is plumbed from the port side along with the line going to the fresh water pump mounted on the transom behind the oil tank.
Thanks. I was actually looking for. A picture of the water tank location with the tank out, showing where the hoses come from bilge into the water tank area.
 

imjus4u2nv

Well-Known Member
Joined
Jul 1, 2018
Messages
264
Reaction score
33
Points
28
Location
New York
Model
Adventure
It is probably going to be easier to put the fill and vent in some other location that what was done at the factory. Possibly even a removable deck plate to fill the tank directly.
I plan to use a water fill like one in the picture, need to check clearance but hope to mount fill on the wall of the bilge, under one of the back seats (see picture with red X), will run vent tube up with the water outlet hose from pump, so if overfill water spills on deck near the faucet/hose connection. I do not have saltwater washdown, and will likely want to hook freshwater up to a washdown (would create hookup near bottom of rod holders that go into the bilge - see red O) and/or possibly to a faucet that swings out from the gunwale but trying to find the faucet (see picture).
Issue is I do not know what was factory. Assuming your freshwater goes to washdown?
 

Attachments

  • 517kE7Gv0VL._AC_SY400_.jpg
    517kE7Gv0VL._AC_SY400_.jpg
    18.8 KB · Views: 42
  • 2018_Grady_White_Adventure_208-14_366ef1c880d8fb2b9575adb87ba505df.jpg
    2018_Grady_White_Adventure_208-14_366ef1c880d8fb2b9575adb87ba505df.jpg
    4.7 KB · Views: 44
  • 4ggbH8NROqsWiiCvvyBg_1993 Grady White Adventure 20 Fresh Water Wash.jpg
    4ggbH8NROqsWiiCvvyBg_1993 Grady White Adventure 20 Fresh Water Wash.jpg
    27 KB · Views: 43
Last edited:

imjus4u2nv

Well-Known Member
Joined
Jul 1, 2018
Messages
264
Reaction score
33
Points
28
Location
New York
Model
Adventure
Found this on paragon's website which may work if I can find faucet to fit (was hoping to have faucet swing out from under gunwale, but difficult to find faucet with the ability to pivot that way).
 

Attachments

  • Plastics10077TPinsert-2T.jpg
    Plastics10077TPinsert-2T.jpg
    13.4 KB · Views: 5

DennisG01

GreatGrady Captain
Joined
Sep 1, 2013
Messages
6,744
Reaction score
1,188
Points
113
Location
Allentown, PA & Friendship, ME
Model
Offshore
Keep in mind that whatever was "factory" means nothing now. The only important thing is what YOU want. Make it the way that works best for you.

If you want a true "washdown", that 10g tank is going to empty pretty quickly. But you can definitely still do it. And, there's no reason you can't T the line and have both a washdown (garden hose type setup) and a regular faucet. Just think it through and figure out what you really need/want.

You can get a deck fill that has an integral vent, as well. They're as commonly available as the older style (non-vented) and this would make installation easier. Unless your final location of the fill isn't much higher than the tank - then you run the risk of what we spoke about above.
 

seasick

Well-Known Member
Joined
Aug 19, 2008
Messages
9,071
Reaction score
1,292
Points
113
Location
NYC
Keep in mind that whatever was "factory" means nothing now. The only important thing is what YOU want. Make it the way that works best for you.

If you want a true "washdown", that 10g tank is going to empty pretty quickly. But you can definitely still do it. And, there's no reason you can't T the line and have both a washdown (garden hose type setup) and a regular faucet. Just think it through and figure out what you really need/want.

You can get a deck fill that has an integral vent, as well. They're as commonly available as the older style (non-vented) and this would make installation easier. Unless your final location of the fill isn't much higher than the tank - then you run the risk of what we spoke about above.
I believe that the factory fill is a combo fill/vent Perko similar to the model 540 unit. The original fill is mounted to the port side of the engine well just behind the flip up/down panel that you generally flip down when tilting the motor all the way up. I am 100% sure that the vent does not connect/drain into open space like the bilge. If you overfill the tank, the water comes out of the fill fitting. I do that often since it is a simple way to flush the inevitable gunk that grows in the tank.
 

imjus4u2nv

Well-Known Member
Joined
Jul 1, 2018
Messages
264
Reaction score
33
Points
28
Location
New York
Model
Adventure
I believe that the factory fill is a combo fill/vent Perko similar to the model 540 unit. The original fill is mounted to the port side of the engine well just behind the flip up/down panel that you generally flip down when tilting the motor all the way up. I am 100% sure that the vent does not connect/drain into open space like the bilge. If you overfill the tank, the water comes out of the fill fitting. I do that often since it is a simple way to flush the inevitable gunk that grows in the tank.
I plan to have the vent come up through the bilge area to the port back corner, I have snaked wires through there for my gunwale lighting, would ultimately shoot excess water out from under the gunwale onto the deck (where bottom fishing poles goes) and out the scupper (never hitting the bilge area).
I plan to cap the 3/8 vent hose with a filter/screen, but dont plan to use anything fancy, just have to make sure no dips in the hose.
 

imjus4u2nv

Well-Known Member
Joined
Jul 1, 2018
Messages
264
Reaction score
33
Points
28
Location
New York
Model
Adventure
Does anyone know what sealant to use when installing the 90 degree fittings? They screw into the tank and was not sure what sealant to use. UPDATE - grady recommended 5200 so that is what I will use.

I have most of my materials gathered (still need 1 1/2" fill hose, the 5/8th vent hose, an adapter to attach faucet to the 3/8th water hose). Also looking to purchase a 90 degree elbow, as it will be a tight turn for the 1 1/2" fill hose to attach to the water fill (this will be installed near you calf if you were sitting in the back port seat).
 

Attachments

  • 20190110_114306.jpg
    20190110_114306.jpg
    209.5 KB · Views: 20
  • 20190110_114409 (3).jpg
    20190110_114409 (3).jpg
    685.1 KB · Views: 18
Last edited:

DennisG01

GreatGrady Captain
Joined
Sep 1, 2013
Messages
6,744
Reaction score
1,188
Points
113
Location
Allentown, PA & Friendship, ME
Model
Offshore
5200 is EXTREME overkill for this application and you'd just be wasting money. First of all, in reality, no sealant would be needed. Those are pipe fittings and the threads are soft - meaning, it would seal itself as it goes. Nothing is under any real pressure, either. But, ANY sealant that you have laying around will more than do the job. Teflon tape would be fine, too.
 

Ky Grady

GreatGrady Captain
Staff member
Joined
Mar 1, 2006
Messages
2,914
Reaction score
1,271
Points
113
Location
Berea, KY/Cross, SC
Model
Seafarer
Does anyone know what sealant to use when installing the 90 degree fittings? They screw into the tank and was not sure what sealant to use. UPDATE - grady recommended 5200 so that is what I will use.

I have most of my materials gathered (still need 1 1/2" fill hose, the 5/8th vent hose, an adapter to attach faucet to the 3/8th water hose). Also looking to purchase a 90 degree elbow, as it will be a tight turn for the 1 1/2" fill hose to attach to the water fill (this will be installed near you calf if you were sitting in the back port seat).


Where did you come up with the faucet? Mine is surface corroded from saltwater exposure and would like to swap it out.

Never mind, found one, just ordered.
IMG_1919.JPG
 

imjus4u2nv

Well-Known Member
Joined
Jul 1, 2018
Messages
264
Reaction score
33
Points
28
Location
New York
Model
Adventure
I ordered mine off ebay, but ended up getting the wrong one in the mail, they gave it to me for free and refunded my money.

My faucet was originally longer and would not give me the angle I needed, after cutting it down I got what was in the picture I posted. Will see if it holds up to the saltwater.