You are using an out of date browser. It may not display this or other websites correctly.
You should upgrade or use an alternative browser.
You should upgrade or use an alternative browser.
1993 209 Escape Fuel Tank Replacement
- Thread starter nightfighter
- Start date
If you have a deck panel that can be removed, the job is easier than if you don't. That said, assume that when you open the deck and pull the old tank, you may or may not find other areas that need attention.
We are well into this project. One piece of advice; do not trust the GW tank drawings. Pull your tank and have it built off of that original. My original fill, vent, ground, pick up and sending unit were all very different from what was supplied by GW. Tank is back getting reworked now....
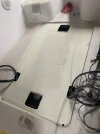
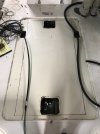
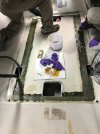
After removing the console, we were faced with a full deck, so we did indeed have to cut the deck to expose the fuel tank. And yes, those are holes you see in the top of the tank, but the larger one was used as a lifting point.jpg")
After removing the console, we were faced with a full deck, so we did indeed have to cut the deck to expose the fuel tank. And yes, those are holes you see in the top of the tank, but the larger one was used as a lifting point
Hookup1
GreatGrady Captain
- Joined
- Oct 16, 2007
- Messages
- 3,645
- Reaction score
- 1,037
- Points
- 113
- Age
- 71
- Location
- Cape May, NJ
- Model
- Islander
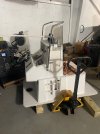
Not mine, but yes, a commercial tongue jack in the shop I have the boat for the replacement.
$200 change order to get the tank right, for total of $1800 to the fabricator... Now all new hoses, stem to stern, bilge pump, steering, replacement SS screws of different sizes, maybe a new wheel... The crew is off to either Florida or doing continuing ed for captain license, so no progress until end of January.
In the meantime, I am researching new switch panel and while I am at it, trying to see if there is a later model console of the 209 Escape that will fit into the molded shoe in the deck...
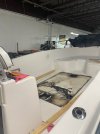
Anyone have a lead on salvage boat yards? Specifically GW boat parts? This is the console I would consider upgrading, but note that it does house the live well under forward seat...
$200 change order to get the tank right, for total of $1800 to the fabricator... Now all new hoses, stem to stern, bilge pump, steering, replacement SS screws of different sizes, maybe a new wheel... The crew is off to either Florida or doing continuing ed for captain license, so no progress until end of January.
In the meantime, I am researching new switch panel and while I am at it, trying to see if there is a later model console of the 209 Escape that will fit into the molded shoe in the deck...
Anyone have a lead on salvage boat yards? Specifically GW boat parts? This is the console I would consider upgrading, but note that it does house the live well under forward seat...
Attachments
glacierbaze
Well-Known Member
- Joined
- Jul 6, 2012
- Messages
- 2,587
- Reaction score
- 676
- Points
- 113
- Age
- 77
- Model
- Seafarer
Looks like there might have been a 2 x 4 cross brace where those holes are. Pressure treated wood used to contain arsenic, until 2004, and it would eat holes in aluminum. A lot of jon boats ended up with 2 rows of pin holes, where they sat on PT bunks.
Last edited:
Fishtales
Well-Known Member
- Joined
- Jan 31, 2005
- Messages
- 8,492
- Reaction score
- 1,398
- Points
- 113
Always a messy job due to years of being covered. Sorry to hear the drawings were not the same as the original tank. I'd be interested in how your coating the tank and mounting. If you can, share some pics.
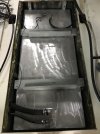
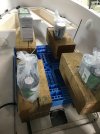
Sorry not to have updated. Did not coat tank. Used 4200 to adhere half dozen small strips of starboard for the tank to lay on. Sanded down and painted the original wedges and cross pieces, as they were all in great shape, if discolored and ugly. Did not use rubber under the cross members as that was where the original tank fared the worst. Epoxied deck with West Systems Six 10 epoxy and weighted it down. Next is grind, glass, and a little white paint (even though this will not be seen again unless the console gets removed.) Happy to be on the backstretch for this project. But I am now trying to figure out whether I undertake new switches and dash.... Or, since I can really just plug the electrical harnesses together and go, do nothing except put something on the fake wood photo on the dash material...
Attachments
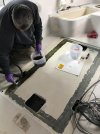
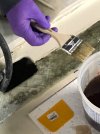
I found the deck patch was absolutely solid to stand on with just the West System Six 10 we used the other day. But, since I always overbuild... we ground around the seam and glassed in two layers of 17oz biaxial fiberglass cloth. Wetted and rolled out. (well actually the first pot kicked before we got one long side done due to a little fuzzy math....) But that biaxial stuff has to be bulletproof! Wish they had that when I was younger. Ripped out the Jensen stereo/CD player and the amp. A small blue tooth speaker on the dash will fit the bill... More progress.
Attachments
Deck repair is complete, sanded and painted, even though the console covered the opening completely. I will post a pic of that before the console went back in, for prosperity. Because I do not see me ever having a reason to pull it out again.... This week we (the crew) will hook up new steering, plumbing and wiring. Red LED lights were installed above the rod holders on either side facing downward for more courtesy lighting. So except for new lighting, all the money spent will be unseen....