1993 GW 209 Rehab

dainlaroche

Well-Known Member
Joined
Jan 29, 2013
Messages
55
Reaction score
16
Points
8
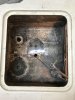
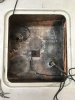
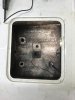
Last year I bought a 1993 Grady White 209 from the original owner and I’ve been rehabbing it over the winter. I’m at the point where I need some advice. I’ve replaced all the hoses and through hulls, am replacing and resealing the aluminum transom cap, recaulking seems, replacing inspection plates, polishing hull to remove oxidation, new radio and antenna, rewiring and filling holes. There were two transducers not needed anymore (old depth gauge and paddle wheel speedometer) that I’m eliminating. There are two depth transducers I want to keep (one for Garmin chart/fish finder and one Northstar fish finder). The garmin (airmar) transducer is staying put but I thought to relocate the northstar one closer to the center line and aft next to the airmar, then glass in the two forward holes. I would need to enlarge the aft hole a bit and it would end up being 3” apart (edges) from the other. This would also keep it out of line with the roller bunk wheels. Other than creating more work for myself, I’m concerned that if I move it and enlarge the hole I’ll be weakening that area of the hull (it’s about 3/8” thick). Although the transducer shot off at a bit of an angle in the previous forward position, I didn’t notice it and the trailer wheels never damage it (I think it floats past). So, any suggestions on whether to leave it where it is (top left of pic) and glass in the aft hole (top right side of pic) or move it aft and glass in the forward hole (top left side of pic). Anything else I should consider when patching these holes? One question I had was whether to grind a 12:1 taper on just one side of the hull or both before I glass?

Thanks for any assistance you may give.
 

Attachments

  • 6FA4F66F-0C2B-4042-BAC6-EFA0C2F8DB83.jpeg
    6FA4F66F-0C2B-4042-BAC6-EFA0C2F8DB83.jpeg
    1.6 MB · Views: 28
  • 1DDF4A98-0F88-4D2E-8631-02C30DE6FA16.jpeg
    1DDF4A98-0F88-4D2E-8631-02C30DE6FA16.jpeg
    722.9 KB · Views: 27
Last edited:

HookUp

Well-Known Member
Joined
Sep 27, 2007
Messages
236
Reaction score
61
Points
28
Model
Adventure
I own a 208 of the same vintage and cant help with any of your questions, but man I would kill to be able to put my boat in my own garage and work on it :)

Good luck with the re-hab - You're gonna have a great boat
 

seasick

Well-Known Member
Joined
Aug 19, 2008
Messages
9,166
Reaction score
1,318
Points
113
Location
NYC
Enlarging the hole won't weaken the area at all I suspect. I would make sure that you aren't going to create turbulence from on x-ducer to the other though. The x-ducer that is an an angle to the sea floor probably needs a wedge block of the appropriate angle.
Tapering on the inside is not necessary. All that aside, I do wonder if the effort as well as the possibility that new issues might pop up are worth it. What really are you gaining. Note that you can always move the rollers a bit if needed
 

dainlaroche

Well-Known Member
Joined
Jan 29, 2013
Messages
55
Reaction score
16
Points
8
Enlarging the hole won't weaken the area at all I suspect. I would make sure that you aren't going to create turbulence from on x-ducer to the other though. The x-ducer that is an an angle to the sea floor probably needs a wedge block of the appropriate angle.
Tapering on the inside is not necessary. All that aside, I do wonder if the effort as well as the possibility that new issues might pop up are worth it. What really are you gaining. Note that you can always move the rollers a bit if needed
Thanks. I decided to leave them where they are but glassed over the two unused holes. I beveled the topside 12:1 and the bottom closer to 6:1 so the hole was completely sealed over from both sides. I used biaxial fabric and through a few extra layers on the topside for good measure, reinstalled the transducers with 4200 and will paint the bilge. Taking everything apart and resealing is good for on-water confidence. A pain, but well worth it.
 

Attachments

  • C23F436B-A505-4B46-9E3D-E73C69055842.jpeg
    C23F436B-A505-4B46-9E3D-E73C69055842.jpeg
    1.7 MB · Views: 9
  • C8E6BFC8-68FA-45ED-B740-E1136D1D9AEC.jpeg
    C8E6BFC8-68FA-45ED-B740-E1136D1D9AEC.jpeg
    1.7 MB · Views: 9