2001 Sailfish Transom - How to Access for Rebuild?

Bretts02

Member
Joined
Oct 2, 2020
Messages
20
Reaction score
3
Points
3
Age
40
Model
Sailfish
Hey Fellas,

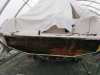
I've been lurking here for the last month since I bought a 2001 sailfish, amazing forum. Long story short - the surveyor that inspected the boat said the transom looked/sounded sturdy, no flex when jumping on the motor, had some life left in it, but wasn't pristine and definitely showed signs of they typical rot/delamination starting. My plan was run this boat for a few years until time for repower and take care of the transom then.

Fast forward to today - the 3-4 trips i put on the boat, plus trailering it, and the transom has shifted since initial inspection. I'm not ok with this and plan to do the transom rebuild over the winter.

My question is this: what is the best way to access the core on this boat. Access from inside looks really tough, even if i cut open a larger access panel just forward of the transom i'm going to be very limited in access. I could cut the whole deck open further forward, but an really worried about how well it goes back together. From the outside access appears to be much easier, with my main concern being the trim tab pockets, not sure exactly how they're integrated into the transom.

I'm really interested in your thoughts on where to cut the boat open to get access. The motors will be coming off one night this week and by the weekend i'd like to start the 'demolition phase'

My observations

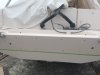
1. Cut aluminum trim cap away some - looks like some sections of the transom is pulled back by about 5/8"
2. The outer/lower engine mounting bolts have pulled through the inner skin by at least 3/8". The inner lower bolt on each motor is fine and the uppers are fine.
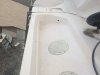
3. It looks like core has delaminated from the inner skin in some places. Guessing once the motors get unbolted i'll see the whole area separate.
4. I've drilled a few holes in the transom and the wood is dry now, but clearly this thing got full of water and froze a few times.
pic1.jpgpic2.jpgpic3.jpgpic4.jpgPic5.jpgPic6.jpgPic8.jpg


Thanks
Brett
 

VeroWing

GreatGrady Captain
Joined
May 21, 2009
Messages
430
Reaction score
22
Points
18
Location
Vero Beach, Fl.
I did a 22' Seafarer transom recore from the inside by cutting in roughly center of splash area floor completely from from under the gunwale side to side and removing section towards the transom. This gave me a clear working area from inside of the hull without interrupting the integrity of the outer factory hull. After removing old core material and sanding/cleaning inner transom, I made template from cardboard leaving 3/4" around sides and bottom and then cut marine plywood coated with epoxy resin, and attached1 layer at a time, using an epoxy mixed with sawdust applied wit floor trowel to adhere to inner transom, using clamps, screws through existing outer hull holes, lengths of wood, etc, pushing against new attached layers and cockpit areas, to secure layer in place to setup. Next day I would do it again with next layer. Each layer had to be cut in sections, (2 or 3) to fit into place. That is not an issue, just be sure to stagger cut areas on each layer. After final layer, I mixed more expoxy resin with sawdust and filled in all around perimeter of new core to in hull, and adhere removed splash area back into place. Lot of work, but stronger than new.
 
  • Like
Reactions: PointedRose

Bretts02

Member
Joined
Oct 2, 2020
Messages
20
Reaction score
3
Points
3
Age
40
Model
Sailfish
Thanks Vero,

Any pictures? After cutting out the splash area could you get access far enough to each side? I'm worried that even after i cut the splash well out i won't have access to the far side of the 2nd set of stringers. It definitely provides great access for the center portion of the transom though.
 

Fishtales

Well-Known Member
Joined
Jan 31, 2005
Messages
7,612
Reaction score
1,187
Points
113
With the eurotransom, I think I'd go through the external side of the hull. Access is a PIA.
 

ScottyCee

Well-Known Member
Joined
Feb 11, 2020
Messages
456
Reaction score
86
Points
28
Location
Samish Island, WA
Model
Sailfish
I'm going to be prepared do my '98 272 over the next few years too - doesn't need it yet, but that day may come.

It looks like there is a factory joint / panel connection at the bottom of the panel that has the seat molded into it. I was thinking of cutting it loose there (under the vinyl trim strip)and just separating it on the sides at the rub rail. It would be a big piece to remove and replace, but access would be huge. That's an early plan without much knowledge - no idea how much work that would actually be.
 

Bretts02

Member
Joined
Oct 2, 2020
Messages
20
Reaction score
3
Points
3
Age
40
Model
Sailfish
K2,

I took a look at cutting it there today. That's a BIG section of boat to remove. The more I look at it the more I think I'm going to go from the back and maybe reinforce the stringers & motor mounts on the inside skin by cutting out the splashwell for decent access. I'll take pictures so you can benefit from my mistakes.

Thanks
Brett
 

ScottyCee

Well-Known Member
Joined
Feb 11, 2020
Messages
456
Reaction score
86
Points
28
Location
Samish Island, WA
Model
Sailfish
I was thinking that it is already in two sections everywhere except at the port gunwale ahead of the live well, so that would be the only "new" cut. I'm making the assumption that it's easier to work with the areas that they were joined at the factory than it would be to repair (nicely!) my own cuts. This could definitely be wrong. But I love the idea of reconnecting the halves where they were originally joined. Also, I need to get in there area rebuild the entire battery and fresh water tank area, and as you know that isn't much fun due to accessibility. That said, I haven't ever taken my live well out yet - that is supposed to be the key to access those areas back there...
 

Bretts02

Member
Joined
Oct 2, 2020
Messages
20
Reaction score
3
Points
3
Age
40
Model
Sailfish
Do you have a picture of where you're talking exactly? Sure sounds like what you're describing would be a convenient way to go about it, but i don't see factory seam anywhere.
 

ScottyCee

Well-Known Member
Joined
Feb 11, 2020
Messages
456
Reaction score
86
Points
28
Location
Samish Island, WA
Model
Sailfish
I'm talking about the floor line at the extreme rear of the cockpit. Mine has vinyl trim on it, and when I changed it out this year it was clear that there is a factory joint under there. From memory (questionable at best) it looked like it goes from the upper starboard side of the sea door to the lower port side of the cockpit floor - all of this is under trim except the side by the sea door. I'll have to look again. Picture is small, but I outlined the trim that the joint is under. I'm hoping that someone who has done this will chime in. Sailfish is a popular model...joint.jpg
 
Last edited:

Stephnic

Well-Known Member
Joined
Apr 24, 2017
Messages
174
Reaction score
52
Points
28
Location
Somers Point NJ
Model
Islander
Here is the cut on my 1998 Islander 268. It was cut on the outside.
 

Attachments

  • D691F024-9510-4DFA-B9BF-58570276F92F.jpeg
    D691F024-9510-4DFA-B9BF-58570276F92F.jpeg
    226.8 KB · Views: 10

ScottyCee

Well-Known Member
Joined
Feb 11, 2020
Messages
456
Reaction score
86
Points
28
Location
Samish Island, WA
Model
Sailfish
That looks really clean. And they left the edges in place so that it was probably easy to get the exact same shape. I watched some videos on transoms and one of the ideas that was pushed was to leave the outer layer of glass in place if possible. That looks good too though...
 

Bretts02

Member
Joined
Oct 2, 2020
Messages
20
Reaction score
3
Points
3
Age
40
Model
Sailfish
K2 - i just went and looked, i see what you're saying, that does look like you'd be cutting very little fiberglass to get that section off. Have you looked how that whole section is attached to the main deck? I will dig into that idea tonight. Weould be really nice for working on getting the bilge and fuel tank area cleaned up a bit as well. FYI - for getting that live well up from the side, mine was glued in with WAY too much. I took razor blade and heat gun, went around the perimeter. Took a few hours to get it free. Once free you do have really good access to the oil tanks and some access to water lines.

Stephnic - How did that go in the end, working from the outside? Looks like the transom of that boat is very similar to the sailfish.
 

Stephnic

Well-Known Member
Joined
Apr 24, 2017
Messages
174
Reaction score
52
Points
28
Location
Somers Point NJ
Model
Islander
They are pretty much all the same. it came out great and i removed the bang strip that Grady put on and glassed it completely closed. Here are some pictures before the new motors went on.
 

Attachments

  • 1C01B367-C76E-4F5C-A2C6-F5F68955BBBE.jpeg
    1C01B367-C76E-4F5C-A2C6-F5F68955BBBE.jpeg
    530.8 KB · Views: 10
  • E3B642C8-F181-4F32-98DE-D8FA9DC095C3.jpeg
    E3B642C8-F181-4F32-98DE-D8FA9DC095C3.jpeg
    475.2 KB · Views: 10
  • Like
Reactions: Pat Hurley

ScottyCee

Well-Known Member
Joined
Feb 11, 2020
Messages
456
Reaction score
86
Points
28
Location
Samish Island, WA
Model
Sailfish
Nice work. Very nice. I'm looking forward to this project for some strange reason...

So, the question will be how are the two halves connected under the rub rail. Again, the idea of having the work mostly happen where it will be hidden greatly appeals to me, but there are almost certainly things that are not yet apparent. I look forward to hearing about what you learn...
 

Bretts02

Member
Joined
Oct 2, 2020
Messages
20
Reaction score
3
Points
3
Age
40
Model
Sailfish
Stephnic,

that really looks fantastic, nice job. Anything major you learned along the way you can share? You've convinced me to do this from the outside.
 

ScottyCee

Well-Known Member
Joined
Feb 11, 2020
Messages
456
Reaction score
86
Points
28
Location
Samish Island, WA
Model
Sailfish
I took a better look look at it today, and I think I agree. I’m gonna have to cut out the back deck section as well but that’s probably a lot less work all told.

I put on what I thought was a reasonable search for rub rail ends last summer and found nothing. If anyone comes across those that I’d be interested to know. At this point I’m thinking I’m just gonna cut my own out of 1 1/2” stainless steel tubing. Lot of work for something I’d be happy to pay 30 or 40 bucks for. LOL
 

Bretts02

Member
Joined
Oct 2, 2020
Messages
20
Reaction score
3
Points
3
Age
40
Model
Sailfish
Here’s my progress so far. Motors are off and the fiberglass trim piece has been removed. The aluminum bracket looks straight and solid but there are big sections of the transom that have come delaminated from inner skin. It’s especially bad just to the outside of the splashwell, almost above the trim tab pockets. I’m really nervous about cutting into those pockets to get the outer skin off. Anyone know how those pockets are constructed72DA7EFB-E8BB-4FE5-9148-20208B9E5879.jpegD7A7C0FB-E6A7-4B13-8A8C-B1B4A0FC2F11.jpeg
 

Bretts02

Member
Joined
Oct 2, 2020
Messages
20
Reaction score
3
Points
3
Age
40
Model
Sailfish
Here is where I’m at. Pulled about half the core out before I got tired of the work. I’m going to cut access holes so I can remove the lifting eyes and take the cutout wider as the wettest bits are directly over the trim tab pockets so I’m guessing the core outside of the pockets is soaked too. For the pockets I’ve decided to cut just inside of the outer radius and try to keep the fiberglass skins in place, but we’ll see how that goes. Anyone have better plan on the trim tab pockets?

DFFA8B8A-C80F-4634-A695-9492333FD360.jpeg
 

HTHM

Well-Known Member
Joined
Oct 6, 2019
Messages
150
Reaction score
41
Points
28
Age
62
Location
Mount Hope, On, Canada
Tough job, eh? When you are done getting the wood out, I would suggest using a wire wheel on the inside skin to rough it up prior to "peanut buttering" the new transom in. That will give the resin more surface to bind to. As well, I would suggest that you layout and drill out any penetrations that will occur in the new transom, about 1/2" oversize and fill those holes with peanut butter. That way when you install the new mounting bolts, transducer etc., the fasteners will not expose the wood to moisture. Also, I would suggest that you use resin to laminate the plywood layers of the new transom together rather than wood glue.
Looks good so far!