Hey guys, i got a 2005 f250 yamaha motor, im getting this oil leak somewhere on top dripping down to the valve cover Left side of the engine, cant seem to locate where attached a pic, any help would be appreciated. Mechanic quoted me $500 for the part but wont tell me what it is. It does look like its coming from under the camshaft gear.

You are using an out of date browser. It may not display this or other websites correctly.
You should upgrade or use an alternative browser.
You should upgrade or use an alternative browser.
2005 f250 yamaha oil leak
- Thread starter minhT1
- Start date
Sparkdog118
Well-Known Member
- Joined
- Apr 8, 2020
- Messages
- 638
- Reaction score
- 135
- Points
- 43
- Age
- 56
- Location
- Ft Myers, fl
- Model
- Offshore
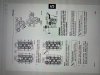
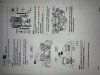
I bet it is your cam seal. #21 in the pic. Not hard to change. You have to remove the belt and the gear. Then you can dig it out and pop in a new one. I can post the procedure if you are wanting to tackle it yourself. Retiming is easy.
Yes please if you can post the procedure, if its easy enough, I'll try it.I bet it is your cam seal. #21 in the pic. Not hard to change. You have to remove the belt and the gear. Then you can dig it out and pop in a new one. I can post the procedure if you are wanting to tackle it yourself. Retiming is easy.
thanks
HMBJack
GreatGrady Captain
Sparkdog nailed it. I had the exact same leak on my 2006 F250.
If you see oil pooling up top near that area, you know what to do.
Your Mechanic isn't telling you anything because he knows you could probably do it and he wants your money (just my guess).
If you see oil pooling up top near that area, you know what to do.
Your Mechanic isn't telling you anything because he knows you could probably do it and he wants your money (just my guess).
Sparkdog118
Well-Known Member
- Joined
- Apr 8, 2020
- Messages
- 638
- Reaction score
- 135
- Points
- 43
- Age
- 56
- Location
- Ft Myers, fl
- Model
- Offshore
Here are some pics of the procedure.
Attachments
-
 0E3D5681-C425-46FC-B129-48FD513A5716.jpeg342.2 KB · Views: 17
 -
 CDE13834-FC20-4FD8-BA65-A53A34CCC852.jpeg442.6 KB · Views: 13
 -
 7070F585-4C5D-4FF0-8FBB-1428EFA05EAD.jpeg416.4 KB · Views: 10
 -
 EE6A4444-BDD9-43EB-9A2B-8CAAB846404C.jpeg408.6 KB · Views: 9
 -
 548BB688-61EC-40FA-9B8F-C117A7150D82.jpeg434.2 KB · Views: 9
 -
 65E7D4DC-9CEB-4441-BB4E-3CB7966E67B9.jpeg389 KB · Views: 8
 -
 549C1E83-4B68-4CAA-B5A7-69384DF73D7C.jpeg438 KB · Views: 7
Sparkdog118
Well-Known Member
- Joined
- Apr 8, 2020
- Messages
- 638
- Reaction score
- 135
- Points
- 43
- Age
- 56
- Location
- Ft Myers, fl
- Model
- Offshore
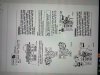
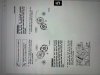
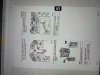
This is the assembly procedure. Some of the info here you don’t need. You are only taking off the cam gear that is leaking. Before you remove the belt, put the engine at 0 deg tdc #1 cyl. Take note of the timing marks for all pulleys. Take many pics. Sometimes I mark the belt tooth and pulley tooth with white out on all the pulleys and just put them back together the same way. Make sure the flywheel pointer is at zero while marking and only turn the flywheel in a clockwise direction. If you overshoot zero, go around 2 more revolutions clockwise to get your marking position. Never back it up to zero, even slightly. When you get to zero, notice the arrows on all the pulleys. If they resemble the position of the timing procedure pic in the manual, mark the belt now. If they don’t, go 1 revolution and check the marks again. Basically the idea is to put every male timing belt tooth back into the same female tooth of the gear. (Keeping the flywheel locked on zero.)
Once you remove the belt, use an electric battery impact to remove the bolt that holds the gear to the top of the cam. Hold the gear in place and zip out the bolt. Gear will lift off and the seal is right under the gear. Dig it out with a flat screwdriver carefully not to scrape the cam gear or the outer aluminum housing of the head. Then clean up the area that the seal was in with brake cleaner and a rag. Then put the new seal in with a small piece of pvc pipe that is the same diameter of the seal. Should slide in easily. I sometimes use 3m 847 sealer On the outside of the seal between the seal and the aluminum. Also grease up the seal spring. Install spring down.
now put the gear back on. Tighten up the bolt with 271 locktite with the electric impact while holding the gear steady. They say to use a special tool and torque it, but that is one of the bolts that just need to be tight and locked with locktite.
While doing these procedures, be sure not to turn anyof the gears including the one you are working on.