I changed all 4 cables yesterday. I couldn't find any specific guidance on the Marlin so hopefully this helps someone else out. It took me 5 or 6 hours but that included pulling more panels off than I needed too, trying to figure out how to disassemble the throttle, etc. I emailed Grady White and they said I needed 24 and 26 foot cables so that's what I bought. They were the perfect size and exactly what came out of the boat. The only panels I needed off were one by the bunk under the stairs, the corner assembly under the throttle, and the hatch in front of the generator.


There is a tube that starts at the fwd panel in the bunk and runs to the generator area. I saw this and felt a lot better about doing this at home. The first thing I did was remove the little access panel on the motor and free up the wires routed through the grommet. I disconnected the throttle and shift cables from the motor and fed them back toward the helm to get some slack. I had to cut a few zip ties near the generator. I pulled the 704 remote control out and took it apart. 2 screws on the bottom and a few plastic tabs hold the plastic cover on. I had 4 screws with nuts on the backside that hold it on the dash. There are three screws that hold the two throttles together. One at the bottom and two at the top. It took me forever to figure which screws to remove.


There is a small plastic piece that is held on with 2 screws and then you see the cable ends. I tried to match the cables I was installing with the ones I was removing. You can see the shift cable threads through the plastic end but not the throttle cable. I used fishing line (60lb test if you're curious) to tie the cable together and used electrical tape over it. I had my wife feed the new cable down through the console and past the floor where the first hangup could be.

One kid went down to the bunk and guided the cable transition through the tube and the other watched for anything at the tube exit and in the generator bay.
 Cables going through or around the floor.
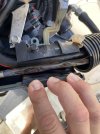
 Tube entrance. The black cables are the new ones.
Once I had both cables for the starboard side through I connected them at the controller and then did the other side. Reinstalled the controller and connected everything back up. I still have to adjust the throttles and put all the panels back but over all this was a pretty easy job. I'm no expert but hopefully this helps someone out there.
There is a tube that starts at the fwd panel in the bunk and runs to the generator area. I saw this and felt a lot better about doing this at home. The first thing I did was remove the little access panel on the motor and free up the wires routed through the grommet. I disconnected the throttle and shift cables from the motor and fed them back toward the helm to get some slack. I had to cut a few zip ties near the generator. I pulled the 704 remote control out and took it apart. 2 screws on the bottom and a few plastic tabs hold the plastic cover on. I had 4 screws with nuts on the backside that hold it on the dash. There are three screws that hold the two throttles together. One at the bottom and two at the top. It took me forever to figure which screws to remove.
There is a small plastic piece that is held on with 2 screws and then you see the cable ends. I tried to match the cables I was installing with the ones I was removing. You can see the shift cable threads through the plastic end but not the throttle cable. I used fishing line (60lb test if you're curious) to tie the cable together and used electrical tape over it. I had my wife feed the new cable down through the console and past the floor where the first hangup could be.
One kid went down to the bunk and guided the cable transition through the tube and the other watched for anything at the tube exit and in the generator bay.
Cables going through or around the floor. Tube entrance. The black cables are the new ones.Once I had both cables for the starboard side through I connected them at the controller and then did the other side. Reinstalled the controller and connected everything back up. I still have to adjust the throttles and put all the panels back but over all this was a pretty easy job. I'm no expert but hopefully this helps someone out there.

")