268 Islander Fuel Tank Replacement

Hookup1

GreatGrady Captain
Joined
Oct 16, 2007
Messages
2,625
Reaction score
717
Points
113
Age
69
Location
Cape May, NJ
Model
Islander
Decided that this is the year to replace my 25 yo fuel tanks. No leaks. I plan to keep the boat. I'll document the process here.

Pulled the hatch. This hatch was rebuilt a few years ago with Coosa board. Looks good and feels solid. Hatch was set with 3M 4000 - kept everything sealed. Some difficulty cutting with blade to get it up. Not sure what it will go down with. Deck ports were caulked in from the underside as well. Kept the tanks dry.

1 Rebuilt hatch.jpeg

I also put plastic over the fill, sending unit and pickup. This deflects any water away from the busy area of the tank.

2 Tanks uncovered.jpeg
Tank labels and drawings.
3 Main Tank tag.jpeg 4 Aux Tank tag.jpeg 72 Gal 268.jpg 134 Gal 268.jpg
 
Last edited:
  • Like
Reactions: A&J Outdoors

Hookup1

GreatGrady Captain
Joined
Oct 16, 2007
Messages
2,625
Reaction score
717
Points
113
Age
69
Location
Cape May, NJ
Model
Islander
Aux tank is easy to pull. It lifts out. Main tank is a challenge. Bulkhead has to be cut out and steps cut out. Slide tank back and tilt out. (hopefully!).

5 Cut Step.jpeg

Fill and vent hoses are accessible on Starboard side deck port. I can get a hand on the hoses. They run 90 degrees across to the main tank. They turn back about 2' and come into aux compartment. They don't feel like they are anchored. Need to get the camera in there to confirm.

Requested quotes and lead times from Patriot Marine in Forked River, NJ and SP Tanks in Clermont, NJ.
 

Ekea

Well-Known Member
Joined
Aug 11, 2020
Messages
439
Reaction score
137
Points
43
Age
38
Location
Mid Atlantic
Model
Chase
following. this may be my winter project. if the quotes and tanks are good i may use one of them. do you plan to leave bare aluminum, or coat with something like coal tar epoxy?
 

Hookup1

GreatGrady Captain
Joined
Oct 16, 2007
Messages
2,625
Reaction score
717
Points
113
Age
69
Location
Cape May, NJ
Model
Islander
following. this may be my winter project. if the quotes and tanks are good i may use one of them. do you plan to leave bare aluminum, or coat with something like coal tar epoxy?
The tank will be epoxy coated.

When hatch was lifted there was no gas smell. Top of tanks were clean Very little water in the compartment. Had a friend stop by this morning. He thought the tanks were in very good shape based on his experience. I may scale this back and only do the Aux tank and new hoses all around. I'm going to pull the Aux tank which should be the worst of the two and inspect it. Depending on what I find will determine how far I'll go.
 

DogBone

GreatGrady Captain
Joined
May 23, 2013
Messages
57
Reaction score
14
Points
8
Location
Tampa Bay
Model
Gulfstream
If your tanks are in good shape with no holes, clean them well and encapsulate the entire tank in one layer of fiberglass and West System epoxy. An experienced boat builder gave me that advice. He said they will last forever with that protection.
 

Hookup1

GreatGrady Captain
Joined
Oct 16, 2007
Messages
2,625
Reaction score
717
Points
113
Age
69
Location
Cape May, NJ
Model
Islander
Anyone fill their tanks with inert gas before removing them or working on them? Dry ice seems the easiest way to do that.
 

Ekea

Well-Known Member
Joined
Aug 11, 2020
Messages
439
Reaction score
137
Points
43
Age
38
Location
Mid Atlantic
Model
Chase
Anyone fill their tanks with inert gas before removing them or working on them? Dry ice seems the easiest way to do that.
for what reason? i read a thread about a guy that needed to cut his tank to get it out (was worried about sparks) and he drained, added a few dozen gallons of water in it, drained it again, let it sit for a day, and ran a leaf blower in it to blow out any remaining fumes, let it sit for a day before cutting. it worked well enough for him to live to write about it after
 

Hookup1

GreatGrady Captain
Joined
Oct 16, 2007
Messages
2,625
Reaction score
717
Points
113
Age
69
Location
Cape May, NJ
Model
Islander
for what reason?
Why? When you start the process of cleaning the nearly empty tank that still contains some fuel and plenty of oxygen you are at the most dangerous point.
i read a thread about a guy that needed to cut his tank to get it out (was worried about sparks) and he drained, added a few dozen gallons of water in it, drained it again, let it sit for a day, and ran a leaf blower in it to blow out any remaining fumes, let it sit for a day before cutting. it worked well enough for him to live to write about it after
I'm not going to stake my life on some internet jackass wannabe (not you - the thread you are referring to). Water and gas don't mix and really a leaf blower?! People work with open tanks all the time and live to tell about. A friend of mine blew himself up earlier this year changing a bilge pump under the shrink wrap. Fortunately he lived to tell about it after he got out of the burn center they airlifted him to.

Filling the tank with CO2 or nitrogen will displace the air in the tank. Much safer to work on then.
 
Last edited:
  • Like
Reactions: A&J Outdoors

Hookup1

GreatGrady Captain
Joined
Oct 16, 2007
Messages
2,625
Reaction score
717
Points
113
Age
69
Location
Cape May, NJ
Model
Islander
I wouldn't try this at home but is demonstrates how effective dry ice CO2 is at preventing ignition.

 
Last edited:

Hookup1

GreatGrady Captain
Joined
Oct 16, 2007
Messages
2,625
Reaction score
717
Points
113
Age
69
Location
Cape May, NJ
Model
Islander
Started to dig in and investigate removing the tanks today starting with the Aux/Aft tank.

Tanks were pumped out using my automotive fuel pump. I then added dry ice (Acme $2/lb.) to fuel fill. Pulled sending unit and added more dry ice. Inserted a 3/8" copper pipe into fuel fill and pumped out remaining fuel - not much left at all. Added more dry ice, cut fill hose and quit for the day..

The tank fill/vent hoses cut over to the Starboard side. They don't appear to be secured under the deck. Generous amount of clear silicone serves as fire stop. The access port on the Starboard side has reasonable access. Hoses go up to vented fuel fill. If I decide to changes these hoses out I will have to cut out a rectangle on the inside of the gunnel. The fuel fills have machine screws and locknuts. Also the hoses are clamped with stainless clamps. No access to work on them. It's not a big deal - I'll decide later.

10 Tanks Before.jpeg

12 Access to Fill.jpeg 13 Fill Access 2.jpeg 14 Fill Access 3.jpeg

All fuel supply lines were removed - replacing all of them. All blocking removed. Had to cut the fuel fill hose off - wire reinforcing. I'll probably replace these hoses too but they can be spliced if I decide to use them.

Tank is loose. I'll slide straps under tank in the morning and pull it.

Next will be the forward/main tank. Stay tuned!
 

Attachments

  • 11 Tanks After.jpeg
    11 Tanks After.jpeg
    1,007 KB · Views: 60
Last edited:

Hookup1

GreatGrady Captain
Joined
Oct 16, 2007
Messages
2,625
Reaction score
717
Points
113
Age
69
Location
Cape May, NJ
Model
Islander
Main tank access/removal: The helm has a large rectangular hatch. Haven't removed it yet. Inside the 8" access port you can see the water tanks. There are two 8" access ports in there as well. They seem to align with the blocking that holds the tank in. Water tank has to be pulled to see in there are more access ports (I expect 2 more forward). The forward end of the aft tank presses up against some 1" neoprene strips and the forward bulkhead. I expect the forward tank to be the same.

When the aft tank is removed the bulkhead has to be cut out. When repairing the cutout will be re-installed (hole in middle) so it can be glassed in. Then the cutout re-installed. Then a full with reinforcing bulkhead glassed in. Aft tank will need to be cut back about 1".

It is unknown if the tank will come out. The step may have to be cut. Worst case I'll chainsaw the tank and install a shorter one. Quick math says I'll be around 150 gallons vs. 205.
11 Tanks After.jpeg
 
Last edited:

Hookup1

GreatGrady Captain
Joined
Oct 16, 2007
Messages
2,625
Reaction score
717
Points
113
Age
69
Location
Cape May, NJ
Model
Islander
Got the tank out today. Going to replace it. Thousand white spots that are the beginning of pin holes. Left edge of this photo is the aft end of the tank. Two larger areas of oxidation. Couple of others along the welds front to back. You can actually feel the missing metal.

Based on the aft tank I'm going to do the forward tank.

15 Old Tank.jpeg
 
Last edited:

Hookup1

GreatGrady Captain
Joined
Oct 16, 2007
Messages
2,625
Reaction score
717
Points
113
Age
69
Location
Cape May, NJ
Model
Islander
Next day in the salt mine. Pulled hatch in helm area. Removed fresh water tank. Pulled the white blocks on the fuel tanks (4). Two from the cockpit and two under 8" deck plates near water tank. Prepped the fuel tank with dry ice. Got about 1/2 gallon of fuel out using copper tubing and my automotive fuel pump. It amazes me that the tank pickups can get that much fuel out if the boat is positioned correctly.

16 Tank Out.jpeg

Quick look at drains for both fuel cells - none found. Need to be looked at in more detail but there doesn't seem to be any! Any water that gets in or if someone washes the tanks will be trapped. Same with condensation or leaking deck ports. The GW strategy likely changed over time but for 1997 this is what I see.

Also the neoprene rubber strips that GW used to raise the tanks compresses and comes loose. You can see them in the aft compartment. The white blocks they used probably were flush to the tanks in 1997 but today the tanks are down 1/2" to 3/4". For the most part the bottom of my tanks are/were wet most of the time. Not much water in there - just enough!

Tomorrow I start to look at my options for getting the forward main tank out. Bulkhead has to be chainsawed out. As is tank can not come out of the existing opening.
 
Last edited:

seasick

Well-Known Member
Joined
Aug 19, 2008
Messages
9,145
Reaction score
1,312
Points
113
Location
NYC
Tank coffins were sealed on purpose so that in case of a fuel leak, the coffin will contain the liquid and not fill the engine compartment with gasoline. I am nor sure if that was a requirement for inboard engines and got carried over to all engine options.
The more recent owners manuals suggest that the tanks be rinsed off occasionally through the access plates. In the case of a sealed coffin, that could be an issue if the tanks are rinsed and not dried out before reinstalling the access plates.
On another topic, neoprene if installed in contact with a meta tank is not a good choice for mounting strips since it contains carbon. As the material ages it will leach carbon which will can accelerate tank electrolysis when in a moist environment..
 

Hookup1

GreatGrady Captain
Joined
Oct 16, 2007
Messages
2,625
Reaction score
717
Points
113
Age
69
Location
Cape May, NJ
Model
Islander
Tank coffins were sealed on purpose so that in case of a fuel leak, the coffin will contain the liquid and not fill the engine compartment with gasoline. I am nor sure if that was a requirement for inboard engines and got carried over to all engine options.
The more recent owners manuals suggest that the tanks be rinsed off occasionally through the access plates. In the case of a sealed coffin, that could be an issue if the tanks are rinsed and not dried out before reinstalling the access plates.
On another topic, neoprene if installed in contact with a meta tank is not a good choice for mounting strips since it contains carbon. As the material ages it will leach carbon which will can accelerate tank electrolysis when in a moist environment..
I tried to get an answer from GW and owners on GG on the sealed fuel compartment. Conflicting answers. I thought the reason they did seal the compartment was to keep a leaking tank from filling the boat's bilge with fuel. Make sense to me. I have to look closer at my boat. In the aft bilge you can see the 1" PVC that connects the forward and aft bilge compartment in this pipe (mine may be broken - freeze damage). Bilge water flows under the fuel compartment. Next to it is a plugged hose. This may be how the fuel compartment can be drained. I did not see a drain hole between the forward and aft fuel compartment. Once the forward tank is out and on order I need to check all this out.
Aft bilge 268.jpeg
If you were to rinse my fuel tanks thru the deck access plates water will remain in the compartment and not drain. You can not see the bottom of the compartment and can not get a hose down there to pump it out. The only way to clean the tanks and get the water out is to pull the deck hatch. SKUNKBOAT does his that way every year.

I spoke to Patriot Marine about neoprene vs. rubber. He said do not use rubber because of the carbon. Neoprene is fine. He also recommends installing it using 3M 4000 directly on the tank. If you look at my tank in post #12 you can see where the black strips were (not sure what they use in 1997). Adhesive failed and they were under the tank. You can see where the dirt/oil line is. No real difference in tank corrosion except at the rear of the tank (left side of photo).

The tank has a flat bottom then it angles up 2" to the sides. The bilge only had a inch or so water in it. Where the tank made contact with the hull (buffer material compressed) the tank got rubbed, paint compromised and corrosion started. You can also see all the little "white spot" paint failures where corrosion is happening.
 
Last edited:
  • Like
Reactions: Jimsalv

seasick

Well-Known Member
Joined
Aug 19, 2008
Messages
9,145
Reaction score
1,312
Points
113
Location
NYC
My bad:)
I have to change my response. Upon further research is seems that neoprene is OK too use as a gasket for gas tanks as long as the neoprene is sealed between itself and the tank. In other words, the neoprene strips should be bedded in something like 5200. The sealing is necessary to preclude any moisture from getting trapped between the neoprene and the metal tank.
My earlier response stated that neoprene contains carbon, which it does, but the neoprene does not break down like other 'rubber like' materials and as long as the strips are insulated from the metal by the adhesive, things should be OK.
This article may be helpful

The recommended Haysite material may be hard to find. Several folks have had success using strips cut from sheets of thin fiberglass reinforced panels (FRP) they bought at the box stores. The sheets are thin so you may have to cut a lot of strips and glue them together to get the required thickness.
 
  • Like
Reactions: Hookup1

Hookup1

GreatGrady Captain
Joined
Oct 16, 2007
Messages
2,625
Reaction score
717
Points
113
Age
69
Location
Cape May, NJ
Model
Islander
Previously pulled the water tank under the helm. Today started with floorboards. Floor board held down by a few screws but otherwise loose. Unfortunately the factory stripped a few of them and some can not be gotten to. But there were only a few of them. Sawzall and cutoff tool and got the board loose. Then I find out the board is too big to come out of the opening!. Cut in half - problem solved. Two hours to get a 2' x 3' panel up!

EDIT 8/26 23: Forward floorboard was cut in half to get out. Added a 3/4" piece of plywood to aft floorboard, epoxy and screws from underneath. Sealed cut floorboards. Reinstalled with clear silicone forward to aft with screws. Aft floorboard can only be removed by cutting the step wide enough to get it out. There may be a vertical plywood tab that has to be cut. There is a third piece of wood under the step that has 2 access ports on it. It has to be sawed away from the step but it is not epoxyed down and can be re-used.

Tank was secured forward with the white plastic blocking. Doubt the tank would have came out without removing them first.

18 Tank Floor out.jpeg

Dumped an expired 5 lb ABC fire extinguisher in the fuel tank to make sure it's inert. Lifted it up with ratchet strap to the tower. Cut bulkhead out with circular saw and Sawzall. I like the Sawzall with long carbide blade. It follows the hull nicely.

17 Bulkhead out.jpeg

At this point the tank is loose and ready to come out. The step has to be cut and another floor board removed that covers the tank. This should allow the tank to be slid back to the rear bulkhead and tilted up and out.

By the way, if you look carefully you can see short piece of PVC that connects the main and aft fuel compartments. The other PVC probably connects the forward and aft bilges and bypasses the fuel compartments. I suspect this PVC is broken. Probably go to 1" reinforced vinyl hose tabbed in. On my list to check out after the tank is on order. This cracked bilge line is probably what cooked my fuel tank - compartment wet all the time. I'm sure I'm not the only one.

Also re-thinking two tanks. I'm going to wind up with a new 134 gallon main tank. I may not install a second tank. For my use case I don't need 206 gallons - 134 gallons is fine. Everything will be there (new hoses, valves, etc) for a second tank if I change my mind. One of those decisions I don't have to make now.
 
Last edited:

Hookup1

GreatGrady Captain
Joined
Oct 16, 2007
Messages
2,625
Reaction score
717
Points
113
Age
69
Location
Cape May, NJ
Model
Islander
Cut step. Removed remaining floor boards. It was a fight to the end - had to cut foam insulation off fish boxes.

The real secret to doing this project is knowing that the step has to be cut and the floor boards above the tank have to be removed. The tank can not be gotten out without the 9" of headroom the step cutout gives you. 1997 268 Islander. I'm not sure who sent me the picture I have of the cutout step but THANK YOU whoever it was.

19 Cut Step.jpeg 19-1 Cut Step.jpeg

The main tank not nearly as bad as the aux tank. Some oxidation and pitting along the foam insulator that was loose in the compartment. Especially bad on the aft end. Ordered a new forward tank. $1,641 for 134 gallon from SP Marine in South Jersey. Accessory items for installation too.

20 Tank Out 1.jpeg 21 Tank Out 2.jpeg
 
Last edited:

Hookup1

GreatGrady Captain
Joined
Oct 16, 2007
Messages
2,625
Reaction score
717
Points
113
Age
69
Location
Cape May, NJ
Model
Islander
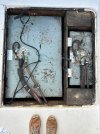
Next is to investigate the amount of water in the fuel compartment and how the drains should be working. The boat has a long 1/2" PVC pipe from the forward bilge to the aft bilge. There are 3 - 1" PVC connectors in each of the bulkheads - forward, center and aft (only aft one shown). I need to confirm there is a forward one.

268 tubing layout.jpeg

I expect to find a long pipe connecting the forward bilge to the aft bilge that bypasses (keeps dry) the fuel compartment. That pipe is there but may be freeze damaged. It also appears to be plugged in aft bilge. GW may have decided to isolate forward and aft bilges.

.Aft bilge 268.jpeg

There is no plug in the 1" PVC feed thru's (plastic limber holes??). Water can flow from the aft bilge forward. It would also allow a leaking fuel tank to put fuel in the aft bilge.

I would like the forward bilge to dry out and drain back. I'll have to see if that really happens when the boat is in the water. I am going to cap the fuel compartment. I'll be able to see how much water accumulates and contain fuel leaks (hopefully none with new tank).

Question to GW CS:
In the process of replacing fuel tanks. I need to know a few things about how GW handles the bilge under the fuel tanks.
First question is a 1/2" PVC pipe the runs thru the compartment. Does this connect forward and aft bilges and keep water out of the two fuel compartments? YES
Second question is a.) are fuel compartments separated (do they drain into each other? YES ) b.) do the fuel compartments drain into the aft bilge? YES unless plugged.


SP Sheet Metal said leave all the openings open. Let the water out of the compartment. The tank killer is water against the tank sandwiched between other material. Nitrile strips should be attached to the tank with 3M 4000 or 5200. When dry do all the edges. Nothing in contact with the tank that isn't 4000 or 5200'ed down - no voids. Look at both of the old tanks. The glue on the neoprene strips failed but stayed in place. You can see the corrosion line where the strip trapped water.

Investigated the drain hoses today. The long tube does connect the forward bilge with the aft bilge. This pipe runs thru the fuel compartment. GW plugged it though in the aft bilge. The forward end was open and crap got into the pipe. Had to cut the pipe and snake it out.

23b Plug.jpeg 23 Cut tubing.jpeg

The forward fuel compartment connects to the aft fuel compartment and that connects to the aft bilge. All thru 1" pipe couplings. This was not plugged although it could be to contain a leaking tank.

EDIT 8/26/23: the 1/2" PVC connects the forward and aft bilges. The 1" PVC is a short feed-thru connecting forward and aft tank compartments and another one connecting the aft fuel compartment and aft bilge. If you have the forward tank out snake out the 1/2" PVC and make sure forward bilge is squeaky clean and free of debris. Same with fuel compartments. Also make sure 1/2" PVC is intact and not freeze damaged. Fill forward bilge and observe fuel compartments - should be no water. You can decide if you want to plug the forward bilge PVC (mine was) or the fuel compartment to aft bilge (mine wasn't).
 
Last edited:
  • Like
Reactions: Stephnic and Chutch

Hookup1

GreatGrady Captain
Joined
Oct 16, 2007
Messages
2,625
Reaction score
717
Points
113
Age
69
Location
Cape May, NJ
Model
Islander
Baitwell fill hose and washdown hose replaced. Four new Duracell AGM's. Bilge scrubbed. Some re-wiring to finish.

25 Biat 4.jpeg

Next: Prepare for new bulkhead and glass work. Setup new fuel hoses. Tank should be ready next week.