272 Sailfish Cracks in Stringers

Richard1572

GreatGrady Captain
Joined
Apr 26, 2008
Messages
59
Reaction score
9
Points
8
Location
Homestead, FL
Model
Sailfish
I’m replacing all my nylon thru hulls and scuppers with stainless ones and while down inside the bilge saw these cracks in the “stringers” that the metal transom reinforcing brackets are bolted to. It’s a strange "stringer" in that its only about 12 inches long and tabbed into the trim tab pocket, not a full-length stringer. Jumping up and down on the engines and transom I don’t see any movement. Thoughts? Anyone else had this happen? The next step is I’m going to get back inside the bilge, I removed the live well so I can crawl into the bilge, and have someone jump on the engines and see if there is any movement in these cracks. Should I grind them down and re-tab them, leave them alone, etc.
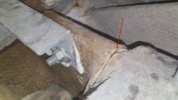
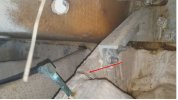
Starboard Pic.jpgPort Pic.jpg
 

Paul_A

Well-Known Member
Joined
Feb 25, 2019
Messages
144
Reaction score
43
Points
28
Model
Adventure
Additionally I would email those pics and maybe a picture of the rear of the boat to Grady to see what they think.

Just by those two pictures and your description my opinion is you should be extremely concerned and a proper repair is required but that is just that, my "opinion".

If you do involve Grady please post their response, be interesting to hear their thoughts.
 

DennisG01

GreatGrady Captain
Joined
Sep 1, 2013
Messages
6,818
Reaction score
1,210
Points
113
Location
Allentown, PA & Friendship, ME
Model
Offshore
It's hard to get a good sense of what is going on there - can you post some pictures from further away? However, JUST from looking at those... yes, this is something I would want to dive further into. In the second picture, I can see another crack at the other end of this short stringer/kneewall, as well. It might be structurally sound but larger cracks are never good and, at the bare minimum, can allow water to get into the wood.

FYI, concerning thru-hulls... if you're referring to any that are below the waterline (or even at the waterline/partially submerged), do not use stainless. Use bronze.
 

TopsulTime

Well-Known Member
Joined
Sep 4, 2021
Messages
65
Reaction score
30
Points
18
Location
Surf City
Model
Sailfish
I'd unbolt the L brackets and fiberglass across that crack with several layers. Start small and increase the size of the fiberglass patch to cover the one below it. I think 3 to 5 layers should do it. Then you'll have to redrill the bolt holes. Coat/seal the inside of the holes when putting the bolts back in.

Looks like an easy fix. Fix it, don't worry, enjoy.


Good luck.
 

Richard1572

GreatGrady Captain
Joined
Apr 26, 2008
Messages
59
Reaction score
9
Points
8
Location
Homestead, FL
Model
Sailfish
Thanks all. All the thru hulls I'm replacing are above the waterline with the exception of the scuppers which are partially submerged. I replaced with new scuppers from Grady and I think they only come in stainless. I don’t thing bronze was an option. All of the thru hulls truly below the waterline are bronze. Here are some videos I took. They should provide more perspective.


Fishtales

Well-Known Member
Joined
Jan 31, 2005
Messages
7,608
Reaction score
1,187
Points
113
I'm not so sure that will be an easy fix or isn't structural. I'd like to understand what is under the glass. The wood core could be junk and the weight of the engines and stress due to throttling may have weakened the support system and transom. I'd want a professional to look at that for sure. The last thing you want is engines at the bottom of the Atlantic.
 

Richard1572

GreatGrady Captain
Joined
Apr 26, 2008
Messages
59
Reaction score
9
Points
8
Location
Homestead, FL
Model
Sailfish
I've sent the pics to a contact I have a Grady. We will see what they say.

@TopsulTime when you say unbolt the L brackets, I assume you mean where they are bolted to the stringer, not the transom? Are you suggesting fiber glassing over the L brackets? Also, so everyone knows I’m looking for a "temporary" fix for a season or two as I plan on pulling the cap and doing a major refit of the boat, new tanks, stingers, transom etc. in a couple of years hopefully when supply chain returns to normal.


DennisG01

GreatGrady Captain
Joined
Sep 1, 2013
Messages
6,818
Reaction score
1,210
Points
113
Location
Allentown, PA & Friendship, ME
Model
Offshore
If this were mine (thank you for the video), I'd start by removing the L-bracket to get that out of your way. Then, grind back a good portion of the glass to better expose the core. I'd also drill a few 1/4" exploratory holes near the base of the stringer on either side of the crack. The goal here is to verify that the core is still solid. Then re-glass the cracked area and put the L-brackets back on.

In the second video, when looking across the bilge area to the port side... is that another crack in the stringer that is immediately inboard of the L-bracket stringer?
 

Richard1572

GreatGrady Captain
Joined
Apr 26, 2008
Messages
59
Reaction score
9
Points
8
Location
Homestead, FL
Model
Sailfish
Is this the crack you are referring to on the Port side? I don’t think it’s a crack or delamination, just some discoloration but I'll take a closer look. Too cold today though for this Florida native.

Second Crack.jpg
 

family affair

Well-Known Member
Joined
Jul 31, 2010
Messages
1,302
Reaction score
292
Points
83
Location
Ohio
Model
Islander
Bouncing on the engines is a good start, but you are only inducing a small fraction of the torque (bending moment) twin 225's will produce from full thrust. Unfortunately you likely have something significant going on there. Those cracks are immediately next to your tab pockets. Are there any cracks in the tab pockets from the outside?
 

family affair

Well-Known Member
Joined
Jul 31, 2010
Messages
1,302
Reaction score
292
Points
83
Location
Ohio
Model
Islander
I wouldn't glass over that gap without putting a straight edge on the bottom, to make sure there is not a hook in the transom.
That model does not have the full running surface. Worst case his transom is not at the same angle it was when it left the factory.
 

Richard1572

GreatGrady Captain
Joined
Apr 26, 2008
Messages
59
Reaction score
9
Points
8
Location
Homestead, FL
Model
Sailfish
It got to a 10 year low here in south Florida. I think it went down to 34. Some places out west more inland even had some frost.

There are no visible cracks in the pockets from the outside. I put a straight edge on both the bottom of the euro transom\integrated bracket and the bottom of the hull, the actual running surface, and they both are flat, no signs of hook or bow. I also put a straight edge on the back of the transom and do see it is not perfectly flat there is a slight hook, very slight I could probably get a thick piece of paper under the straight edge at the largest gap. It was only a one-footer, I need to dig through the garage and find a larger straight edge to get a better sense of how much a hook there is in the transom from top to bottom.

Grady got back to me that they would be glad to look at my issue but I guess in forwarding my message around internally the pics had gotten detached so I resent the pics to them and I should hear from them soon.

Another thing I was thinking about, unless you actually pulled your live well and climbed into the bilge like I did there is no way to see these cracks unless you had a camera on a long pole or something and removed one of the floor hatches and fished your camera back there. I wonder how many other boats of my vintage might have the same issue but no one has done the boat yoga necessary to see it.

Thanks again all.
 

TopsulTime

Well-Known Member
Joined
Sep 4, 2021
Messages
65
Reaction score
30
Points
18
Location
Surf City
Model
Sailfish
I've sent the pics to a contact I have a Grady. We will see what they say.

@TopsulTime when you say unbolt the L brackets, I assume you mean where they are bolted to the stringer, not the transom? Are you suggesting fiber glassing over the L brackets? Also, so everyone knows I’m looking for a "temporary" fix for a season or two as I plan on pulling the cap and doing a major refit of the boat, new tanks, stingers, transom etc. in a couple of years hopefully when supply chain returns to normal.

Just seeing this, been a long week. Yes, just unbolt the L bracket from the stringer and flex it a little out of the way while doing the repair. You should be able to move it away from the stringer and put a spacer there to hold it away while working. You'll have to re-drill the bolt hole thru the new fiberglass you added (seal the hole and coat the bolt with sealant when putting it back together).

As others mentioned you probably need to grind a little to prepare the surface for some new fiberglass mat.
 

Richard1572

GreatGrady Captain
Joined
Apr 26, 2008
Messages
59
Reaction score
9
Points
8
Location
Homestead, FL
Model
Sailfish
Thanks TopsulTime. Hopefully I will hear back from Grady next week and can start making a plan of attack.