98 228: ideas for Refurbishing cockpit coaming side inserts

Jimm H

Member
Joined
Jan 28, 2020
Messages
9
Reaction score
4
Points
3
Age
68
Model
Seafarer
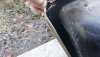
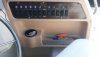
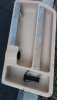
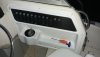
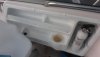
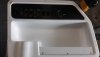
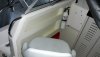
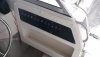
Not even sure what they are officially called. Photos attached. They were likely originally about the color of the gel coat, but were molded black plastic covered in vinyl. They are tan now.

One idea is to simply paint them with Rustoleum or some vinyl paint. Another would be to strip off the vinyl and add a layer of fiberglass, then gel coat. I have seen the use of starboard, of course.

Maybe take it to an automotive upholstery shop?

Any other ideas?
 

Attachments

  • 20201028_083902.jpg
    20201028_083902.jpg
    2 MB · Views: 7
  • 20201027_124554.jpg
    20201027_124554.jpg
    1.8 MB · Views: 8
  • 20201027_124539.jpg
    20201027_124539.jpg
    1.8 MB · Views: 8
  • 20201028_083831.jpg
    20201028_083831.jpg
    915.2 KB · Views: 8

Hookup1

GreatGrady Captain
Joined
Oct 16, 2007
Messages
2,602
Reaction score
714
Points
113
Age
69
Location
Cape May, NJ
Model
Islander
Looks like a car door panel.Auto restoration guys should have suggestions.
 

Jimm H

Member
Joined
Jan 28, 2020
Messages
9
Reaction score
4
Points
3
Age
68
Model
Seafarer
Hookup, it certainly does have the look and feel.

decided on the following steps:
1) Spray Paint Vinyl -- clean it with citrus cleaner, then a vinegar/water mixture, then spray it with Dupli-color Vinyl/Fabric spray paint (white). It is designed specifically for automotive vinyl applications. (Oreilly Auto Parts, $8/can) Ironically, Rust-Oleum Painter's Touch 2X spray paint in Heirloom White actually matches the color of the boat. It lists being applicable to "...wood, metal, plastic and more... " I bought a can for refinishing the wood foot holds and I might just spray a couple of top coats on the combing and see if it sticks to the vinyl.

I can always strip the vinyl off and refinish the parts with new 4-way stretch vinyl if the paint job fails (Sailrite sells it for $60/yard).
 
  • Like
Reactions: JJMag

MooseheadDoc

Well-Known Member
Joined
Sep 16, 2020
Messages
59
Reaction score
12
Points
8
Location
Moosehead Lake, ME
Model
Adventure
Please post pics with results! I’m planning a similar project:

I have some leftover Brightside paint (primer and 1-part epoxy) from a different project. I was impressed by the look on fiberglass- just 2 coats (1 primer, 1 finish) gives a look and feel similar to gelcoat. Not sure it will take on the coaming plastic. Expensive stuff- I wouldn’t have bought it just for the coaming- but since I have it I’ll try it. I’m also planning to use it to resurface my Duratrim. A test piece turned out great.

For me the challenge is making the coaming more useful. Mine is just wasted space. Yours looks much more functional.

Good luck with your project... JB
 

Hookup1

GreatGrady Captain
Joined
Oct 16, 2007
Messages
2,602
Reaction score
714
Points
113
Age
69
Location
Cape May, NJ
Model
Islander
A boating friend on mine uses the vinyl spray paint to refinish coaming pads and seats. His doesn't seem to hold up that long - maybe a season but its easy and inexpensive so give it a shot.

Me? I have a sewing machine. My vinyl looks great - the upholstery work not so much. More practice I guess.
 

Jimm H

Member
Joined
Jan 28, 2020
Messages
9
Reaction score
4
Points
3
Age
68
Model
Seafarer
Painted with 4 coats of duplicate color white. Covered the woodgrain plastic switch panel with black holographic film. Waiting for some newer switches and switch labels arriving this weekend
 

Attachments

  • 20201101_171710.jpg
    20201101_171710.jpg
    2.1 MB · Views: 8
  • 20201101_171727.jpg
    20201101_171727.jpg
    2.3 MB · Views: 8
  • 20201031_155055.jpg
    20201031_155055.jpg
    1.9 MB · Views: 7

Jimm H

Member
Joined
Jan 28, 2020
Messages
9
Reaction score
4
Points
3
Age
68
Model
Seafarer
UPDATE- The Spray on didn't last long. It started to deteriorate in a couple of months.

I ended up fabricating new panels using Seaboard ( a competitor of Starboard) in 3/8" thickness. Offwhite color is Seafoam. 1/2 sheet was 54" x 48" and cost $115. made a new switch panel with $2 in black plastic. Started before the holidays on the fabrication, and ended up finishing up in January with all the holiday delays. About 10 hours on the 1st one (drivers side) learing how to cut and shape, how to screw/glue together without screws showing.

Lots of work, but looks pretty good. I still have to figure out what to do about the instrument console, which is still in its faded salmon color. That one might require a fiberglass fabrication.
 

Attachments

  • Passenger side storage panel  panel.jpg
    Passenger side storage panel panel.jpg
    677.7 KB · Views: 8
  • Drivers side storage panel.jpg
    Drivers side storage panel.jpg
    875.1 KB · Views: 7
  • 98 gauges.jpg
    98 gauges.jpg
    738.2 KB · Views: 7

Blaugrana

Well-Known Member
Joined
Sep 16, 2019
Messages
703
Reaction score
107
Points
43
Age
40
Location
Bayville, New Jersey
Model
Seafarer
Nice job. Any pictures of it in progress?

Also, when you glued the pieces together, did you have to heat up the material?
 

Ky Grady

GreatGrady Captain
Staff member
Joined
Mar 1, 2006
Messages
2,918
Reaction score
1,272
Points
113
Location
Berea, KY/Cross, SC
Model
Seafarer
Those side panels turned out nice. My gauge panel is plastic on my '04. If yours is, might try some Krylon paint for plastic. Lowe's or Home Depot handles it.
 

Fishtales

Well-Known Member
Joined
Jan 31, 2005
Messages
7,559
Reaction score
1,177
Points
113
They are quite thin molded pieces. As long as you can address the cracks and brittle areas and then repaint you should be good to go. Would be interesting to see what folks do for more structural repairs on those pieces. There must be a process with recommended process out there.