Another Fuel Tank Thread

Ekea

Well-Known Member
Joined
Aug 11, 2020
Messages
439
Reaction score
137
Points
43
Age
38
Location
Mid Atlantic
Model
Chase
the tank in my boat gave up the ghost. i had expected this to be the case ever since i filled up the first time this summer (first season with the boat) as there was fuel in the bilge after filling. i got through the season by only running the tank about 1/2 full. yesterday, it failed the pressure test and after the deck hatch was pulled, they found a crack near the top of the tank. the tank is now 24 years old, so......

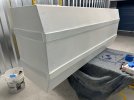
it looks like i will be getting a new tank made by Atlantic Coastal Welding in NJ. the new tank will be the same external dimensions, be made with 1/4" aluminum, have 7 internal baffles, and will be coated in epoxy. i will drop off the old tank this weekend for them to use as a template and they expect to have the new one ready in about 5-6 weeks. while the tank is out, i will be doing fill neck and fuel lines. at least i shouldn't have to worry about the entire fuel system ever again.

B.O.A.T. haha
 

Sardinia306Bimini

Well-Known Member
Joined
Oct 11, 2023
Messages
201
Reaction score
41
Points
28
Age
59
Location
Island of Sardinia
Model
Bimini
I just asked for a quote by the original builder who built in 2006 the 120 gallon SS tank for my actual RIB.
Leaking fuel tanks is one of the biggest annoyances in boating and all materials will fail sooner or later except poly tanks who can hold up much longer. However, if tank builder will build them correctly and boat builder would install them as they should then tanks would last much longer than a lot of them do.
Main reason is corrosion either on SS tanks from water inside corroding tank from the inside or getting humid or wet from wrong installation or leaking access plates or other leaks on aluminum tanks, or just cracking welds from not perfect welding.

Most of the boats will need have the fuel tanks replaced due leaking some sooner, some later, but it will happen and I replaced a lot of fuel tans in my life and until now most where a rather easy job to tackle as access was so wide that we just lifted ol out and new in.
Thats the main reason why I exclude any boat where I have to cut the floor to replace the fuel tank/s as the cost for that would be much higher. I got offered a beautiful and perfectly maintained 2005 Pursuit 3370 Offshore nearby but gathering some information about this boat I stumbled over a 2 part video from a fiberglass shop replacing the fuel tank on same model boat. They had to cut the whole cockpit, pull it, install the new fuel tanks, glass the cockpit back in and sand and paint the whole cockpit.
That led me to step back and drop this model and any other boat wit non accessible fuel tanks from my shopping list as I really don't want to hassle with this anymore, particularly not paying a hefty bill for cutting the floor.
GW seems to have that solved rather well and fuel tank access is in a reasonable way granted, and thats a good thing!
Chris
 

Ekea

Well-Known Member
Joined
Aug 11, 2020
Messages
439
Reaction score
137
Points
43
Age
38
Location
Mid Atlantic
Model
Chase
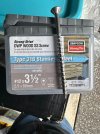
so, while the old tank is out and the new one is being fabricated, i think i am going to paint the bilge area where the tank is (and while i am at it, ill do the aft bilge too). i have decided to go with TotalBoat TotalBilge epoxy paint. just for fun, i am going to "tint" it with their TopSide paint for a nice light blue final color. mixing the TopSide paint is advertised on their website, and i confirmed with their tech line that you just mix it in and apply. just dont go over 20% with the TopSide. it will still be light enough to easily see dirt/oil/drips should they arise. ill do the fuel tank bilge area first since it will hopefully never be opened again, then do the aft bilge when i can make it look a bit better
 
Last edited:

Ekea

Well-Known Member
Joined
Aug 11, 2020
Messages
439
Reaction score
137
Points
43
Age
38
Location
Mid Atlantic
Model
Chase
dropped the old tank off at Atlantic Coastal Welding saturday. 2.5 hours each way the day after a snow. my blue truck is now white. also, had to have the tailgate down since the tank is about 1/2 inch too long to close the bed. oh well

so, the tank that was in the boat is a replacement. in addition, it seems to be a back yard build. no cert sticker, angle iron on the sides to sit on top of the stringers, and a few other things. also, the tank is about 27 gallons too small. i got some drawings from Atlantic that they have on file from Grady. i will be taking measurements this weekend to make sure that nothing else is in the way of fitting the original size tank in.

its never simple or straight forward.
 

Ekea

Well-Known Member
Joined
Aug 11, 2020
Messages
439
Reaction score
137
Points
43
Age
38
Location
Mid Atlantic
Model
Chase
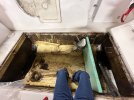
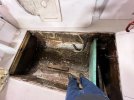
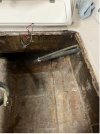
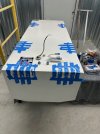
i spent saturday morning scraping out foam and taking measurements. im going to go with the Grady dimension tank. while in there, i was able to check/tap the stringers. they are in great shape. some pics below. btw, the blue foam board is a template i made of the grady spec tank cross section.

can someone post a pic of the bracing over their tank? the old one was bolted to the angle iron tabs you see on the stringers


IMG_3724.jpg
IMG_3725.jpg
IMG_3726.jpg
 

SkunkBoat

Well-Known Member
Joined
Oct 12, 2017
Messages
4,234
Reaction score
1,467
Points
113
Location
Manasquan Inlet NJ
Website
www.youtube.com
Model
Express 265
dropped the old tank off at Atlantic Coastal Welding saturday. 2.5 hours each way the day after a snow. my blue truck is now white. also, had to have the tailgate down since the tank is about 1/2 inch too long to close the bed. oh well
Those are my local guys! They did a tank for my old V20. they use thicker aluminum and more baffles.That does reduce the volume of the tank a little because they keep the OUTSIDE dimensions.
They beef up the Sender hole too.
They also recently repaired my Grady 265 Hardtop frame.
 

SkunkBoat

Well-Known Member
Joined
Oct 12, 2017
Messages
4,234
Reaction score
1,467
Points
113
Location
Manasquan Inlet NJ
Website
www.youtube.com
Model
Express 265
Its interesting that you had foam. My old 84 V20 had foam.
A lot of the Gradys doing tanks on here don't have foam in the tank space.
My 265 does not have foamed tanks. Tanks were replaced 6 months before I bought it.

Does bilge pass under the tank thru a pvc pipe? or a false floor?

Its the foam that really kills aluminum tanks. Holds salt water on the tank. You really have to be watertight. Even if you seal the hatch well, the pieholes always leak.
Are you planning to re-foam?
 

Ekea

Well-Known Member
Joined
Aug 11, 2020
Messages
439
Reaction score
137
Points
43
Age
38
Location
Mid Atlantic
Model
Chase
Those are my local guys! They did a tank for my old V20. they use thicker aluminum and more baffles.That does reduce the volume of the tank a little because they keep the OUTSIDE dimensions.
They beef up the Sender hole too.
They also recently repaired my Grady 265 Hardtop frame.
yea, they really seem to know their stuff. the new tank will be 1/4" alluminium and have 7 internal baffles, i think the slight loss of volume is well worth the strength and performance. mentioned how they beef up the sender hole as well. they will also epoxy coat it.
 

Ekea

Well-Known Member
Joined
Aug 11, 2020
Messages
439
Reaction score
137
Points
43
Age
38
Location
Mid Atlantic
Model
Chase
Its interesting that you had foam. My old 84 V20 had foam.
A lot of the Gradys doing tanks on here don't have foam in the tank space.
My 265 does not have foamed tanks. Tanks were replaced 6 months before I bought it.

Does bilge pass under the tank thru a pvc pipe? or a false floor?

Its the foam that really kills aluminum tanks. Holds salt water on the tank. You really have to be watertight. Even if you seal the hatch well, the pieholes always leak.
Are you planning to re-foam?
the foam was put in when the PO replaced the tank with his backyard build. the grady spec tank wouldnt fit with the foam in.

the flat part of the bilge is a false floor, water can run under it. also, it has a gap by the fore and aft bulk heads so condensation dripping from the tank can get down below the false floor and drain to the rear bilge.

i will not be re-foaming. i will be adhering neoprene strips to the bottom of the tank with 5200 and using bracing over the tank to secure it in place. the tank fabricators suggest at least 1/4" of air space around the tank
 
  • Like
Reactions: SkunkBoat

Sardinia306Bimini

Well-Known Member
Joined
Oct 11, 2023
Messages
201
Reaction score
41
Points
28
Age
59
Location
Island of Sardinia
Model
Bimini
the tank fabricators suggest at least 1/4" of air space around the tank
As much you are able to get, aluminum tanks corrode from outside because they stay humid or wet.
The 120 gallon aluminum fuel tank of my BW 23 Outrage developed pin holes on the rear wall as because the extra weight of the twin Yamaha F150 the bilge filled up so high that the rear of the rear bottom of the fuel tank was submerged.
A non treated aluminum fuel tank will last very long time if not staying humid or wet and that is difficult to achieve in a smaller boat.
Chris
 

Ekea

Well-Known Member
Joined
Aug 11, 2020
Messages
439
Reaction score
137
Points
43
Age
38
Location
Mid Atlantic
Model
Chase
one update, one question...

i picked up the tank and plumbing materials on saturday. the tank looks awesome. fully welded internal baffles, strong welds, nice epoxy coat. i expect do the plumbing this weekend and do final tank prep (apply neoprene strips to tank with 5200)

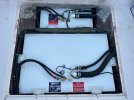
i was originally going to paint the fuel bay with Total Boat Total Bilge paint. once i got into it, everything looks good and hard (stringers, false floor, and inside of the hull) and figured if it looks good a 24 years old, just let it be. it cleaned up well and a pic is below. that being said, i saw on Grady Life FB page someone paint their fuel bay and it looked really good. im now again considering painting it. i already have the paint and it doesnt need any primer for wood/resin. i would just be really pissed if in time it started to flake off and made a mess into the rear bilge and potentially clogged up the bilge pump.

thoughts? leave it, do less work, and enjoy another 1/4 century as is? or paint it?

Clean Fuel Bay.JPG
 
Last edited:

DennisG01

GreatGrady Captain
Joined
Sep 1, 2013
Messages
6,818
Reaction score
1,210
Points
113
Location
Allentown, PA & Friendship, ME
Model
Offshore
I agree - if I was this far into it, I would paint it... I think ;)

The key, of course, is all about the prep - which of course is why you're asking.

On something like this, I'd be doing a couple washes with a very stiff brush and TSP and then some acetone. I would probably, for good measure, do a rough sand, as well - and then wipe down with acetone again.

Another option, that would probably be even more "sticky" would be to tint epoxy resin.
 

Hookup1

GreatGrady Captain
Joined
Oct 16, 2007
Messages
2,625
Reaction score
717
Points
113
Age
69
Location
Cape May, NJ
Model
Islander
You can probably get 20 more years out of the new tank with or without paint. Mine were epoxy painted by SP Tanks in Marmora. They didn't use an aluminum primer and it is easily scratched. I wouldn't epoxy coat - use epoxy paint and etch primer if you can. Some guys talk about fiberglassing them. Anything that leaks a little and gets in-between the tank will accelerate crevice corrosion.

Clean all the debris from the space under the tank, snake out and tubing under there. You will get water in there but don't drowned the tank!

Also I used the neoprene strips attached with 3M 4000. I Did the same with the areas the hold down blocks are.

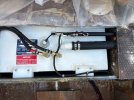
28 Tank.jpeg 28 Tank 2.jpeg 33 Tanks installed.jpeg
 
  • Like
Reactions: A&J Outdoors

Ekea

Well-Known Member
Joined
Aug 11, 2020
Messages
439
Reaction score
137
Points
43
Age
38
Location
Mid Atlantic
Model
Chase
I agree - if I was this far into it, I would paint it... I think ;)

The key, of course, is all about the prep - which of course is why you're asking.

On something like this, I'd be doing a couple washes with a very stiff brush and TSP and then some acetone. I would probably, for good measure, do a rough sand, as well - and then wipe down with acetone again.

Another option, that would probably be even more "sticky" would be to tint epoxy resin.
the whole fuel bay got hit with a cone shaped wire brush mounted to an angle grinder, so should be pretty well "rough sanded"
 

Ekea

Well-Known Member
Joined
Aug 11, 2020
Messages
439
Reaction score
137
Points
43
Age
38
Location
Mid Atlantic
Model
Chase
You can probably get 20 more years out of the new tank with or without paint. Mine were epoxy painted by SP Tanks in Marmora. They didn't use an aluminum primer and it is easily scratched. I wouldn't epoxy coat - use epoxy paint and etch primer if you can. Some guys talk about fiberglassing them. Anything that leaks a little and gets in-between the tank will accelerate crevice corrosion.

Clean all the debris from the space under the tank, snake out and tubing under there. You will get water in there but don't drowned the tank!

Also I used the neoprene strips attached with 3M 4000. I Did the same with the areas the hold down blocks are.

View attachment 33005 View attachment 33006 View attachment 33007
im referring to painting the fuel bay, not the tank. see pic above.

the tank manufacturer already epoxy painted the tank.

do you have close up pics of the hold-down blocks? im curious how that works. i am planing to use aluminum banding over the tank to hold it down (stringer, over tank, stringer)
 

DennisG01

GreatGrady Captain
Joined
Sep 1, 2013
Messages
6,818
Reaction score
1,210
Points
113
Location
Allentown, PA & Friendship, ME
Model
Offshore
the whole fuel bay got hit with a cone shaped wire brush mounted to an angle grinder, so should be pretty well "rough sanded"
Yup - that works!

Anywhere where something will be touching the tank, you run the risk of corrosion setting in because water will gather, eliminating the necessary air for the aluminum to self-protect itself. Now, you have a coating so it's not nearly as important... until the coating wears away :)

Best practice would be to insulate the area somehow. This can be done a number of ways... neoprene strips glued to the tank (3M5200 is best here). Another option would be to use 5200 to glue fiberglass stock (you can buy various widths/lengths/shapes from a place like McmasterCarr) anywhere your bracing will contact the tank. For example, you can get fiberglass "angle iron" for the corners and flat stock for the bottom. Then you can brace against those corner pieces with more angle's screwed into the stringers to keep it from moving - you won't need anything going over the top. Plenty of boat manufacturers use this method, actually.

The key takeaway here is make sure there is an air gap and no place where water can stagnate against the aluminum.
 

Ekea

Well-Known Member
Joined
Aug 11, 2020
Messages
439
Reaction score
137
Points
43
Age
38
Location
Mid Atlantic
Model
Chase
thats the plan.

there will be at least 1/4" air gap all around the tank. the only thing that will touch the tank is 5200 holding on closed cell neoprene, and of course, the plumbing and fittings. all fittings will have permatex (i forget what kind, the tank fabricators supplied it) on the threads and barbed fittings
 

Sardinia306Bimini

Well-Known Member
Joined
Oct 11, 2023
Messages
201
Reaction score
41
Points
28
Age
59
Location
Island of Sardinia
Model
Bimini
I would paint the fuel tank compartment and if applied correctly it should not flake off.
Just use a paint made for submerged parts and bilge area, a 2K paint would probably do better.
Chris
 

Ekea

Well-Known Member
Joined
Aug 11, 2020
Messages
439
Reaction score
137
Points
43
Age
38
Location
Mid Atlantic
Model
Chase
I would paint the fuel tank compartment and if applied correctly it should not flake off.
Just use a paint made for submerged parts and bilge area, a 2K paint would probably do better.
Chris
i already have this paint


Hookup1

GreatGrady Captain
Joined
Oct 16, 2007
Messages
2,625
Reaction score
717
Points
113
Age
69
Location
Cape May, NJ
Model
Islander
im referring to painting the fuel bay, not the tank. see pic above.

the tank manufacturer already epoxy painted the tank.

do you have close up pics of the hold-down blocks? im curious how that works. i am planing to use aluminum banding over the tank to hold it down (stringer, over tank, stringer)
I was talking about the tank. I did not paint the compartment. Not really necessary if fiberglass is good.

The blocks are stock GW factory HDPE plastic pieces. You could make them with a table saw. Fit tight - lubed them and used a bar to keep the tank over. I replaced the Philips head screws with a stainless Torx head. They are beasts. Don't use Philips like the factory - they are impossible to get enough weight behind them to avoid stripping.

32 New tank.jpeg Tank Screws.jpeg
 
Last edited: