
You are using an out of date browser. It may not display this or other websites correctly.
You should upgrade or use an alternative browser.
You should upgrade or use an alternative browser.
Autopilot installation in GW 265 Express...
- Thread starter bartoma
- Start date
captain swag
Well-Known Member
- Joined
- Aug 18, 2011
- Messages
- 138
- Reaction score
- 9
- Points
- 18
I have a 2001 265. I used a Simrad pilot. Remove the drawer assembly in the cuddy where you step down. There is a large area that you can mount the pump behind it.
SkunkBoat
GreatGrady Captain
- Joined
- Oct 12, 2017
- Messages
- 4,999
- Reaction score
- 1,788
- Points
- 113
- Location
- Manasquan Inlet NJ
- Website
- www.youtube.com
- Model
- Express 265
Just did it My pump went behind tackle box/under bait prep sink.
The 9 axis sensor went behind drawers in cabin (under the captains feet)
see these threads
https://www.greatgrady.com/threads/autopilot-upgrade-from-manual-hydraulic.26808/
Field replaceable fittings for SeaStar 5/16ID hose
The 9 axis sensor went behind drawers in cabin (under the captains feet)
see these threads
https://www.greatgrady.com/threads/autopilot-upgrade-from-manual-hydraulic.26808/
Field replaceable fittings for SeaStar 5/16ID hose
- Joined
- May 8, 2014
- Messages
- 144
- Reaction score
- 38
- Points
- 28
I'm familiar with that area - I replaced the fresh water pump in that cavity a year ago... Looking at it today, there was no obvious way to run lines from that space to the helm... I noted a couple cables coming down from the starboard side, but the passage appeared quite narrow... How do you run your hydraulic lines and control cable from the pump?
captain swag
Well-Known Member
- Joined
- Aug 18, 2011
- Messages
- 138
- Reaction score
- 9
- Points
- 18
Remove the access plate behind toilet in the head. Remove the tilting glovebox and you will see a passage to get behind the helm pump.
SkunkBoat
GreatGrady Captain
- Joined
- Oct 12, 2017
- Messages
- 4,999
- Reaction score
- 1,788
- Points
- 113
- Location
- Manasquan Inlet NJ
- Website
- www.youtube.com
- Model
- Express 265
You will see some guys put Tees directly into the helm and add the pump hoses. Garmin recommended breaking into the existing hoses with Tees nearer the cylinder.
SkunkBoat
GreatGrady Captain
- Joined
- Oct 12, 2017
- Messages
- 4,999
- Reaction score
- 1,788
- Points
- 113
- Location
- Manasquan Inlet NJ
- Website
- www.youtube.com
- Model
- Express 265
First things first...If you have not done so... unscrew the dash panel that has your gauges and set it to the side with cables still attached.I'm familiar with that area - I replaced the fresh water pump in that cavity a year ago... Looking at it today, there was no obvious way to run lines from that space to the helm... I noted a couple cables coming down from the starboard side, but the passage appeared quite narrow... How do you run your hydraulic lines and control cable from the pump?
captain swag
Well-Known Member
- Joined
- Aug 18, 2011
- Messages
- 138
- Reaction score
- 9
- Points
- 18
Fowl Hooked
Well-Known Member
- Joined
- Jun 4, 2007
- Messages
- 223
- Reaction score
- 62
- Points
- 28
- Location
- Southern Maryland
- Model
- Express 265
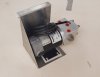
Both the original Simrad and the replacement Raymarine system I just installed have the pump mounted directly under the instrument panel per the attached picture. Will admit that having that large a motor so close to the compass is not ideal and I noticed a lot of deflection as I moved the pump into position but it seemed to come back to baseline once the pump was in place. Plus, it's fairly easy to get to and as the original was there I was able to reuse all the existing hoses, just had to add some 90* elbows to the pump so things lined up properly.
- Joined
- May 8, 2014
- Messages
- 144
- Reaction score
- 38
- Points
- 28
What year is your 265? I'm not sure my round Yamaha gauges would clear the pump I have... I presume the pump fittings on your install are facing downwards?Both the original Simrad and the replacement Raymarine system I just installed have the pump mounted directly under the instrument panel per the attached picture. Will admit that having that large a motor so close to the compass is not ideal and I noticed a lot of deflection as I moved the pump into position but it seemed to come back to baseline once the pump was in place. Plus, it's fairly easy to get to and as the original was there I was able to reuse all the existing hoses, just had to add some 90* elbows to the pump so things lined up properly.View attachment 11143
Fowl Hooked
Well-Known Member
- Joined
- Jun 4, 2007
- Messages
- 223
- Reaction score
- 62
- Points
- 28
- Location
- Southern Maryland
- Model
- Express 265
It's a 2005. I have the square gauges from the repower done in 2015 and the new panel layout has them running in a single row of three across the top but there's decent clearance beneath them. The original 4 round gauge layout could have been tight but I think it would have still fit and there is surface area to have mounted the pump even further towards the centerline of the boat. The line connections come off the front face of the unit, believe this is what you meant by facing downward, but the reservoir line is on the top side (it has a front face connection as well but the top side worked better for my install). As the hoses had been in the same position for 15 years I added elbows on the connectors so things would line up better with the t-connectors and the hoses weren't forced very far out of their original positions. Haven't seen one in person but that Garmin pump unit certainly appears to be larger which could also be a challenge, pump face on mine is about 3.5" square.What year is your 265? I'm not sure my round Yamaha gauges would clear the pump I have... I presume the pump fittings on your install are facing downwards?
With the pump positioned behind the drawers in the cabin next to the fresh water pump. It should be a straight shot vertically up to he helm. Thats where I had my simrad pump on my 265. Just remove the dash panels, and the flip out box. At that point your access should be good.
TortugaBob
GreatGrady Captain
FWIW, I am also adding Simrad Auto Pilot for Twins so had to get the larger pump. I had local sheet metal guy build an Aluminum Bracket to hang under console. Wanted Motor Horizontal per Spec, as weight is balanced this way. Had to move panel to fit Computer for Pilot. Some ideas for others perhaps.
Attachments
- Joined
- May 8, 2014
- Messages
- 144
- Reaction score
- 38
- Points
- 28
Maybe mine is different, but I see no passage from the helm to the compartment below other than the rigging tube that the Binnacle control cables pass through - and there is certainly no room for multiple hydraulic lines... Maybe someone has some pics?
SkunkBoat
GreatGrady Captain
- Joined
- Oct 12, 2017
- Messages
- 4,999
- Reaction score
- 1,788
- Points
- 113
- Location
- Manasquan Inlet NJ
- Website
- www.youtube.com
- Model
- Express 265
there's a gap. I ran the cable to my sensor/computer down to below the helm seat.
You might get a better look if you remove the panel behind the head. I seem to remember having that off for some reason.
You could break into the lines behind the cockpit tackle drawers like i did. Plenty of space to mount the pump there.
You might get a better look if you remove the panel behind the head. I seem to remember having that off for some reason.
You could break into the lines behind the cockpit tackle drawers like i did. Plenty of space to mount the pump there.
TUNAHUNTER197
Well-Known Member
On my 265 the auto pilot pump is where Skunk and Captain Swag suggested. Lots of space behind those drawers. The pump is located on the port side of the boat, hope that helps. I was able to run my transducer cables through the bathroom access hatch and straight up to my dash, you should follow the same route.
Sketchywind
GreatGrady Captain
- Joined
- Nov 18, 2013
- Messages
- 83
- Reaction score
- 27
- Points
- 18
- Location
- San Francisco
- Model
- Express 265
Hi Bartoma.
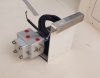
I mounted my Simrad Autopilot pump inside the helm inspection cover area, under the accessory switches. I didn't want to purchase long hydraulic lines. It works great, except for a little bit of pump noise since it's just under the steering console. I covered the pump with some moldable noise deadening sheets which helped a bunch. I mounted the Compass behind the drawers inside the cabin under the helm. The NAC-1 mounted in the electronics console. No need for any additional cords.
Look at the wall immediately to the right looking into the helm inspection cover. I mounted pump with the fittings pointing down. The hoses and NMEA lines fit perfectly, with no extensions needed. I replaced the helm fittings to ORB fittings, since the OEM brass fittings cannot be positioned and tightened correctly without leaking. That was learning this mod the hard way. Here are the brass fittings after switching to ORB fittings ( Rebuilt Helm). The ORB fittings on the helm unit can be rotated so hydraulic hoses are not kinked.
Attachments

- Joined
- May 8, 2014
- Messages
- 144
- Reaction score
- 38
- Points
- 28
I was inspired by your account, so I dug in and identified what I think is the same location - right?
I would also like to use the ORB fittings that came with the kit... I ordered a orb/F to NPT 1/4" M adapter and an orb elbow... I ordered both in stainless steel, but now I am not sure if I need to use brass... Do you know is stainless fittings can be used in an NPT helm?

I would also like to use the ORB fittings that came with the kit... I ordered a orb/F to NPT 1/4" M adapter and an orb elbow... I ordered both in stainless steel, but now I am not sure if I need to use brass... Do you know is stainless fittings can be used in an NPT helm?
SkunkBoat
GreatGrady Captain
- Joined
- Oct 12, 2017
- Messages
- 4,999
- Reaction score
- 1,788
- Points
- 113
- Location
- Manasquan Inlet NJ
- Website
- www.youtube.com
- Model
- Express 265
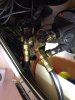
I was inspired by your account, so I dug in and identified what I think is the same location - right?
I would also like to use the ORB fittings that came with the kit... I ordered a orb/F to NPT 1/4" M adapter and an orb elbow... I ordered both in stainless steel, but now I am not sure if I need to use brass... Do you know is stainless fittings can be used in an NPT helm?
View attachment 12097
Stainless is ok and nickeled brass. Shouldn't use plain brass in the aluminum housing.