Bolster and Seat Recover

Fishtales

Well-Known Member
Joined
Jan 31, 2005
Messages
7,496
Reaction score
1,161
Points
113
Found the black end caps for the aft seat on Amazon as well. These bang into the end of the straight bar that installs into the (2) powder coated pieces. The bar moves up and down in the powder coated pieces when you fold up/down the seat. They make the seat slide easier.
 
  • Like
Reactions: Fuzz

Bg56126

Well-Known Member
Joined
Jun 17, 2013
Messages
62
Reaction score
19
Points
8
Location
Mystic, CT
Model
Express 330
Thanks for sharing all of this. Looks great!

What did you use to sew this material together? I've been interested in fixing some of my canvas and can't seem to come across a suggestion.
 
  • Like
Reactions: Fuzz

Fishtales

Well-Known Member
Joined
Jan 31, 2005
Messages
7,496
Reaction score
1,161
Points
113
A heavy duty home sewing machine with a walking foot attachment. Really wasn't that bad. If you use piping it will be harder. Use high quality sail thread as well.
 
  • Like
Reactions: Fuzz

Hookup1

GreatGrady Captain
Joined
Oct 16, 2007
Messages
2,546
Reaction score
709
Points
113
Age
69
Location
Cape May, NJ
Model
Islander
Nice work Fishtails! Like you I'm new to doing this kind of work. I get by with my upholstery work but my enclosure work has been right on for my use case. Sailrite is great - DIY friendly and lots of videos.
 

PointedRose

Well-Known Member
Joined
Feb 11, 2021
Messages
645
Reaction score
196
Points
43
Location
San Francisco
Model
Overnighter
Here is the companion seat final fitting. It looks better today as it is fully stapled down, bottom seat bolted and U shape trim ring on the bottom is done. I'll post a few final shots after using the heat gun. I added 3 small wooden supports for the seat frame. It deflected a bit in the corner so I thought I should add.
It came out ok,. I expect to be able to work the wrinkles and make it presentable. Certainly not professional, but I did all this for less than $500 including the tools required and all the covers are new, so I'm happy.
Looks great!
 
  • Like
Reactions: Fuzz

Fishtales

Well-Known Member
Joined
Jan 31, 2005
Messages
7,496
Reaction score
1,161
Points
113
Hi Folks,
A few pics of the cockpit and seating areas. I re-upholstered the cockpit bolsters, aft seat and the companion seat. All installed now. I purchased a Llebrock chair and swapped the Pompanette Deluxe II chair out. The bolsters came out super. Anyone can do these. The aft seat was more tricky. The companion seat was a bear, but I learned a lot. I know I could do a better job in the future. There are a couple of wrinkles but it is still much better and firmer than the old material and foam. Everyone is happy....
 

Attachments

  • I1.jpeg
    I1.jpeg
    111 KB · Views: 71
  • I2.jpeg
    I2.jpeg
    64.2 KB · Views: 69
  • I3.jpeg
    I3.jpeg
    85.3 KB · Views: 69

Fishtales

Well-Known Member
Joined
Jan 31, 2005
Messages
7,496
Reaction score
1,161
Points
113
More..
 

Attachments

  • I4.jpeg
    I4.jpeg
    96.6 KB · Views: 64
  • I7.jpeg
    I7.jpeg
    118.9 KB · Views: 66
  • I6.jpeg
    I6.jpeg
    110.9 KB · Views: 65
  • I5.jpeg
    I5.jpeg
    123.6 KB · Views: 66
  • Like
Reactions: Fuzz and Pighunter

Fishtales

Well-Known Member
Joined
Jan 31, 2005
Messages
7,496
Reaction score
1,161
Points
113
Some other notes.
The Llebroc helm seat is a nice upgrade. Heavier and much more comfortable than the sock chair.
I ordered the 12" pedestal mount which was recommended by Pat when he ordered a Llebroc chair. I have not installed the new pedestal yet, it is temp sitting on the stock one.
The 12" pedestal is not adjustable so no rocking or movement of the chair (huge positive). The stock pedestal gives nice height adjustment, but it moves a bit.
The stock pedestal is about 10" max height. So I will gain a couple of inches. Should help me with visibility.
I will initially mount in the same mount area and see how it feels, may go back a bit more.
My chair has has vinyl backing versus the stock Llebroc chair. I thought I was getting the white plastic back. When this arrived, I liked it so kept it.

I have a second aft seat. I plan to recover this and keep as a spare. This cushion seems to get the most wear and for me was the only one to seam rip. I'll have one in the wings if needed. The companion seat order of sewing is critical. I now know the best order to ensure tight seams and corners. When I do the companion again, I'll shoot for a perfect job.

The curved bolster is the only tricky bolster. I detailed the pie shaped cuts you need to do for this to look good. Use the stock fabric as a pattern and you will be fine. I used ultra firm cushion material and think this is the best. Very firm now but over time may get softer. The stock seat was pretty beat after 13 years and the cushion was marginal at best. I think the firmer material will last better over time.
 

PointedRose

Well-Known Member
Joined
Feb 11, 2021
Messages
645
Reaction score
196
Points
43
Location
San Francisco
Model
Overnighter
Hi Folks,
A few pics of the cockpit and seating areas. I re-upholstered the cockpit bolsters, aft seat and the companion seat. All installed now. I purchased a Llebrock chair and swapped the Pompanette Deluxe II chair out. The bolsters came out super. Anyone can do these. The aft seat was more tricky. The companion seat was a bear, but I learned a lot. I know I could do a better job in the future. There are a couple of wrinkles but it is still much better and firmer than the old material and foam. Everyone is happy....
Nice work, looks great. Some of those small wrinkles will shrink away in the sun probably.
 
  • Like
Reactions: Fuzz

Fishtales

Well-Known Member
Joined
Jan 31, 2005
Messages
7,496
Reaction score
1,161
Points
113
Final picture set after settling in from heat within the enclosure. Enclosure was redone in 2019 (2 plus seasons) still looks great.
 

Attachments

  • aft seat and bolsters.jpeg
    aft seat and bolsters.jpeg
    97 KB · Views: 60
  • helm from cockpit enclosure and admiral.jpeg
    helm from cockpit enclosure and admiral.jpeg
    94.2 KB · Views: 58
  • helm seat.jpeg
    helm seat.jpeg
    56.1 KB · Views: 56
  • port bolsters and aft seat.jpeg
    port bolsters and aft seat.jpeg
    106.5 KB · Views: 53
  • port bolsters and aft seat.jpeg
    port bolsters and aft seat.jpeg
    106.5 KB · Views: 54
  • starboard bolsters.jpeg
    starboard bolsters.jpeg
    97.2 KB · Views: 57

JackStraw

New Member
Joined
Jun 15, 2022
Messages
4
Reaction score
0
Points
1
Age
34
Thank you for posting this as I found it extremely informative. I got a quote recently for my 2008 Sailfish that was much higher than I expected and am considering doing something similar with the help of a seamstress friend.

I had a few questions I was hoping you could answer:
1) Did you use the silk film only to help fit in the foam and then remove? I've read and saw on Sailrite that if using open cell foam that is intended to dry out, to not use silk film as it can trap moisture. I would think the grommets and phifertex would allow drainage.
2) Did you use 316 stainless steel grommets? I found 305 stainless on Sailrite and was planning to use that as not in contact with other metals and only on underside.
3) Do you recall how many yards you needed of pleated and flat vinyl? I was thinking at least 3 yard of pleated to not have seams in the longer bolster and 2-3 yds of flat for the aft bench and corners of other bolsters.
4) Do you recall what thread you used? I don't believe there is outside stitching other than potentially in the aft seat so I was planning to use Sailrite's v-92 Polyester Natural UV 4oz and not worry about color so much as not exposed.
5) Did you need to join two pieces of foam for the longer bolster? Sailrite has 80" sections of foam but maybe able to find longer sections contacting them or through other suppliers.
6) Did you screw in bottom of the bolsters back through grommets or use a different mechanism. I've heard there are clips you can use that extend just slightly below bolsters and are not visible when standing but haven't been able to locate.

Thanks in advance.
 
Last edited:

JJF

Well-Known Member
Joined
Feb 14, 2021
Messages
399
Reaction score
122
Points
43
Location
Gloucester, MA
Model
Canyon 306
Pretty impressive.

Do you have a link for the end caps?
 

seasick

Well-Known Member
Joined
Aug 19, 2008
Messages
9,073
Reaction score
1,293
Points
113
Location
NYC
Thank you for posting this as I found it extremely informative. I got a quote recently for my 2008 Sailfish that was much higher than I expected and am considering doing something similar with the help of a seamstress friend.

I had a few questions I was hoping you could answer:
1) Did you use the silk film only to help fit in the foam and then remove? I've read and saw on Sailrite that if using open cell foam that is intended to dry out, to not use silk film as it can trap moisture. I would think the grommets and phifertex would allow drainage.
2) Did you use 316 stainless steel grommets? I found 305 stainless on Sailrite and was planning to use that as not in contact with other metals and only on underside.
3) Do you recall how many yards you needed of pleated and flat vinyl? I was thinking at least 9 yard of pleated to not have seams in the longer bolster and 2-3 yds of flat for the aft bench and corners of other bolsters.
4) Do you recall what thread you used? I don't believe there is outside stitching other than potentially in the aft seat so I was planning to use Sailrite's v-92 Polyester Natural UV 4oz and not worry about color so much as not exposed.
5) Did you need to join two pieces of foam for the longer bolster? Sailrite has 80" sections of foam but maybe able to find longer sections contacting them or through other suppliers.
6) Did you screw in bottom of the bolsters back through grommets or use a different mechanism. I've heard there are clips you can use that extend just slightly below bolsters and are not visible when standing but haven't been able to locate.

Thanks in advance.
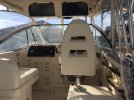
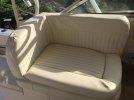
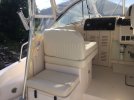
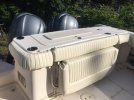
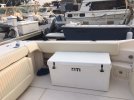
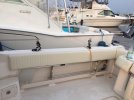
I also redid my bolsters a while back. They are looking a bit worn these days but were redone 12 years ago and sit all summer in the sun.
I use Dryfast foam and no plastic wrapping.
I used cheap brass grommets and they are still in good shape
I don't remember how much material I used but I probably had enough left over to recover another set of bolsters.
I use polyester V-92 thread. It has held up OK on the bolsters since most of the stitching is hidden from the sun. Similat sewing work on things like helm covers tend to suffer breakdown of the thread over time.
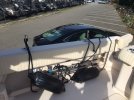
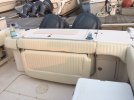
Funny think about joining the foam. I didn't need to join the long section for my 208 bolsters but I did need to glue up rounded corners and make them thicker. The Dryfast foam is so porus that liquid contact cement when applies drains right through and out the bottom. A suitable spray adhesive would have been better.
I bough my foam from the Foam Factory I think it was called. I bought a half sheet ( a full sheet is 48 by 96 inches.) That foam is not cheap:)
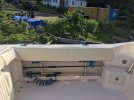
I did screw the bolster on using the grommet holes but drilled new holes. It is extremely hard to reuse the original holes. You don't need a lot of screws, maybe two per long section and one for the curved return if you have returns.

A few recommendation and some advice.
Take apart the original bolsters using a seam ripper for the stitching after you remove the staples ( your hands are going to really ache.
Label all the pieces and use them as patterns for the new material. Same for the original foam. Use it as a guide to cutting, building up, and shaping the new foam.

I used welting in matching color for the outer seams and the corner pieces. It is more work but it does help hide the stitching which makes it last longer.
An electric meat carver works very well to cut and shape the foam. I did trim (shape) the outer edges of the foam so that the vinyl would form a rounder edge.
But Monel staples not stainless. Buy a few boxes, 2 at a minimum maybe more if your work is longer than mine. The vinyl bolster is stapled to the backer board with staples basically next to each other with very little spacing. If you decide to apply welting to the outer edges, staple it on to the backer board after you staple the vinyl cover on. Use a pneumatic stapler. Electric didn't work for me.
 
  • Like
Reactions: JackStraw

Fishtales

Well-Known Member
Joined
Jan 31, 2005
Messages
7,496
Reaction score
1,161
Points
113
Thank you for posting this as I found it extremely informative. I got a quote recently for my 2008 Sailfish that was much higher than I expected and am considering doing something similar with the help of a seamstress friend.

I had a few questions I was hoping you could answer:
1) Did you use the silk film only to help fit in the foam and then remove? I've read and saw on Sailrite that if using open cell foam that is intended to dry out, to not use silk film as it can trap moisture. I would think the grommets and phifertex would allow drainage. Yes I did this....
2) Did you use 316 stainless steel grommets? I found 305 stainless on Sailrite and was planning to use that as not in contact with other metals and only on underside. I used the 305 ok but not the best... They are underside so tough to see anyway.
3) Do you recall how many yards you needed of pleated and flat vinyl? I was thinking at least 3 yard of pleated to not have seams in the longer bolster and 2-3 yds of flat for the aft bench and corners of other bolsters. To be honest I forgot. I laid out the old pieces and then figured it out.
4) Do you recall what thread you used? I don't believe there is outside stitching other than potentially in the aft seat so I was planning to use Sailrite's v-92 Polyester Natural UV 4oz and not worry about color so much as not exposed. Sail thread from Sailrite.
5) Did you need to join two pieces of foam for the longer bolster? Sailrite has 80" sections of foam but maybe able to find longer sections contacting them or through other suppliers. I believe it was one piece. I used yellow contact cement where I needed to join foam. Got the firmest foam I could find. Got this on Amazon as it was cheaper.
6) Did you screw in bottom of the bolsters back through grommets or use a different mechanism. I've heard there are clips you can use that extend just slightly below bolsters and are not visible when standing but haven't been able to locate. I used the existing backing boards. These are a composite material and can be easily reused. Same mounting - over the hooks and screwed through the grommets.
Thanks in advance.
 
  • Like
Reactions: JackStraw

Fishtales

Well-Known Member
Joined
Jan 31, 2005
Messages
7,496
Reaction score
1,161
Points
113
Seasicks notes are spot on. Def use the existing to pattern, layout, lots of pics. Really not that bad to do.
 
  • Like
Reactions: JackStraw

Pat Hurley

Well-Known Member
Joined
Apr 22, 2020
Messages
244
Reaction score
113
Points
43
Age
66
Location
OCMD
Model
Marlin
I hadn't seen this thread and the pictures Fish ... Looks real good. How did you like that Llebroc ? I cut my fixed pedestal @ 9" for the portside chair and vis is great there (guys fight over who gets that seat). I need to put a fixed pedestal on the helm side this winter (get rid of the adjustable one) probably have that one cut @ 10" for a good clean view over the MFD"s
 

Fishtales

Well-Known Member
Joined
Jan 31, 2005
Messages
7,496
Reaction score
1,161
Points
113
Hi Pat,
Hope all is well with you and your boat. I love the Liebroc. The adjustable seat is great as a seat and leaning post. Glad you turned me on to it and I got when I did. The THT discount is no longer offered and I thought the price was very good for the product at the time. I have not installed the fixed height pedestal yet, still using the original. I plan to install this year though as there is a little movement in the adjustable pedestal and it needs to be higher. I've been hemming and hawing on the height. Given I have one shot at it (unless I want it shorter), I want to make sure I got it right. I guess I'll start at 10" and work my way down as needed. Working to get a pipe cutter that can handle the diameter to make it a nice cut. Thanks for the tip on the height.
The upholstering was really not that bad except for the companion seat. A bit of bitch due to the many pieces, but it came out fine in the end.
Next thing will be the cockpit drain hoses. I have all the parts (hose, clamps, new drains and deck plates), just need to execute it. I'll wait until early spring as I can't get under the wrap now.
I'm going to put an 8" hole in the sides of the euro transom on the starboard side it is to the right of the ladder. Will only be a couple inches above the ladder deck area. Going with the Beckson screw in deck plates. Working up the balls to do the cuts. This will be the biggest hole yet after the 6" speakers. I don't like the idea of cutting a boat, but I think it will be necessary to gain access - especially on the port side as there is a lot going on under the cockpit floor and euro transom on that side.
 
  • Like
Reactions: Pat Hurley

Pat Hurley

Well-Known Member
Joined
Apr 22, 2020
Messages
244
Reaction score
113
Points
43
Age
66
Location
OCMD
Model
Marlin
… you know we could probably install the pedestal at the full 12” and see what sight line looks like then cut it down. Although 12” is most likely too high it never hurts to sneak up on the height that works for you. The other thing is you’ll have to cut the locking hole or slot to keep the chair from moving if your tension adjustment isn’t tightened.

Can’t weight to follow along on your scupper project… I’ll be right behind you tackling the same.

Happy New Year !!