Bow Pulpit Restoration and New Windlass Install

ROBERTH

GreatGrady Captain
Joined
Jun 10, 2006
Messages
1,304
Reaction score
120
Points
63
Location
Raleigh, NC
Model
Sailfish
Well, finally got around to putting this together for this last project.
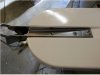
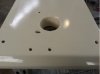
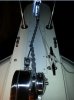
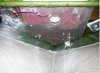
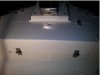
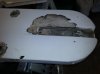
It was time to get to the pulpit and repair the cracking and damage and gel coat damage. As well, installation of a new Lewmar Profish 700 Windlass.
Was able to get a special deal on Lewmar Windlass with anchor package. It is a 14# anchor, which is rated for this size boat, even though I wanted the 22#, but since it was a really good deal, could not pass it up. Will see how well the 14# holds.
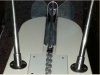
I also purchased 600' of 8 plait with 30' of 1/4" HT chain with swivel from Seco South. Great Deal! Looks so far like I have plenty of room for this rode. It does not pile up any higher than my previous 300' of 3 strand with 15' of chain, so hoping this will be ok. If not, I can pull some off to the side....this model as others mentioned has a very large rope locker with ability to expand it easily if needed.

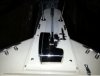
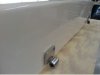
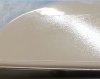
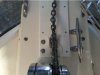
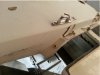
Here is a series of pics to show the progress. Gelcoat and texture came out great as well as the repairs. Very happy with everything except for the chain tensioner. It is a little off too far to the side and will bend slightly, but as long as I don't over tighten the chain with the windlass, I should be ok. I also took many ideas from you all on previous posts, so thank you all for the inputs and info! :D

Will try the rope tie off trick to move from spot to spot like others mentioned, and will not use the tensioner until time for long runs or when not using the anchor.

I also have the wireless remote, which is great for when you need to use it away from the helm, but only thing I don't like about it is the 1.5 second delay it has. You can't use it to tighten up the windlass as the last final step as it will try to overtighten and you can see the stress on the pulpit when you can't keep it from overrunning. I can't wait to get it out in the water and learn how to use it now! The free fall feature is pretty cool how it works.
 

Attachments

  • BP1 Before.jpg
    BP1 Before.jpg
    16.7 KB · Views: 5,632
  • BP2 Before.jpg
    BP2 Before.jpg
    21.6 KB · Views: 5,624

ROBERTH

GreatGrady Captain
Joined
Jun 10, 2006
Messages
1,304
Reaction score
120
Points
63
Location
Raleigh, NC
Model
Sailfish
Adding other pics
 

Attachments

  • BP3 After.jpg
    BP3 After.jpg
    20.7 KB · Views: 5,617
  • BP4 After.jpg
    BP4 After.jpg
    12.5 KB · Views: 5,616

ROBERTH

GreatGrady Captain
Joined
Jun 10, 2006
Messages
1,304
Reaction score
120
Points
63
Location
Raleigh, NC
Model
Sailfish
more pics
 

Attachments

  • BP5 After.jpg
    BP5 After.jpg
    17 KB · Views: 5,613
  • BP6 After.jpg
    BP6 After.jpg
    22.3 KB · Views: 5,609
  • Like
Reactions: Dave2020

ROBERTH

GreatGrady Captain
Joined
Jun 10, 2006
Messages
1,304
Reaction score
120
Points
63
Location
Raleigh, NC
Model
Sailfish
more pics
 

Attachments

  • BP7 After.jpg
    BP7 After.jpg
    28.5 KB · Views: 5,607

ROBERTH

GreatGrady Captain
Joined
Jun 10, 2006
Messages
1,304
Reaction score
120
Points
63
Location
Raleigh, NC
Model
Sailfish
I also used a 3/8" Aluminum backing plate.
 

Attachments

  • BP8 BackPlate.jpg
    BP8 BackPlate.jpg
    26.1 KB · Views: 5,613

ROBERTH

GreatGrady Captain
Joined
Jun 10, 2006
Messages
1,304
Reaction score
120
Points
63
Location
Raleigh, NC
Model
Sailfish
The anchor hatch that I stepped on last year in rough seas and cracked since it was not removable and always in the way, is restored, reglassed and gelocoated. Now is much stronger and I installed motor box hinges so it can easily be removed out of the way if needed.

Close up of the hinge:
 

Attachments

  • BP9 Hatch.jpg
    BP9 Hatch.jpg
    13.1 KB · Views: 5,607
  • BP10 Hatch Hinges.jpg
    BP10 Hatch Hinges.jpg
    11.7 KB · Views: 5,604

ROBERTH

GreatGrady Captain
Joined
Jun 10, 2006
Messages
1,304
Reaction score
120
Points
63
Location
Raleigh, NC
Model
Sailfish
One other shot is the helm switch location:
Other things I did and show up here on panel are the Emergency backup Bilge and Emergency High Water Alarm as well as Fusion remote for Sonic Hub sound.
 

Attachments

  • Helm Switch.jpg
    Helm Switch.jpg
    33.6 KB · Views: 5,587

1st grady

GreatGrady Captain
Joined
Jan 31, 2005
Messages
537
Reaction score
3
Points
18
Rob,
Did you lay any cloth in the damaged areas?
Did you use poly resin or epoxy?
I didn't know about jacking up the pressure, I figured it would atomize the gel too small and not get the texture. I eventually used the prevail because that is what worked for me in the past. Surface is very similar to the factory finish.
Just curious as to how others repair these issues as it seems it is continuous with these older vessels. It seems every winter I need to repair a hatch cover or two. I previously tried some poly resin to repair the fish box lids and the repair started to separate over time so now I use epoxy resin. Keeping the drip edges of the hatches, hard top and pulpit sealed with gelcoat are necessary in preventing moisture from wicking up into the glass.
Nice looking job on the repairs. Anchor hatch looks great.
 

ROBERTH

GreatGrady Captain
Joined
Jun 10, 2006
Messages
1,304
Reaction score
120
Points
63
Location
Raleigh, NC
Model
Sailfish
Thanks! So for the pulpit, I found that when grinding down into it, the most product that was used by Grady was the structural filler type material. Basically bondo with some glass in it. I was going to use polyester resin with layers of glass, but was afraid of having different materials expanding/contracting under the gelcoat would cause more problems than there already are this this sub surface product, so maintained original material for compatability.
In regards to using epoxy, everyone warned me not to use that under gelcoat due to poor adhesion. It is best to apply over polyester resin products.
Will this fix last 20 years? I doubt it, but if it has problems down the road, I think I can patch/repair it while still on the boat and keep up with it. This one as you can see was let go by previous owner, and over time, water got into the filler and expanded and broke the bond with the gelcoat so it was popping off in areas.

I played around with the spraying. I used to paint cars and construction equipment many years ago and used a lot of industrial type urethane's and acrylic urethanes. Found that using more pressure always yielded better response to surface for atomization/smaller droplets.
I think the secret for the gelcoat is to back way off and let it snow down so that it does not melt down and try to flatten down too much, but at same time, you have to get it thick enough to let it kick.

On the hatch, I did use the preval. It came out ok, but I had better results with a better texture with the spraygun at a much higher pressure with more reducer with methods mentioned. I used to spray my urethanes at over 100psi and had zero orange peel. If you check the surface on this pic next to the texture, you will see gelcoat near perfecly slick with no orange peel. This is due to spraying at higher pressure than most folks and putting it on in a fairly heavy layer to allow enough material to flow. It is technique as with anything.
This is zoom in on the bow pulpit texture with spraygun technique:
 

Attachments

  • BP ZOOM IN TEXTURE.jpg
    BP ZOOM IN TEXTURE.jpg
    38.9 KB · Views: 5,565
  • Texture Zoom View.jpg
    Texture Zoom View.jpg
    104.7 KB · Views: 5,565

ROBERTH

GreatGrady Captain
Joined
Jun 10, 2006
Messages
1,304
Reaction score
120
Points
63
Location
Raleigh, NC
Model
Sailfish
Thanks Tbaxl! I think there might be quite a few out there that need refurbishing, so hope that this info will help others.

The only thing I was not sure of on this was the installation of the chain tensioner. I had researched before install and could not find any examples of installation or suggestions from anyone on where/how to install it. So I did what I thought was right, but you can see the side strain on it when applying some tension to the chain once connected. If I put too much strain, it will bend the arm.

So just this last week, I found some good pics from some folks on the seaswirl site and the chain tensioner should be mounted just directly under the chain where it exits the windlass and directly in-line. This is where I debated, but thought it would interfere with grabbing chain when deploying, but they said it was not an issue as the chain is always under some tension when dropping.

So this weekend, I will re-mount the tensioner and take new pics so others will know about this.
Also found that the best chain tensioner to use is the Lewmar over the Windline as it has a security pin that locks it down and prevents accidental release which others had said that theirs at times would release on it's own for the windline brand.
 

1st grady

GreatGrady Captain
Joined
Jan 31, 2005
Messages
537
Reaction score
3
Points
18
I placed mine directly inline with the chain. I have had the same tensioner for about 3 years and it has not released. I feel that if it would release, the chain will remain on the hook and will just have a bit of slack but not completely deploy. We manually deploy the anchor so have not had an issue with catching.
 

ROBERTH

GreatGrady Captain
Joined
Jun 10, 2006
Messages
1,304
Reaction score
120
Points
63
Location
Raleigh, NC
Model
Sailfish
1st Grady, where did you mount yours in regards to closeness to the windlass?

In regards to the tensioner snapping open, it would be hard for it to come unhooked. I think the point that the posts I had read was more on the fact that the chain tension was released allowing anchor to bounce around as well as the chain, but everyone felt it was very important to have some type of device to secure the anchor and not just rely upon the windlass to hold it.
I did read a few posts where the anchor deployed while under way and caused some damage and others had near miss damage due to catching it when it happened. That sounds pretty scary!
 

bayrat

GreatGrady Captain
Joined
Jun 19, 2010
Messages
277
Reaction score
0
Points
0
Location
long island, new york
I have been debating the chain tensioner for 3 yrs (have it and never mounted it).....soooo.. still using a bungee with my Lewmar 700. The guy I bought my boat from told me that he always turned the windlass breaker off when running (not a big deal because its mounted port side of the console and reachable while underway). Im not sure that its foolproof but at least I cant accidentally lower the anchor without meaning it. Anchor slipping out is a different story.
 

ROBERTH

GreatGrady Captain
Joined
Jun 10, 2006
Messages
1,304
Reaction score
120
Points
63
Location
Raleigh, NC
Model
Sailfish
One thing I did not want to worry about when running in rough seas is my anchor or chain flopping around or coming loose. The tensioner does a great job pinning down the anchor and will definately work better when I have it in line. The rope trick that goes down with the anchor makes a big difference as well as it brings on tension from a slightly different angle. At some point, might not need the rope. Will see how it plays out.
I really do like the design of the lewmar tensioner though with the safety pin.
 

ROBERTH

GreatGrady Captain
Joined
Jun 10, 2006
Messages
1,304
Reaction score
120
Points
63
Location
Raleigh, NC
Model
Sailfish
Ok, was able to remount chain tensioner positioned inline with chain coming off windlass and as close to windlass as possible. This is the ticket for sure. Much easier to hook and unhook the chain and just looks right.
 

Attachments

  • Chain Tensioner Inline mount.jpg
    Chain Tensioner Inline mount.jpg
    29.9 KB · Views: 2,295

ROBERTH

GreatGrady Captain
Joined
Jun 10, 2006
Messages
1,304
Reaction score
120
Points
63
Location
Raleigh, NC
Model
Sailfish
Update. Was able to splash boat last weekend and use the windlass/anchor for first time. I bet I deployed/retreived 10 time over the course of the day to learn the behavior and habits of the system.
Was worried the anchor would not hold as it is the 14# and not the 22# model. It held fine in the currents. Got to do real test though this weekend. Winds were 15-25 with gusts to 40. Fortunately, the winds were off the beach, so could get out and stay close and no problem.
Went out just far enough to get into wind and see how the anchor would hold. It did great! Seems to stick fast and hold tight in sand, so think I am good there.
One thing though is I have to give it a nudge to get is started off the roller, so I give it just enough slack and then return to the helm to drop it when I am in position. The 30' chain might be the thing that really helps this ligher anchor.

The one part of this install I am not happy about is the chain tensioner. After remounting it inline, it is no issue being directly inline and close to the windlass, but today, when it was secured, running back in the inlet, a bit choppy, but no pounding, the chain somehow came loose, but the tensioner held and kept it from dropping the anchor while running. But, when I went up front to see what happened, the chain was barely held and easily could slip off the chain, so I was lucky this time!

Seems somehow the chain tension held by the windlass loosened enough to allow the slack.

So, now I will put the small safety rope back on and use it as double safety. I had removed it since I thought the tensioner was going to handle this part of the safety concern. I still think I am doing something wrong with this tensioner. Also, the tensioner rod is bent due to when tightening chain in windlass, it lifts up enough to pull and bend it.

I did see another boat today that had a safety cable with quick connects that I think I will look for instead of the rope. It will make it easier to release and connect and will not get in the way of the safety rope.

Anyway, just wanted to give an update and have to say, this thing works great and I am so happy not to have to heave up the anchor line!
 

bayrat

GreatGrady Captain
Joined
Jun 19, 2010
Messages
277
Reaction score
0
Points
0
Location
long island, new york
Although I have a chain tensioner I have never installed it because of stories similar to yours (loosening under way). So, for the past 3 years I still havent moved past a bungee secured around the base of the windlass and attached to the chain. The safety chain/ quick disconnect idea seems interesting.
 

ROBERTH

GreatGrady Captain
Joined
Jun 10, 2006
Messages
1,304
Reaction score
120
Points
63
Location
Raleigh, NC
Model
Sailfish
I took a pic on a world cat this weekend that had the safety cable with quick connects and thought I had seen these short cables before, but was not able to find them online or in any of my many sales manuals for all the suppliers. Assume one would have to make one up. If we can get the admin to allow more pics to be posted, I can put a pic here and show you what it looks like.