Bulkhead between gas tanks rotting and general questions

HarryCarry

New Member
Joined
Apr 28, 2014
Messages
3
Reaction score
0
Points
0
Location
Long Island
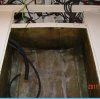
Hi guys, new member here with a bunch of questions. Great site with so much great advice! I have a 1989 25 Sailfish. I have some rot (approx 20" wide by 3" deep)in the center of the bulkhead between the two gas tanks. The sides still have laminate and on top on either side of the rot is still sealed. It looks like water came in through a leaky snap-in deck plate. I'm wondering what would be the best way to repair this without removing the tanks. So far I've removed most of the rot and am letting it dry. I was thinking about drilling some holes from above down into the plywood and pouring in some Gitrot. Then maybe filling the void with resin and or some kind of filler like a piece of wood. Any advice would be greatly appreciated!

A little background about the boat: It has twin 1997 175 Evinrude Ocean Pros with a notched transom. I went from a 33 foot sprortfish to this and am getting ready for my second season with it. The first season i spent more time repairing then fishing, but that was expected because of its age and the p/o neglected her for two years. I'm not too crazy about the notched transom, especially at anchor. I don't trust that flimsy splash guard. The boat and motors seem solid except for some cosmetic issues. Everything seems pretty well sealed and encapsulated. I wish I had better access to the bilge to check the structural integrity completely without ripping up decks. The transom seems solid but I guess I'll get a better idea when I install the new transducers for structure scan. Is it a good idea to drill some 1/8 pilot holes as well to check the coring for water damage? Also I read about drilling through the deck to stbd and port of the tank hatches and sticking a brake line into the foam to check for water. The gas tanks were replaced within the past 8 years otherwise I might remove them to check them and the stringers and get to that bulkhead between them. Another thing are those cockpit drains. One had a little ball right beneath the drain cover which I removed last season and the others ball was down in the pipe where I guess it should be. Anyone familiar with these?

Thank you, Harry
 

ROBERTH

GreatGrady Captain
Joined
Jun 10, 2006
Messages
1,304
Reaction score
120
Points
63
Location
Raleigh, NC
Model
Sailfish
Removal of the rear tank is not hard to do which can allow you more access and visibility to drill and work it and see the extent of the rot. In mine, I could see through the green tinted resin layers and the wood looked clean.
If you drill out and dry out, I would instead use Rot Doctor CPES which I think is a much more effective product than Git Rot. I have used both and there is a huge difference.
It would be possible to cut the rear skin side off, and insert a new piece of wood and re-attach the skin with some SS screws to allow bonding, using epoxy resin and layer some glass around the edges.

My cockpit drains do not have the balls in them. Just a straight through 90 degree fitting that exits out the scuppers with the flapper.
 

DennisG01

GreatGrady Captain
Joined
Sep 1, 2013
Messages
6,864
Reaction score
1,218
Points
113
Location
Allentown, PA & Friendship, ME
Model
Offshore
I'm currently doing a similar project with my aft bulkhead (behind where the aft tank would normally be). I cut one skin off, cut the wood back to good stuff. I drilled numerous holes in the rest (vertical) and let it dry over the winter. So far, now, I've heated the wood up and then poured straight epoxy into the holes and encapsulated the rest. The heated wood will thin the epoxy and allow it to flow further into the wood, without losing any structural strength of the epoxy. Next will be to epoxy some new wood in, use a few screws to pull the skin tight to the new wood, fill gaps, then glass over the new wood and tab around to the stringers.
 

DennisG01

GreatGrady Captain
Joined
Sep 1, 2013
Messages
6,864
Reaction score
1,218
Points
113
Location
Allentown, PA & Friendship, ME
Model
Offshore
gw204 said:
Pull the tanks. I bet that bulkhead is worse than you think.

I bet you're right. Harry - you mentioned "most" of the rot was removed. Until you get back to dry wood and let the wet stuff dry out, you really won't have gotten all of it. However, this is like opening a can of worms - how far are you prepared to go? Chances are, if you go a little further... you'll need to go a little further still... and then you'll need to go a little further... etc, etc. At some point, you need to just let it go and be OK with it. Fix what you can, reinforce some other areas. Unless you want to get into tearing most of the boat apart.
 

Pez Vela

Well-Known Member
Joined
May 7, 2008
Messages
218
Reaction score
1
Points
18
Location
San Diego
I would take a minimalist approach to the bulkhead repair and just use the boat until one or both of the fuel tanks begin to leak. If they're 25 years old, that should be any day now. That's the time to do your carpentry, when the old tanks are taken out of their compartments for replacement.
 

HarryCarry

New Member
Joined
Apr 28, 2014
Messages
3
Reaction score
0
Points
0
Location
Long Island
I appreciate the advice guys. I think I'll go with a combination of everyone's advice. I like the idea of pulling the aft tank that Roberth suggested as it's the older of the two, built by Atlantic Coastal Welding in 2008. I'll make that decision based on the results of further testing. Otherwise I'll patch up that bulkhead best as I can. It seems to me that bulkhead is mostly for supporting the tank hatches, but I could be wrong.
 

ROBERTH

GreatGrady Captain
Joined
Jun 10, 2006
Messages
1,304
Reaction score
120
Points
63
Location
Raleigh, NC
Model
Sailfish
Harry, I some pics of mine which I would assume is same or near same as yours.
In the fuel tank cavity, both large and small tanks share same cavity. There is no bulkhead between them. Just a separator board. Here is what it looks like with both tanks out.The back side of the bulkhead shown is painted white from the bilge gel coat or whatever Grady uses in that area. So you can see through from the inside toward the tanks. By removing the rear tank, you should be able to see the wood condition through the glass.In my case, all the wood was in great shape. Some dark areas were not wet or rotted. I tested by drilling. Maybe they get some moisture at some time and darken or some wood darkens as well. Close up pics revealed no rot in my case.
 

Attachments

  • Fuel Tank Bulkhead Rear.jpg
    Fuel Tank Bulkhead Rear.jpg
    177.9 KB · Views: 1,908

HarryCarry

New Member
Joined
Apr 28, 2014
Messages
3
Reaction score
0
Points
0
Location
Long Island
Roberth, Thanks for the pic. I believe that's the same as mine. I see you have a new fill hose and vent line. I just replaced all my feed lines. The lines going from the tanks to the valve manifold were horrendous, I guess from ethanol. i'm wondering if I should also replace the fill and vent. They seem fine but can't absolutely be sure.

This weekend I plan on installing the transom mount ducers. Then I'll get to do some poking and prodding to check out the transom. I had planned on running the cables through the rigging boot, but now I'll run them through the transom into the stbd batt box so I can see if there's any water intrusion. From what I can see, the boat is solid. It's what I can't see that bothers me. Maybe I've been reading too many horror stories on the web. It's like going on WebMD and reading about diseases.
 

ROBERTH

GreatGrady Captain
Joined
Jun 10, 2006
Messages
1,304
Reaction score
120
Points
63
Location
Raleigh, NC
Model
Sailfish
Good observations......I replaced all hoses. Actually, all my original were in very good shape, but chose to replace them due to age and concern for ethanol. Not so sure former owners used ethanol fuel, so might be why I was in good shape and when I used it I always used the Startron to negate the affects of the ethanol.

In regards to the fills, they are all Stainless steel and were in great shape, so no need to replace them in my case. Just got some new Orings to make sure they sealed correctly. :wink: