Converting 228 aux fuel tank area to storage

SuskyMike

Member
Joined
Nov 20, 2018
Messages
13
Reaction score
2
Points
3
Age
45
Howdy Grady owners/fans,

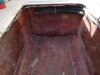
I bought a 1998 Seafarer 228 this winter, and am already running into some "where do I store it" issues with new toys/gear that I'd like to store on board but get out of the way. Things like small inflatable tubes, a little grill and bait table, etc. I don't have a hard top, so things like life jackets are in one of the fish boxes, and we keep towels, extra clothes, sunscreen and beach gear in the compartments in the cuddy.

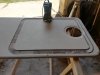
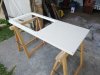
I noticed that the area where the auxiliary fuel tank or fresh water tank could go in the deck is a fairly large, currently unused part of the boat. I'm not running offshore or taking multi night trips, so I have no need in the near future for either of those tanks down there. Any reason I can't cut a rectangular hatch opening in that deck cover and convert that area to extra storage? The removable deck area to service/install a tank is 24x52", so I can't imagine cut-out to handle a 13x24" hatch would do anything to the structural integrity, which the bulkheads probably handle anyway. It's potentially something to trip over or slip on, but I could put non-skid on the top to help with that.

Basically, I'm thinking long and hard before making any holes in my boat, deck or otherwise, so I wanted to run it by other owners. Anyone see this done before? Or any pitfalls I'm not considering?
 

DennisG01

GreatGrady Captain
Joined
Sep 1, 2013
Messages
6,818
Reaction score
1,210
Points
113
Location
Allentown, PA & Friendship, ME
Model
Offshore
I only have one gas tank. The aux tank area is just as you are wondering - a huge storage space for me. I used the entire aux hatch - added a couple hinges and a flush pull ring. Of course, without the hatch being sealed, you will get water down there from rain - so make sure whatever goes down there is OK being wet. I added a drain to the trough that runs around and tied the drain into the scupper drains.
 

Bdsp1234

Well-Known Member
Joined
Jan 8, 2019
Messages
157
Reaction score
14
Points
18
Age
66
Model
Seafarer
Oh..... I can’t wait for replies on this. I have an 01 226 and want to do the same thing. Any pictures that anyone has would be huge.
 

wrxhoon

Well-Known Member
Joined
Apr 4, 2012
Messages
958
Reaction score
291
Points
63
Location
Sydney Australia
What Dennis said plus any water that gets in the bilge will find its way there as well..
I'm sure the cover is not structural in any way. On my new boat it's even screwed down.
 

Ky Grady

GreatGrady Captain
Staff member
Joined
Mar 1, 2006
Messages
2,918
Reaction score
1,272
Points
113
Location
Berea, KY/Cross, SC
Model
Seafarer
Here's the area I have with the auxiliary tank and water tank removed. Don't see why it wouldn't work for your use of storage. Other than the mentioned water issues, unless you seal it and cut a sealable hatch into the floor.
20190404_162958.jpg
 

SuskyMike

Member
Joined
Nov 20, 2018
Messages
13
Reaction score
2
Points
3
Age
45
I didn't even think of using that whole cover as the lid. I'll have to consider that.

Even though my boat is now >20 years old, it's so clean below deck it really looks like there's never been water in the bilge. I think I'd probably opt for a smaller sealed hatch, and keep that deck piece sealed to keep it clean and dry. Good to hear that other people have done it.

Seeing how big that is with the cover off, I'll also have to consider things sliding/banging around. That part of the boat takes some abuse in rough seas.
 

Doc Stressor

Well-Known Member
Joined
Nov 13, 2009
Messages
1,177
Reaction score
288
Points
83
Location
Homosassa, FL
Model
Seafarer
I converted the forward tank compartment on my old 1986 Seafarer to a storage area. I put a large plastic tub in there to keep things away from the bilge water. I used to put 2 scuba tanks in there.

I used the original floor panel as the hatch. This required some cutting in the area where I put the hinges in order to allow the panel to rotate up. I used a pair of stainless steel springs to hold the hatch open and liftable latches on the opposite side from the hinges. I don't remember where I sourced the springs, but nowadays I would use gas-filled struts similar to those used to hold the fish box open.

The final job wasn't waterproof, but the hatch was located in a pretty dry area of the deck.

I wish I had pictures but that was a long time ago.
 

OMER

Active Member
Joined
Dec 1, 2018
Messages
34
Reaction score
21
Points
8
Age
72
Location
Marennes France
Model
Seafarer
I did like that:
1) test with the rescue
2) rigging tube removal, elongation of wires
3)inlay of the outer part of the hatch
4)screwing and sealing the hatch
 

Attachments

  • IMG_20190629_170436.jpeg
    IMG_20190629_170436.jpeg
    65.6 KB · Views: 170
  • IMG_20190704_105645.jpeg
    IMG_20190704_105645.jpeg
    110.5 KB · Views: 169
  • IMG_20190703_152609.jpeg
    IMG_20190703_152609.jpeg
    91.7 KB · Views: 169
  • IMG_20190704_091452_BURST001_COVER.jpeg
    IMG_20190704_091452_BURST001_COVER.jpeg
    70.6 KB · Views: 171
  • IMG_20190713_141755.jpeg
    IMG_20190713_141755.jpeg
    55 KB · Views: 180
  • IMG_20190713_141849.jpeg
    IMG_20190713_141849.jpeg
    73.5 KB · Views: 178

Doc Stressor

Well-Known Member
Joined
Nov 13, 2009
Messages
1,177
Reaction score
288
Points
83
Location
Homosassa, FL
Model
Seafarer
Now that's how to do it if you don't need hatch access to the full length of the compartment. Nice job!
 

SuskyMike

Member
Joined
Nov 20, 2018
Messages
13
Reaction score
2
Points
3
Age
45
Nice, OMER. That was exactly what I had in mind when I started thinking about this. I need a little more practice with my router first! This looks like a good winter project.
 

DennisG01

GreatGrady Captain
Joined
Sep 1, 2013
Messages
6,818
Reaction score
1,210
Points
113
Location
Allentown, PA & Friendship, ME
Model
Offshore
Omer, what brand hatch is that? Before I did what I did, I was looking around for a large, pre-match hatch like yours. I was only coming up with heavy duty, aluminum type sealing hatches that were quite expensive.
 

UCPA111

Well-Known Member
Joined
Jul 24, 2017
Messages
325
Reaction score
103
Points
43
Location
Erie, PA
When I redid my Seafarer I cut the partition between the main and aux take areas. I installed a new main tank in the forward position to better distribute weight and account for my 300 Verado on the aft. I installed a new bulk head and made the rear area into a storage compartment. I built a shelf in the aft portion and installed my batteries there, and then put built a hatch to cover the entire area. The hatch is removable. I sealed the edges with some compression foam. Thus, I can hose the deck and get a couple cups of water, but not a deluge, into the compartment. It drains through the rear bulkhead into the aft of the boat.
you can checkout the concept here: At the ~9 minute mark I hit on the storage area.

Some more finished footage is here:
 
  • Like
Reactions: PNW_Drifter

RussGW270

GreatGrady Captain
Joined
Mar 5, 2019
Messages
1,761
Reaction score
253
Points
63
Age
57
Model
Islander
If it were me, I'd keep the tank.. BUT.. if I were you.. lol.. I'd sell the tank.. I bet someone would want it.. and use the funds to have a "box" made that would make it a sealed compartment...i.e. the bilge would be under it...then, a thick lid to support a tad more weight. They could add cross-members to the fiberglass lid, not big ones, but anything helps, to add more strength. Would lose a little space due to the box, but you add dryness.

Again.. just picturing it in my head.... not saying my head is screwed on right lol

R
 

PNW_Drifter

Well-Known Member
Joined
Oct 20, 2019
Messages
407
Reaction score
158
Points
43
Location
Seattle, Washington USA
Model
Seafarer
Very cool Omer. Very creative with the router work! Did you do that to make the edge of the new hatch frame more flush with the Grady deck? At first I was going to cut out the pie plate like you did but the support is right behind it so was weary of doing that...

I'm about to do the same with my 228 but I have a few questions:
  1. It looks like you cut through 1 of 2 grady hatch supports (front one). Is the hatch bouncy now?
  2. Where did you find that huge hatch?

I bought this one from amazon It's 13" x 24" and off white (supposedly, haven't got it yet). The color is hardest thing to find online I noticed. Bright white is easy to find.

Hatch I bought: https://amzn.to/3ewTAnd

Very exited to get that huge storage! It's weird that, this area is the cleanest area of my boat. No dirt down there in 20 years! must stay pretty dry.
 

OMER

Active Member
Joined
Dec 1, 2018
Messages
34
Reaction score
21
Points
8
Age
72
Location
Marennes France
Model
Seafarer
I made sure that the hatch did not extend too far from the deck, so as not to catch my feet.
the frame of this hatch is very rigid and strengthens the bridge.

I bought this hatch in Germany. the defect is that it is slippery, I added this year a non-slip coating
IMG_20200611_183144.jpg
 
  • Like
Reactions: PNW_Drifter

PNW_Drifter

Well-Known Member
Joined
Oct 20, 2019
Messages
407
Reaction score
158
Points
43
Location
Seattle, Washington USA
Model
Seafarer
I made sure that the hatch did not extend too far from the deck, so as not to catch my feet.
the frame of this hatch is very rigid and strengthens the bridge.

I bought this hatch in Germany. the defect is that it is slippery, I added this year a non-slip coating
View attachment 14178
Thanks OMER

I see your hatch is very wide so the frame carries the load right to the supports on the edges of the Grady boat hatch.