Core Replacement Guide?

Seafarer228_G

Active Member
Joined
May 30, 2023
Messages
29
Reaction score
6
Points
3
Age
62
Model
Seafarer
Can anyone point me to a guide on materials/process for replacing the wood core? Maybe I was searching the wrong terms on this site and YouTube.

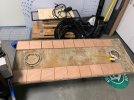
My 1994 seafarer 228g has a very soft spot over the gas tank and want to fix it this weekend. Reading through old posts on this forum I know this is not unique issue. Spent some time researching fixes and understand the general idea but still have a few questions. Specifically looking to clear up:

-Some people use marine plywood, some use normal (non pressure treated) plwood wood from Home depot. Any strong preferences either way, or is there a special type of plywood to use? Have also read about people glassing up the exisitng wood but assume I'm better off replacing it.

-How hard is it to remove the old wood core and what the best way to do it? Are we talking a grinder job, sanding, crowbars, a power washer, or just unbolting it?

-What type of epoxy/resin should I use to seal the new core up and attach the core to the cover?

-What type of caulking should I use to seal along the outside of the tank?

Thanks,

Pete
 

Hookup1

GreatGrady Captain
Joined
Oct 16, 2007
Messages
2,675
Reaction score
729
Points
113
Age
69
Location
Cape May, NJ
Model
Islander
I did the deck core replacement on my 268 Islander. Mine was done with 1/2" Coosa composite material (like a plywood sheet). West System epoxy. 3M 4000 caulk. Read this thread thru to see how it was done.


There are many different opinions how to do this and what materials to use. Don't use pressure treated plywood. Marine plywood is ok.

Getting the old plywood out was easy for me. The underside was coming loose. I peeled it off and took the balsa squares out. One of the oscillating saw tools is helpful for stubborn sections.
 
Last edited:
  • Like
Reactions: Seafarer228_G

kirk a

Well-Known Member
Joined
Sep 26, 2009
Messages
349
Reaction score
111
Points
43
Location
Massachusetts
Model
Express 330
There are a number of well documented threads on this site for re-coring panels.

Removal of old - depending on how bad, grinder with a flap blade, oscillating tool, or when really bad putty knife.

Materials needed core - ply or composite core same thickness as original

Epoxy or resin - my preference has been epoxy and have had great luck with the Total Boat 5-1 epoxy from Jamestown distributors

Fiberglass mat - both in 3oz weave as well as some 1706 for additional strength

For caulking I used a DAP product in Almond color recently which was dang near a perfect match for the gel coat. I've read where others had luck with GE product, but my store happened to have DAP.

You might also widen your search to you tube - boatworx? Seems like there are a bunch of good how - to's there.
 
  • Like
Reactions: Seafarer228_G

seasick

Well-Known Member
Joined
Aug 19, 2008
Messages
9,160
Reaction score
1,317
Points
113
Location
NYC
It seems like the repair work is new to you and you need to do more research. Take a look at Boatworks Today Youtube videos. Andy has some good videos on fiberglass work.

I don't think you can do the project in one weekend for several reasons. More importantly, you won't know if you have additional structural issues until you open the tank coffin.
Is the tank cover screwed and caulked in? If not the job will be a lot more challenging.
If the existing deck panel is flat, recoring would be easier than if it were curved. I f not flat, the wood or composite filer panel has to be cut into smaller pieces and installed like a jigsaw puzzle. In that case, a composite core is probably easier to install.
If plywood is used as mentioned do not use pressure treated material. Solid core non marine plywood may be hard to find locally. That is plywood that doesn't have any gaps or voids. You can tell just by looking at the edges.
So do your research and decide if you are up to the task.
 
  • Like
Reactions: Seafarer228_G

SkunkBoat

Well-Known Member
Joined
Oct 12, 2017
Messages
4,283
Reaction score
1,486
Points
113
Location
Manasquan Inlet NJ
Website
www.youtube.com
Model
Express 265
see https://www.greatgrady.com/threads/deck-hatch-re-core-265.32638/


As for Core materials:

Plywood can be Hardwood (oak, maple,birch, Douglas Fir) or Soft(pine)
Plywood can be rated Exterior, Exposure 1, Exposure2, and Interior. For core material you can only use EXTERIOR.
The ply can be 3,5,7 or more plys and is graded by letters.
A is nearly perfect and sanded
B is very good with minor flaws repaired
C has large repaired knots and voids inside the ply from knots
D is crap

AB is A on one exposed ply and B for all others...The Best.
Marine grade plywood is Exterior AB Douglas fir. Ideally, you would want 7-ply 1/2" Exterior AB Douglas Fir. Its hard to find but Lowes used to carry it.
I have sustituted a very clean piece of BC Exterior Pine but only time will tell if I get burnt... Douglas Fir is the prefered wood for "Marine Grade"

To be clear...the term "Marine grade" does not mean pressure treated. Pressure treated plywood at home centers is usually CDX aka crap....

If you can get it (delivered) at a reasonable price, Coosa board is a great alternative. It is fiberglass reinforced lightweight poly resin.

The 6" squares are important. You are not screwing the core down 16" on center and covering it in glass. You are glueing the core to the underside of a thin flat piece of glass.
A large piece of plyood will have some twist or get some when it dries out. The 6" squares make full contact with the resin and don't impart any twist to the finished part.
 

Seafarer228_G

Active Member
Joined
May 30, 2023
Messages
29
Reaction score
6
Points
3
Age
62
Model
Seafarer
Awesome, thanks everyone for the replies they have been super helpful and informative. Have a good lead on a local supplier of marine plywood.

"Is the tank cover screwed and caulked in?"
Yes. I haven't lifted it so am very curious to see what it looks like underneath.

-Is one gallon of epoxy of resin liekly enough to get the job done?

-Might go with 1.5oz mat size 3oz is harder to find but will try to find some locally. Ideally would like to find a wooven fiberglass sheet with a mat backing

-is covering the marine plywood with fiberglass and resin the last step or do I need to add another thicker layer of resin on top?
 

Hookup1

GreatGrady Captain
Joined
Oct 16, 2007
Messages
2,675
Reaction score
729
Points
113
Age
69
Location
Cape May, NJ
Model
Islander
Awesome, thanks everyone for the replies they have been super helpful and informative. Have a good lead on a local supplier of marine plywood.

"Is the tank cover screwed and caulked in?"
Yes. I haven't lifted it so am very curious to see what it looks like underneath.

-Is one gallon of epoxy of resin liekly enough to get the job done?

-Might go with 1.5oz mat size 3oz is harder to find but will try to find some locally. Ideally would like to find a wooven fiberglass sheet with a mat backing

-is covering the marine plywood with fiberglass and resin the last step or do I need to add another thicker layer of resin on top?
Fiberglast.com is a good source for materials.
MESCO marine supply is good for Coosa board but you have to deal thru a marina - no retail.
Marine plywood is fine to use. It uses a water resistant glue vs regular plywood.
Use a slow hardener for the epoxy. West System 105 resin and 206 slow hardener.
Be careful with larger batches of epoxy resin. Get it out of the container as quickly as possible or you risk a smoking mess. Even a few ounces will go thermo nuclear!
Overdrill all screw holes from underside. Fill with epoxy and a little glass. Re-drill from top side. This is how screw down decks fail - water into coring at screw hole.
I vacuum bagged mine to squeeze everything together. Plastic from Home Depot, sticky tape from Fiberglast and a A/C vacuum pump.


seasick

Well-Known Member
Joined
Aug 19, 2008
Messages
9,160
Reaction score
1,317
Points
113
Location
NYC
Fiberglast.com is a good source for materials.
MESCO marine supply is good for Coosa board but you have to deal thru a marina - no retail.
Marine plywood is fine to use. It uses a water resistant glue vs regular plywood.
Use a slow hardener for the epoxy. West System 105 resin and 206 slow hardener.
Be careful with larger batches of epoxy resin. Get it out of the container as quickly as possible or you risk a smoking mess. Even a few ounces will go thermo nuclear!
Overdrill all screw holes from underside. Fill with epoxy and a little glass. Re-drill from top side. This is how screw down decks fail - water into coring at screw hole.
I vacuum bagged mine to squeeze everything together. Plastic from Home Depot, sticky tape from Fiberglast and a A/C vacuum pump.

are you sure it was 'small' plywood and not balsa squares?
 

Seafarer228_G

Active Member
Joined
May 30, 2023
Messages
29
Reaction score
6
Points
3
Age
62
Model
Seafarer
The most challenging part of this is that my boat is a couple hours away so I won't see it in person until tomorrow but have limited time so want to make sure i'm as prepared as I can be. Had a friend take off the hatch above the gas tank and take pictures. Told him there would be wood squares or one big wood piece but he said it looks like there is only a layer of fiberglass on the bottom and no core. Guessing he can't see the core because there is a layer of glass that needs to be cut out first. Does this hatch look normal?

When inspecting my gas tank I assume I should look for pitting and holes. Is there anything I can do to clean it and make it last longer? Will post better pics but are these pictures telling of the tank condition? Tank is still full from sitting over the winter. Apprecaite all the help!


IMG_9535.jpgIMG_9536.jpg
 

Hookup1

GreatGrady Captain
Joined
Oct 16, 2007
Messages
2,675
Reaction score
729
Points
113
Age
69
Location
Cape May, NJ
Model
Islander
are you sure it was 'small' plywood and not balsa squares?
Probably was balsa. Although there was a significant amount of glue that leaked out. The black mold and sticky film was on my tanks too. When I pulled the hatch and stood it up it leaked coffee colored ooze out!
 
  • Like
Reactions: Seafarer228_G

Seafarer228_G

Active Member
Joined
May 30, 2023
Messages
29
Reaction score
6
Points
3
Age
62
Model
Seafarer
Interesting didn't think of balsa. Assume it's the same removal process, cut the glass and tear the balsa out, sand the base, and put in the new!

Was going to follow this process (cued up to the right spot):
 
  • Like
Reactions: rlorenc24

Seafarer228_G

Active Member
Joined
May 30, 2023
Messages
29
Reaction score
6
Points
3
Age
62
Model
Seafarer
Apprecaite all the suggestions and advice. Everyone was spot on...panel is rotten to the core!

There are reminants of a flat rubber gasket that ran around the base of the panel, although its unclear if it ran all the way around or was just in certain places...is this gasket something that I can/should replace and if so does anyone have suggestions on what to use?

IMG_2208.jpg
I don't see these wooden ridges on the bottom of other Grady tank panels. They don't appear to sit on the 2x4 running across the tanks so unlcear if I need to put them back in or if they are just there to add rigidity.
Capture.JPG

IMG_9536 (1).jpg


Also was wondering if anyone could tell me if this is the original tank, due to wear on the tank sticker I cannot tell year produced/model number:
IMG_2209.jpg
 

Hookup1

GreatGrady Captain
Joined
Oct 16, 2007
Messages
2,675
Reaction score
729
Points
113
Age
69
Location
Cape May, NJ
Model
Islander
Thank is likely original. Board under the deck may have been put there by PO to stiffen it up.

Tank covered in black mold. Don't see a core. You can tell it it has one by how thick it is. Usually cored with 1/2" material. If not consider adding one.

Those glassed in cross pieces are wood stiffnessers.

If the tank can be removed without a chainsaw I would replace it.
 
  • Like
Reactions: Seafarer228_G

SkunkBoat

Well-Known Member
Joined
Oct 12, 2017
Messages
4,283
Reaction score
1,486
Points
113
Location
Manasquan Inlet NJ
Website
www.youtube.com
Model
Express 265
I'm pretty sure there is core in that. you can see the relief around the pie holes.
I'm pretty sure grady only used plywood in decks and deck hatches. Balsa was in hardtops and hull sides of larger models.
 
  • Like
Reactions: Seafarer228_G

Seafarer228_G

Active Member
Joined
May 30, 2023
Messages
29
Reaction score
6
Points
3
Age
62
Model
Seafarer
I'm pretty sure there is core in that. you can see the relief around the pie holes.
I'm pretty sure grady only used plywood in decks and deck hatches. Balsa was in hardtops and hull sides of larger models.
confirmed that there is 1/2" ply core...will be replacing with 1/2" marine core


There is a second empty hatch just in front of the cabin, is that for a larger or auxiliary fuel tank? Lots of space, looks like it could fit ~30 gallons if that's what it's for but also wouldn't want to throw the boat off balance.
 

Seafarer228_G

Active Member
Joined
May 30, 2023
Messages
29
Reaction score
6
Points
3
Age
62
Model
Seafarer
I plan to remove the round access hatches and seal them back as the last step before the panel goes back into the boat. Will be sealing the round access ports and the hatch with 3M fast cure 4000 sealant.

open_hatch_IMG_2241.jpg Hatch_2_IMG_2248.jpg hatch_IMG_2249.jpg


Hatch is cleaned up and ready for a new 6" pieces of 11 ply 1/2" thick marine plywood, just have to do a little more sanding:

Clean_IMG_2250.jpg
 
Last edited:

GradyGary226

Member
Joined
Dec 14, 2016
Messages
9
Reaction score
5
Points
3
My 226 has a 56 gal. aux. tank in the forward hole. also a small fresh water tank between.

I am doing a transom replace right now...those tank covers are a little soft on mine also.

Gary
 
  • Like
Reactions: Seafarer228_G

Seafarer228_G

Active Member
Joined
May 30, 2023
Messages
29
Reaction score
6
Points
3
Age
62
Model
Seafarer
Are you supposed to leave space between the squares or not?

Seen people using one large solid piece and people using many small pieces close together. From what I read you want to leave .25" between the pieces for contraction but would apprecaite advice. In the pictures I took above it looked like there is space between the vertical columns but not horizontally. Hard to know if this was done on purpose.
 

SkunkBoat

Well-Known Member
Joined
Oct 12, 2017
Messages
4,283
Reaction score
1,486
Points
113
Location
Manasquan Inlet NJ
Website
www.youtube.com
Model
Express 265
I "painted" each square with epoxy on all sides and then just had them barely touch. So there is epoxy between them.
To me that seemed to be the way the original was done.
I recommend a wetted layer of chopped strand on the original skin and then pressing them into it.

Also, chamfer the outside edges 45deg to run the next layers of glass down to the edges. I left it so the screw holes go thru glass and high density filler not the wood.

Oh, tape the screwholes and pieholes with packing tape on the gelcoat side. anything you don't want epoxy on...cover it with clear packing tape. Epoxy does not stick to packing tape.
 
  • Like
Reactions: Seafarer228_G

Seafarer228_G

Active Member
Joined
May 30, 2023
Messages
29
Reaction score
6
Points
3
Age
62
Model
Seafarer
I "painted" each square with epoxy on all sides and then just had them barely touch. So there is epoxy between them.
To me that seemed to be the way the original was done.
I recommend a wetted layer of chopped strand on the original skin and then pressing them into it.

Also, chamfer the outside edges 45deg to run the next layers of glass down to the edges. I left it so the screw holes go thru glass and high density filler not the wood.

Oh, tape the screwholes and pieholes with packing tape on the gelcoat side. anything you don't want epoxy on...cover it with clear packing tape. Epoxy does not stick to packing tape.
Awesome, thanks for the advice! Just a few more pieces to cut and sand and then it'll be a new hatch.


IMG_2264.jpg


70856549532__ED5D5804-D6DF-44C1-911A-4E56B5E0254F.jpg
 

Attachments

  • IMG_2262.jpg
    IMG_2262.jpg
    74.2 KB · Views: 9
  • Like
Reactions: SkunkBoat