You are using an out of date browser. It may not display this or other websites correctly.
You should upgrade or use an alternative browser.
You should upgrade or use an alternative browser.
Deck drain hose & thru hull replacement
- Thread starter -Dan
- Start date
River Rat
Active Member
I'm pleased to hear Grady White's customer support.
I must say I'm perplexed about the notion of having to cut large holes in the deck to access ANY of the thru hulls. Is this normal? Of our previous boats I have replaced all of the hoses on two Sea Rays and replaced all of the thru hulls on a Silverton. While I had to squeeze tight to get to a couple of these, I never had to cut into anything. All were late 80's vintage. I guess I've just been lucky?
I must say I'm perplexed about the notion of having to cut large holes in the deck to access ANY of the thru hulls. Is this normal? Of our previous boats I have replaced all of the hoses on two Sea Rays and replaced all of the thru hulls on a Silverton. While I had to squeeze tight to get to a couple of these, I never had to cut into anything. All were late 80's vintage. I guess I've just been lucky?
UPDATE:
I pulled the boat out & took on the project. I did the Port side first to see how difficult removal of the hoses from the fittings would be. They took a little coercion and contortion to get them out but anyone with some skills would have no trouble. I could reach the hose clamps, hoses and fittings to manipulate for removal without hanging upside down as noted by 1st Grady...I guess I have long arms. Since the through hulls were marelon, I used a really stiff taping knife to carefully chisel the out board portion off. The rest was just a matter wrestling with the hoses/ fittings.
On the Starboard side I cut an access hole for an 8 inch round armstrong deck plate behind the transom door as recommended by GW through Fishbust's direct inquiry (Thanks!). Then I basically went through the same procedure as noted above and removed the old hoses and fittings. An 8 inch access plate hole is the minimum diameter I would recommend as I needed some room to manipulate the hose clamps & hoses. I did need to wrestle with the hoses a bit to get them removed from the fittings. It certainly can be done through a 6 inch hole but it would be A LOT less fun.
Lastly,
I keep my boat in the water for 1.5 to 2 years without hauling it out dependent on bottom paint condition & projects/ repairs. The boat is a 1995 and sits slightly low in the water were the scuppers are just slightly submerged. Based on the condition of my my deck drain hoses, I would say I pushed my luck by not replacing these sooner and am very fortunate I did not have a water ingress situation.
I hope this was helpful and strongly recommend tackling this project sooner rather than later. I am pretty E-illiterate but will make an attempt to post pictures...no promises.
-Dan

fishbust
Well-Known Member
I would say it looks a little less "clean" than the screw or pry out type installed as original equipment. This could be because the originals are recessed into the deck and the armstrong sits directly on top of the deck. And IMO the armstrong design is aesthetically less "clean" to begin with not having a "frame" or "molding" around the plate like the others. I was concerned with the clearance for opening the transom door, it is really close, but not a problem. I will try to post pics soon.
-Dan
-Dan
Shutterbug
Well-Known Member
ROBERTH said:Replaced all my Thru Hulls and Hoses and the 90 Degree drain fitting as well. For me, was pretty easy to get to on the older sailfish model design. Just removed the back panel that goes across the entire back and everything was accessible. The hoses were not that bad of shape for their age, but I was mostly after replacing the plastic Thru Hulls with SS since I trailer. The deck drains were not possible to get since Grady basically took a straight threaded flush plastic drain and cut the threads shorter and then put on a 90 degree threaded hose barb fitting since no one apparently made a complete fitting like this back in those years. But they sent me new one's that are all one piece that I installed. Gained a bit of angle with the new ones for better draining.
Good luck as I know accessing some of these areas on the newer models is very difficult.
I've an 87 Offshore. My flush type cockpit drains are as you described and are way overdue in replacing. So did you deal directly with Grady or did they divert you to a dealer? Were the new pair of one piece 90* flush fitting? Thanks.
ROBERTH
GreatGrady Captain
- Joined
- Jun 10, 2006
- Messages
- 1,367
- Reaction score
- 136
- Points
- 63
- Location
- Greenville, NC
- Model
- Sailfish
I had contacted my dealer and explained what I was looking for. He talked to Grady and they explained that back then, no one made the proper type fitting, so they made one from a flush straight sink drain type that was threaded and cut the threads, then added a 90 degree fitting threaded on to the hose. It worked well for them all these years.
Now, on the newer boats, someone is making a one piece with 90 degree hose barb. So I placed the order for them and they were very cheap. I installed them and they worked perfectly. Being a one piece system, they probably gave me about a 1/2 to 3/4" rise in the hose angle which is always an improvement.
Now, on the newer boats, someone is making a one piece with 90 degree hose barb. So I placed the order for them and they were very cheap. I installed them and they worked perfectly. Being a one piece system, they probably gave me about a 1/2 to 3/4" rise in the hose angle which is always an improvement.
Shutterbug
Well-Known Member
ROBERTH said:I had contacted my dealer and explained what I was looking for. He talked to Grady and they explained that back then, no one made the proper type fitting, so they made one from a flush straight sink drain type that was threaded and cut the threads, then added a 90 degree fitting threaded on to the hose. It worked well for them all these years.
Now, on the newer boats, someone is making a one piece with 90 degree hose barb. So I placed the order for them and they were very cheap. I installed them and they worked perfectly. Being a one piece system, they probably gave me about a 1/2 to 3/4" rise in the hose angle which is always an improvement.
Thanks, I take it you ordered from Grady (dealer) and not the manufacturer of the drain? I emailed Grady, know a phone call is quicker just haven't had time. I found what I think is the correct size, just not flush mount.
ROBERTH
GreatGrady Captain
- Joined
- Jun 10, 2006
- Messages
- 1,367
- Reaction score
- 136
- Points
- 63
- Location
- Greenville, NC
- Model
- Sailfish
Yes, sorry I missed answering your question. I am not sure who manufactured these fittings, so I was able to order these through the Grady Dealer and they were very cheap.
ROBERTH
GreatGrady Captain
- Joined
- Jun 10, 2006
- Messages
- 1,367
- Reaction score
- 136
- Points
- 63
- Location
- Greenville, NC
- Model
- Sailfish
Found my old email where I ordered. You might check if this part number will fit your boat:
> Here are the prices you asked for from Grady White:
>
> Part #: 11-369 $ 1.50 ea. QTY = 4 for Floor Drains.
Also, I had the Grady Dealer Drop ship them to me so I didn't have to drive 200 miles to pick them up.
> Here are the prices you asked for from Grady White:
>
> Part #: 11-369 $ 1.50 ea. QTY = 4 for Floor Drains.
Also, I had the Grady Dealer Drop ship them to me so I didn't have to drive 200 miles to pick them up.
BobP
GreatGrady Captain
- Joined
- Apr 27, 2005
- Messages
- 4,744
- Reaction score
- 6
- Points
- 38
- Location
- Long Island, NY
- Model
- Sailfish
Shutterbug
Well-Known Member
ROBERTH said:Found my old email where I ordered. You might check if this part number will fit your boat:
> Here are the prices you asked for from Grady White:
>
> Part #: 11-369 $ 1.50 ea. QTY = 4 for Floor Drains.
Also, I had the Grady Dealer Drop ship them to me so I didn't have to drive 200 miles to pick them up.
Thanks again, will take my old and your part #'s to the dealer. Hopefully come up with something.
soundwave15
Member
- Joined
- Feb 4, 2016
- Messages
- 7
- Reaction score
- 0
- Points
- 1
I am in the process of tackling this on my 1999 Fisherman 222. It appears the 90 degree elbows were added after the plastic nut was tightened on the drain. I can't see any to unscrew the nut. Looks like I will need to cut it of, unless anyone else has a better idea. Thanks
ROBERTH
GreatGrady Captain
- Joined
- Jun 10, 2006
- Messages
- 1,367
- Reaction score
- 136
- Points
- 63
- Location
- Greenville, NC
- Model
- Sailfish
Feel your pain Fishbust. I was fortuate on my model as i was able to disassembled the transom and get in there easily enough. Some of these models seem to require a monkey to get down in there!
Islander268GW
Member
- Joined
- Feb 17, 2019
- Messages
- 24
- Reaction score
- 8
- Points
- 8
- Age
- 40
- Model
- Islander
For those still looking to change the drain hoses:
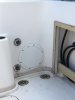
I recently just cut the hole on the starboard side for a 98 Grady White Islander. The location in this post was spot on. I used a Beckson 10" deck plate with 8.5" hole. I am not familiar with Armstrong plates but it sounds like those could stick up from the floor just a bit. Use caution bc I don't know if the transom door would rub on something else that sticks up higher. You can see that the 20 year old drain hoses have just about reached their limit. Here are some photos!
I recently just cut the hole on the starboard side for a 98 Grady White Islander. The location in this post was spot on. I used a Beckson 10" deck plate with 8.5" hole. I am not familiar with Armstrong plates but it sounds like those could stick up from the floor just a bit. Use caution bc I don't know if the transom door would rub on something else that sticks up higher. You can see that the 20 year old drain hoses have just about reached their limit. Here are some photos!
Attachments

Thanks for posting this. Going to cut my deck hole soon. How close was the trim tab hose. Any risk of cutting it? Mine is 2001
For those still looking to change the drain hoses:
I recently just cut the hole on the starboard side for a 98 Grady White Islander. The location in this post was spot on. I used a Beckson 10" deck plate with 8.5" hole. I am not familiar with Armstrong plates but it sounds like those could stick up from the floor just a bit. Use caution bc I don't know if the transom door would rub on something else that sticks up higher. You can see that the 20 year old drain hoses have just about reached their limit. Here are some photos!View attachment 6823
Islander268GW
Member
- Joined
- Feb 17, 2019
- Messages
- 24
- Reaction score
- 8
- Points
- 8
- Age
- 40
- Model
- Islander
The trim tab hose wasn't really that close. However, there was a plastic drain tube that runs from the starboard scupper in the engine well to the other drain next to the trim tab hose. I cut that hose while cutting the hole which was an easy fix (cutting this was unavoidable for me due to the lay of the hose). I would say make sure that there is no slack in the tab hose and that its pulled as far over to the battery compartment as possible.
If your hoses are as bad as mine, I had a time getting them off. I ended up slicing them on the bronze through hull side to get them off of that and then they pulled right off of the plastic deck drain. PB blaster and heat as others have said.
I am glad I did this because I had water coming in after rain and was able to see it thanks to the deck plate. The best I could tell, water was coming through the rub rail screws. I took care of those yesterday and sealed each screw on the rub rail while replacing the bent ones. Interesting to see how many and loosened up or bent.
Good luck!
scott1949
Member
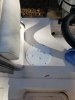
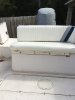
I have a 1996 Islander and had the same issue about access. Instead of on top, I put the access on vertical portion which put me closer to the hose connections. Also, got rid of those little Grady scuppers and replaced with Gemlux which are larger and the top can be removed for easy cleanout if necessary. Also went with Gemlux thru holes with duckbill inserts. Very happy with this setup.
Attachments
scott1949
Member
My attached picture shows the starboard access area. Note: Cut these access holes on both starboard and port to not only help me get to the thru holes but also for better access to stringers so I could tie back to those when transom was rebuilt. I thought a long time about doing this but in the end, glad that I did. I called Grady about it couple of times just to make sure nothing structurally would be changed. Decided to cut them on the vertical wall and not on top because the deck has a lip that goes up about 1 - 2 inches, so with the larger scuppers not a significant amount of water that did come in from the stern would have a lot of time to seep down into the bilge below. That was my theory at the time and in actuality I have not had any issues with these access panels. One thing I will remind everyone is to make sure you keep those rubber gaskets on any access panels in good shape. Once a year, I put petroleum jelly on all of my gaskets and they continue to seal as if they are still new. Friend of mine got into trouble by not doing that on his GW and almost sunk his boat before finally figuring this out. We routinely spend the night out when fishing and with the water splashing on those stern access panels, if they are not sealing properly you can get quite a large amount of water in the bilge area and not know it until it is too late. I have also added a waterwitch high water alarm which is just extra piece of mind. Attaching picture of port Gemlux scuppers and access panel.