- Joined
- Sep 26, 2009
- Messages
- 341
- Reaction score
- 105
- Points
- 43
- Location
- Massachusetts
- Model
- Express 330
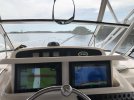
Over the winter, I purchased a set of Raymarine e127 MFD's from a member here. This post will document the process of removing the old units and replacing with the e127's.
The former units were a Raymarine C140w and a Furuno L182 Fishfinder.
The first step was to remove the helm pod from the boat to bring it home for the work. To do this, I chose to remove the bolts on the boat side of the hinge, rather than on the pod side. This required first removing the tub-but I wanted the tub out to provide additional access to the wiring underneath, and also to allow the drain tubing for the helm cup holder to be accessed, as it was clogged. Disconnect the hydraulic piston at the top, and raise the pod as high as possible and secure with a rope. Tub removal is pretty straightforward, unscrew the 10 or so screws, and disconnect the drain hoses for the tub. Once out, the nuts on the hinge bolts could be accessed.
Disconnect all the wires from the existing units, and then free the pod for removal.
Once home, the old units were removed, and I could plan the rebuild. I briefly considered using lexan or starboard, but have never liked the look, as it always seemed like a bandaid or a shortcut. In this case the old C140 unit was way too big, and the bottom of the pod was cut out, which also might have been a structural issue with starboard or lexan. Ultimately my decision was to reglass the pod and then cut out for the new units. On a previous boat I did several glass projects, so this one seemed possible.
Once the old units were out, I cut some baltic birch plywood to size for the opening on the face, as well as the bottom. The two pieces were screwed together temporarily, and cleats added to ensure the front face would not shift.
The plywood was clamped into place on the pod, and then the inside was glassed in to hold it in place.
Last edited: