First Time Timing Belt Change F250

Meanwhile

Well-Known Member
Joined
Feb 16, 2014
Messages
566
Reaction score
105
Points
43
Location
Warren, OR
So I finally got the old timing belt off. Very tight even after pinning the tensioner with a 5mm pin. I tried to put the new belt on using a rubber band to hold the belt on to start (tip from Sim on other site). No go.

So what is the secret to getting this belt on?
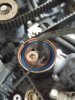
After the flywheel, Does it makes sense to start in the order, 1,2,3,4 on my photo? I'm trying to not turn anything out of alignment but I bumped 4 and it rotated about 30°. Hopefully didn't harm anything.

I'll try to get the belt on tomorrow, after renewing my patience.
 

Attachments

  • 20210328_171435.jpg
    20210328_171435.jpg
    925.1 KB · Views: 20
  • 20210328_185246_compress10.jpg
    20210328_185246_compress10.jpg
    596.2 KB · Views: 21

wrxhoon

Well-Known Member
Joined
Apr 4, 2012
Messages
958
Reaction score
291
Points
63
Location
Sydney Australia
I never done one on a Yamaha but on car V6 quad cam engines you lock the inlet and exhaust cam gears in place ( special tool , or make your own) then you run the belt as per 2nd photo but leave the idler and tensioner last in that order.
Someone that has done a Yamaha maybe able to advice an easier way .
 

Halfhitch

GreatGrady Captain
Joined
Nov 11, 2017
Messages
1,352
Reaction score
427
Points
83
Location
Venice, Florida
I just did mine a couple weeks ago. One thing that may help you. Fill a 5 gal bucket with hot water from your house water heater (120 to 140 degrees) and soak the belt for 10 min or so, keeping the water refreshed if it's still cold in Oregon. The extra flexibility may help. A heat lamp can achieve the same result but the chance of overheating the belt becomes a possibility.
 

g0tagrip

GreatGrady Captain
Joined
Mar 14, 2010
Messages
402
Reaction score
29
Points
28
Location
Indialantic
I watched a Yamaha guy do it to my engines 932 hours ago, mine a almost due again. I would be concerned about number 4 moving 30 degrees. Hopefully you set it back. Anyway it seemed to me that the tech removed the tensioners to put the belt on. In fact he told me to replace the tensioners every time the belt is due changing.
I intend to have a Yamaha guy do it again for my engines. Best of luck.
 

Meanwhile

Well-Known Member
Joined
Feb 16, 2014
Messages
566
Reaction score
105
Points
43
Location
Warren, OR
Thanks for the replies. I read where the last step is over the rear middle idle. A bit of heat may also help, I'll give that a try.

I moved 4 back into position, didn't feel any movement of broken parts inside. The interference motor makes me skittish.
 

Halfhitch

GreatGrady Captain
Joined
Nov 11, 2017
Messages
1,352
Reaction score
427
Points
83
Location
Venice, Florida
When I first started trying to get my belt to start, I just put the belt on full engagement till I got to the one I was trying to finish on. No way I could do it. I wound up putting it on the crankshaft fully of course because it has guides top and bottom, but then on the others I just barely engaged the top of the cog wheel with the belt , less than 1/4 inch and let it ride high on the idler wheels. After a few try's, I was able to get it started. Then going back around to each cog wheel, I was able to push the belt down with the heel of my hand a 32nd of an inch or so. Once I made it to about 50% engagement, it started getting much easier to move the belt down the cogs. When I removed the pin from the tensioner, it hardly moved.
 
  • Like
Reactions: Meanwhile

seasick

Well-Known Member
Joined
Aug 19, 2008
Messages
9,149
Reaction score
1,313
Points
113
Location
NYC
I found a video of belt replacement on a 300. The actual procedure starts several minutes into the video. I did notice one tip was not to slide the belt all the way down on several of the sprockets until the belt is around ALL the sprockets.
 
  • Like
Reactions: efx and Meanwhile

Meanwhile

Well-Known Member
Joined
Feb 16, 2014
Messages
566
Reaction score
105
Points
43
Location
Warren, OR
Thanks so much for the advice. Heading out now.

Also called a mobile tech to price the second engine. My old fingers HATE the wire disconnects. I find it painful to get those suckers off.
 

JAdams1

Well-Known Member
Joined
Aug 20, 2018
Messages
123
Reaction score
25
Points
28
Location
North Kingstown , RI
Doing my timing belt on my F200 in a few weeks. Good timing on your thread....LOL Can you tell me the what size bolts you used for the flywheel puller? I need to grab some grade 8 bolts.. Thanks.
 

Meanwhile

Well-Known Member
Joined
Feb 16, 2014
Messages
566
Reaction score
105
Points
43
Location
Warren, OR
My bolts were 8mm, but some came with a basic puller from Napa. A large rubber mallet provided enough of a punch to make the fly wheel release under tension.

I finally got the new belt on the first engine. I loosened the rear center idler to get the belt on.

I called a mobile marine mechanic to price him doing the second engine. He was nice enough to call me to let me know he will not do timing belts. Too big of a pain, and a large liability. Intetesting.

Now on to the first VST tank, since I had to remove the port side intake to gain access to an electric connection on the low pressure fuel pump. I think I'm halfway to getting the VST out.20210328_160811.jpg
 
  • Like
Reactions: JAdams1

Meanwhile

Well-Known Member
Joined
Feb 16, 2014
Messages
566
Reaction score
105
Points
43
Location
Warren, OR
Talking tools, I bought this adjustable pin spanner for the torque needed on the flywheel bolt. I'm hoping it will work with a pipe stinger. I'm not paying $200 for the Yamaha version. I'll update if it holds up to the torque required.
20210328_155322_compress27.jpgScreenshot_20210329-212352_Amazon Shopping.jpg
 

Meanwhile

Well-Known Member
Joined
Feb 16, 2014
Messages
566
Reaction score
105
Points
43
Location
Warren, OR
I'm as slow as a retiree. All the time, for my yard right now. I took the VST tank off today to change the filter. All that work to change a clean filter. That is good news I guess. I'll start putting it all together tomorrow. 20210408_170649_compress71.jpg20210408_173357_compress89.jpg20210408_173604_compress60.jpg
 
  • Like
Reactions: GreatNate

Meanwhile

Well-Known Member
Joined
Feb 16, 2014
Messages
566
Reaction score
105
Points
43
Location
Warren, OR
I hate timing belts.

The closest I've come to lining up those top double marks. As I tighten the belt that port cam moves a bit. I must be one tooth off. But don't see how to overcome this. I'll keep trying.20210423_084435_compress84.jpg
 

Meanwhile

Well-Known Member
Joined
Feb 16, 2014
Messages
566
Reaction score
105
Points
43
Location
Warren, OR
How did your Amazon tool work out? I made a tool out of 1-1/2w x 3/8 thick flat stock. Cost $25 in materials.
. View attachment 19854View attachment 19855View attachment 19856
Not very well. It broke on the first try to get 177 ft lbs on the flywheel nut. I was using a pipe for more power and you can see where it broke. There is little metal right where the stress hits. Oh well, I'll have to find some metal stock as you did. Thanks for the photos.20210423_134119.jpg20210423_134104.jpg
 

Meanwhile

Well-Known Member
Joined
Feb 16, 2014
Messages
566
Reaction score
105
Points
43
Location
Warren, OR
I finally got the starboard engine all buttoned up and went to test the engine with a 100 gallon tank. Of course I had lost the bung. I grabbed a foam plug I keep on board and was able to test the engine. She ran fine after I pumped the bulb enough to get cramps in my hand.

Now for the oddity, the port engine will not raise, will not turn over and the Yamaha gauges do not work. Everything else on the boat works.

So what did I do? I posted earlier that I had a new plastic & canvas job done. I raised both engines to prepare for that tow. I had not finished the starboard engine so fitted the cowling on for the hour drive.

I'm stumped. 20210423_174211.jpg
 

Meanwhile

Well-Known Member
Joined
Feb 16, 2014
Messages
566
Reaction score
105
Points
43
Location
Warren, OR
Check your grounds. (negative connections)
If I'm lucky it will be the first point I check. I don't want to take bets on my luck.

Something that 80 miles and 2 sets of railroad tracks could loosen. I'll see if setting the battery selectors to ALL has any positive result. That would mean one bank ist kaput. Could be an issue with the 2007 battery charger if that is the case.

But I'm procrastinating.
 

Meanwhile

Well-Known Member
Joined
Feb 16, 2014
Messages
566
Reaction score
105
Points
43
Location
Warren, OR
I would have preferred a loose connection.

So it is battery bank #1. Found the cause.
During move water shifted to the bow, turning on the bow bulge pump. It stuck on. Completely drained one set of batteries. Engine raises fine on all battery settings.

Batt bank #1 shows 12.2 v after 4 days on board charging.
Toast.