fish box drain thru hull on Fisherman204

gradyrod

Well-Known Member
Joined
Jan 30, 2008
Messages
97
Reaction score
0
Points
0
Location
Long Island,NY
Need to replace a flush mounted thru hull in my fish box on my 1985 fisherman204. Does anyone know where I can get a flush mounted plastic drain(thru-hull) that is 90 degrees and fits 1 inch hose??

Thanks!

Gradyrod
 

seabob4

Well-Known Member
Joined
Oct 19, 2007
Messages
325
Reaction score
1
Points
0
Location
Weeki Wachee, FL
Rod,
Check this one out from Marine East, P/N 6360 W...
1241.png


Should be a 1" hose barb, doesn't say it on their site, but I've worked with them, the way it placed on the product page, I would bet it's 1". Here's a link to their site...Marine East

Bob
 

NOTHING ELSE MATTERS

GreatGrady Captain
Joined
Jun 26, 2006
Messages
1,993
Reaction score
5
Points
38
Age
59
Location
LONG ISLAND NEW YORK
gradyrod said:
Need to replace a flush mounted thru hull in my fish box on my 1985 fisherman204. Does anyone know where I can get a flush mounted plastic drain(thru-hull) that is 90 degrees and fits 1 inch hose??

Thanks!

Gradyrod

I got some from Fred Chall Marine Supply.
 

gradyrod

Well-Known Member
Joined
Jan 30, 2008
Messages
97
Reaction score
0
Points
0
Location
Long Island,NY
thanks..

I'll stop by Fred Challs this weekend when he is running his spring sale.

Gradyrod
 

gwwannabe

GreatGrady Captain
Joined
May 14, 2007
Messages
255
Reaction score
1
Points
0
Location
Piankatank River, Gloucester, VA
Here's the info I posted when I had to replace the fish box drain in my 89 204c.

OK. Since my last posting I spoke to customer service at GW and visited Southeaster Marine in Richmond. As a reminder, I had to replace the cockpit deck drain on the port side and the fish box drain on the starboard side.

Up to fairly recently, the deck drain fitting screwed into a 90 degree El fitting that has a hose barb end. Even tho' the part you see on the deck looks like a thru-hull fitting, the threads are not the same. Problem is, the deck fitting that screws in is no longer available. It has been replaced by a one piece fitting - part # 11-101.

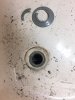
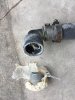
The fish box drain fitting is part # 11-066 and as luck would have it, my Grady dealer had one in stock. This part screws into the 90 degree el that is attached to the end of the drain pipe. This is actually a sink drain made by Forespare. Their part # is SW-1. http://www.forespar.com/onlineCatalog/2 ... ains.shtml.

Customer service at GW recommended cutting thru the bottom of the compartment under the helm seat. I thought about this long and hard and studied the port side to get an idea of how effective this would be. With the drawers and cabinet frame out of there, you have pretty good access but try as I might, I couldn't see or do anything back where the fish box drain is.

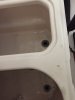
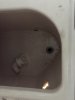
I spoke with my dealer about this and the parts manager said if you don't have arms like an orangutan, you can't do it. Well, I don't. I tried a few other ideas but finally opted to cut a 6" opening in the bottom of the fish box. Boy am I glad I did.

As I suspected, there is virtually no room to work if one cuts out the bottom of the box under the helm seat. Secondly, there was a fair amount of standing water under the fish box. The way GW foams in the hull, water gets trapped between the hull/side wall and the foam. It can't drain back to the bilge pump. I found 2 pockets of water on the starboard side and one on the port side.

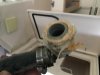
With the hole in the fish box, I was able to pull the drain hose up where I could see the El and get the old drain fitting out. As I was looking at the threaded El, I could see that it was not perpendicular to the fitting. This put some twisting force on the fitting and ultimately caused it to break. I had to loosen the clamp and straighten the El in order to thread the new fitting on.

After lots of mumbling and grumbling and some cursing (ok, lots - it's not Sunday) I finished the project. It was a lot more difficult than I expected. I always seemed to be working at arms reach and able to get only one arm/hand in there. Regarding the fish box drain - if I'd have cut a hole anywhere else, there is no way I could have done the repair. SFC, I strongly suggest you take the port side drawers and liner out so you can evaluate your ideas knowing it's even tighter on the starboard side.

Sorry for the long post but I hope it provides some of the insight I was looking for when I asked for help.

Gary 89 Overnighter
 

Kevin Hawes

Active Member
Joined
Feb 4, 2021
Messages
27
Reaction score
0
Points
1
Age
66
Model
Voyager
I just removed the same lines today on my 248, I figured out a way to replace them without cutting any holes, I used a 1 inch cutting disk on my pneumatic pen high speed ( or a Dremel tool ) and carefully cut the inside of the drain and once thru the downspout the sealing ring will come off and at that time you can push the drain elbow down and pull the elbow and hose out from under the livewell, will post pictures
 

Attachments

  • 73FF88A1-3BBC-4381-8155-E47C69DC869D.jpeg
    73FF88A1-3BBC-4381-8155-E47C69DC869D.jpeg
    537.3 KB · Views: 5
  • 3BB53CF0-6918-4FC2-8C45-3ACA9A2655AB.jpeg
    3BB53CF0-6918-4FC2-8C45-3ACA9A2655AB.jpeg
    379.8 KB · Views: 5
  • 5F08A825-9DF0-47CD-85C4-8DB1F5A57B3F.jpeg
    5F08A825-9DF0-47CD-85C4-8DB1F5A57B3F.jpeg
    864.1 KB · Views: 5
  • CBF08542-DE21-49D0-A029-13C387D4E310.jpeg
    CBF08542-DE21-49D0-A029-13C387D4E310.jpeg
    544 KB · Views: 5
  • 53520157-42E3-46EA-AB6A-3EDE4DE4D04B.jpeg
    53520157-42E3-46EA-AB6A-3EDE4DE4D04B.jpeg
    1.3 MB · Views: 5
  • 55B9F417-E77C-49EE-98F5-CF4349985DBB.jpeg
    55B9F417-E77C-49EE-98F5-CF4349985DBB.jpeg
    559 KB · Views: 5

MrD

Active Member
Joined
Nov 25, 2020
Messages
28
Reaction score
5
Points
3
Age
46
Location
Brick, NJ
Model
Offshore
I just removed the same lines today on my 248, I figured out a way to replace them without cutting any holes, I used a 1 inch cutting disk on my pneumatic pen high speed ( or a Dremel tool ) and carefully cut the inside of the drain and once thru the downspout the sealing ring will come off and at that time you can push the drain elbow down and pull the elbow and hose out from under the livewell, will post pictures

Kevin, how then did you replace the drains if there is no cutout? I can see using the dremel to remove the drains but how would you re-install. I have this problem now too on my 248 Offshore. Thanks for any advice.
 

Attachments

  • 20210330_124248.jpg
    20210330_124248.jpg
    1.1 MB · Views: 6
  • 20210330_124322.jpg
    20210330_124322.jpg
    1 MB · Views: 6

Kevin Hawes

Active Member
Joined
Feb 4, 2021
Messages
27
Reaction score
0
Points
1
Age
66
Model
Voyager
I ordered the new fittings and they will be here soon but I found some that the elbow has one end with a 1 inch barb and the other has a flat flange that will seat on the bottom of the hole and is threaded and the drain sealing head will screw into the elbow from above into the elbow ( head has slots for tightening) so with some 4200 applied on the elbow flange and some on the upper surface of the tank and tightened it will be sealed above and below, I slid the old hose out and was able to slide it back into position so once I get the fittings I will put hose on elbow tighten the clamp ( the new drain will stand up about 1/8 inch inside of the livewell tank ) and a plug will still fit into the throat of the drain. Look at both corners of the helm area you might find some drains almost like the ones I ordered. They are from Seaflo and they are listed as a thru hull. Will list parts and pics when I install them.