Need some help !!! I have to replace my Fuel sender ... The screws are frozen due to i'ts age. any tricks to loosen them up to get the unit out. The last thing I want to do is snap them off. If I do snap any screws off comon sense tells me not to drill on a fuel tank .So then what happens ?. The last thing I want to do is pull the tank

You are using an out of date browser. It may not display this or other websites correctly.
You should upgrade or use an alternative browser.
You should upgrade or use an alternative browser.
Fuel sending unit 1993 209 Escape frozen screws HELP
- Thread starter scruitt
- Start date
Soak'm good with liquid wrench (or other) repedialy for a couple days. Then find a phillips that fits perfectly and give it a shot. I was lucky and mine came out relatively easily (if the tanks weren't out I'm sure they would have fought me to the end). If they still don't come out and you feel that you might strip the threads or snap the screw you may want to wait 'till the season is over.
PFB1769
Active Member
I had the same problem with not being able to get the screws out. I purchased a bit the was supposed to get out screws with stripped screw heads but all it did was snap off the screw heads. Fortunatly the old sender had a high profile plastic top and the new one had a low profile thin metal top Wema SSS/SSL. The remaining screws were long enough to pass through the new sender head and the threads were still good so I was able to sercure the new sender to the screw threads with 10-24 locking nuts with the nylon inserts. It actually worked out great. No problem for 4 years now. So if there is no way the screws will come out as a last resort you may want to try this fix. Good luck.
I've posted on this before. Stainless screws in an aluminum tank basically welds the screws in. Try a cordless impact drill will an easy-out bit and if they break off drill and tap new holes. Just turn the sending unit an inch or so and drill new holes. Use a cordless (sparkless) drill and keep a damp rag in the hole. I had a buddy hold a shop vac by the drill as I went to suck up as many chips as possible until I broke through.
Thanks for all the good advice I am going to try the soak thing with liq wrench . It's the same tall plastic one described above I'm going to try to drill a pilot hole at an angle to the bottom where the bolt meets the floor plate that way when I spray it it has a pocket to feed it . Man I hope this works
Fishshoreman
Well-Known Member
- Joined
- Mar 31, 2011
- Messages
- 90
- Reaction score
- 0
- Points
- 6
- Age
- 57
Get some valve grinding compound and put it on the screw driver bit. It will give much better gripping power. DO NOT use a cordless drill. It still sparks, it is a battery operated motor. Use a long handled screwdriver. If you must drill use air tools only. Be careful with a shop vac as well. It will build up static electricity. Soak them good before attempting to remove the screws and work them back and forth. Good luck!!
Cordless drill are not sparkless as long as they have an armature and just about all do.bhemi said:I've posted on this before. Stainless screws in an aluminum tank basically welds the screws in. Try a cordless impact drill will an easy-out bit and if they break off drill and tap new holes. Just turn the sending unit an inch or so and drill new holes. Use a cordless (sparkless) drill and keep a damp rag in the hole. I had a buddy hold a shop vac by the drill as I went to suck up as many chips as possible until I broke through.
Using a vacuum to suck up chips cold test the limits of your life insurance policy.
Seriously, any fumes near the vacuum will be sucked in to the vacuum and that could cause an explosion.
Parthery
GreatGrady Captain
If you can't get the screws out by hand after soaking them, you need to use air tools.
I went through this about a month ago when I changed out my sender....don't take a chance....if you don't have the tools, recognize that and have a shop with the right tools remove the screws.
I went through this about a month ago when I changed out my sender....don't take a chance....if you don't have the tools, recognize that and have a shop with the right tools remove the screws.
Corless drills are DC brush motors, just because you don't see sparks flying out they're there. => BOOOOOM
Shop vacs are usually AC motors (brushless and non sparking) but... when you turn them off or unplug them you have a spark. So at the very least you'll have a chamber of fumes, again bad idea.
Around 15 years ago at a Pfizer plant in CT they had a natural gas leak and an engineer heard a vacuum running. When he went to the wall and unplugged the vac, the gas ignited. It was a painful death for the guy.
If you need anything more than hand tools, pass the job off.
Fishshoreman
Well-Known Member
- Joined
- Mar 31, 2011
- Messages
- 90
- Reaction score
- 0
- Points
- 6
- Age
- 57
Thanks for the offer But I'm going to just work them out slowly. If they don't come out I think I will drill the heads off the screw and use nuts I'ts the same tall plastic sender described above. I think that might be the safest way to do it. If I drill the heads off the seal is still on the old sender
. + I'm going to use several damp WET rags when I do it")
. + I'm going to use several damp WET rags when I do it
ahill
Well-Known Member
Shop vacs & gas don't mix.
In the '7'0s a guy in Miami attempted to transfer fuel from a dock to his boat using a shop vac.
He, his wife and the boat did not survive.
In the '7'0s a guy in Miami attempted to transfer fuel from a dock to his boat using a shop vac.
He, his wife and the boat did not survive.
First -- Find a product called PB Blaster. SOAK the screws and repeat at least 3 times. When your ready try TIGHTENING --- Yes I said tightening the screws slightly -- them try backing them out. I'd go with the air driven drill rather than a hand crank drill if you need to go that way.
pfb1769
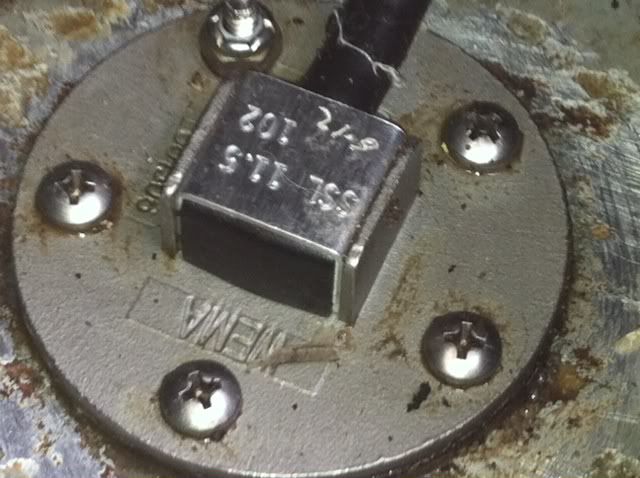
Ok Folks My sender just arrived from WEMA and looks very nice .. I've soaked them several times in liquid wrench and no budge.The good news is that the old sender is the plastic one PFB1769 had in his boat . It has a tall profile like he described above so while it is still sealed i am going to drill the tops off the screw heads off. before I do I'm going to soak it all over with soapy water to seal off fuem leak and drop a wet soaked towel down on it . will go slow on each one ... once I have them off I purchased a 10-24 dye to chase the threads . I also made a plate to cover the hole while I do this .... I plan on using grease to seal the plate while tapping the threads . Once I am ready to install the new unit I just wipe it clean I have a special sap type sealer for the gasket ... drop it down in there and bolt it up ... I'ts risky since I plan on using my cordless drill but i will be out in the open with precautionary mesures ... fire extinguisher and a 5 gallon bucket of water... also the drill bit i'm going to use is a long bit bringing the drill away from the sender ... thanks for all the advice wish me luck ....
Ok Folks My sender just arrived from WEMA and looks very nice .. I've soaked them several times in liquid wrench and no budge.The good news is that the old sender is the plastic one PFB1769 had in his boat . It has a tall profile like he described above so while it is still sealed i am going to drill the tops off the screw heads off. before I do I'm going to soak it all over with soapy water to seal off fuem leak and drop a wet soaked towel down on it . will go slow on each one
... once I have them off I purchased a 10-24 dye to chase the threads . I also made a plate to cover the hole while I do this .... I plan on using grease to seal the plate while tapping the threads . Once I am ready to install the new unit I just wipe it clean I have a special sap type sealer for the gasket ... drop it down in there and bolt it up ... I'ts risky since I plan on using my cordless drill but i will be out in the open with precautionary mesures ... fire extinguisher and a 5 gallon bucket of water... also the drill bit i'm going to use is a long bit bringing the drill away from the sender ... thanks for all the advice wish me luck ....FOLLOW UP
wanted to let you guys know everything went great . Liquid wrench did the trick . When checked the screws 4 out of the 5 had movement so it was no time when I worked them back and forth and they came right out . The 5th did not want to budge so off with the head and removed the old sender . The tank was pretty rough on the surface so I gave it a light sand and used a light coat of Johnson/Evinrude sealer that is like tree sap. snugged not tightend the screws and hooked up the wires. I had to call WEMA cuz the wire diagram said to hook it up backwards. The girl said it works the same both ways . They only recomend the pink to ground and black to sender because thats the wiring on there sending gauge. I've had it out and it seems to be working great No fuel smell . When I finished I had over half a tank of fuel and when I got up on a plane the fuel reached the top where the sender is so I'm pretty confident it will not leak
THANKS AGAIN ALL FOR YOUR GREAT ADVISE I LOVE MY GRADY WHITE AND I'M SURE YOU DO TOO