Hey everyone it’s been a while since I’ve posted (kids,work etc) has been insane the past few years. Anyhow, years back ( 6 if I remember correctly) I had my gas tank lid repaired/re cored with new wood. I noticed this past off season that there appears to be an air pocket forming in one section aprx 8” round with stress mark coming from the center of the pocket. It was done at a reputable shop, but the worker is no longer there that I used to deal with. My best guess is when the work was performed in the middle of the winter, that it didn’t cure properly and the resin didn’t spread evenly in that area and created a small air pocket that’s now rearing It’s ugly head. My fear is obviously that the stress mark is going to crack on the pressure and I want to know if I’m able to repair it without removing the lid. I was thinking that I could a hole saw to cut out the section , apply a layer of expoxy resin and weight it all down till it cures. I don’t have the time to remove the lid until after the summer and I plan on doing a lot of fishing in the next month. What’s your guys thoughts on this?

You are using an out of date browser. It may not display this or other websites correctly.
You should upgrade or use an alternative browser.
You should upgrade or use an alternative browser.
Gas tank lid delamination repair
- Thread starter mleads310
- Start date
Just to be clear what I mean by cut the section out I mean, just cut the gel coat layer out not the core itself
That would be my approach; grind out the delaminated area to see how bad the issue is. If the substrate is solid, the tapered out section can be reglassed, faired and gel coated. If you do not have experience with fiberglass repair and you care what the final job looks like, I suggest you have a reputable shop do the repair

I have experience with fiberglass, but I am by no means very skilled in it. But I can do it. I was hoping that if I take a hole saw and cut out the air bubble section giving me just the skin removed ( 8” circle piece of gel coat skin in tact) that I should be able to lay a thin layer of glass and reattach the circle skin cut out in the process, removing all the air.
SkunkBoat
GreatGrady Captain
- Joined
- Oct 12, 2017
- Messages
- 5,006
- Reaction score
- 1,792
- Points
- 113
- Location
- Manasquan Inlet NJ
- Website
- www.youtube.com
- Model
- Express 265
My thought is that its generally better to remove the lid and repair from the bottom. That leaves the top "deck" gelcoat intact.
All your work is hidden. You don't have to paint or re-gelcoat.
If the deck side has already been painted then it doesn't matter.
All your work is hidden. You don't have to paint or re-gelcoat.
If the deck side has already been painted then it doesn't matter.
The deck side has never been repainted. It was left intact when the core repair was done years ago. I’m not so concerned about the aesthetics of it as I do fish the boat hard and the deck side gelcoat definitely has its marks on it.
Hookup1
GreatGrady Captain
- Joined
- Oct 16, 2007
- Messages
- 3,692
- Reaction score
- 1,046
- Points
- 113
- Age
- 71
- Location
- Cape May, NJ
- Model
- Islander

Sardinia306Canyon
GreatGrady Captain
- Joined
- Oct 11, 2023
- Messages
- 1,040
- Reaction score
- 237
- Points
- 63
- Age
- 62
- Location
- Island of Sardinia
- Model
- Canyon 306
Repair from the bottom as you have the fuel tank below and don't want to drill in it or scratch it and it's probably not necessary to cut a hole out.
If you can't do it now then leave it as it is or overpaint with a "flexible" paint to seal the spider cracks.
You could also grind the gelcoat and fibreglass away and add new glass and gelcoat but that would not look pretty as well and a lot of work for a temporary fix.
Weak wood is what Hookup1 mentioned above, in six years a lot can happen.
Chris
Last edited:
I see your point about doing it from the underside. I guess my biggest concern is that if i keep stepping on it for the season and the gelcoat/skin splits open, I’ll be in the same boat as just fixing it from the top side.
If the skin makes it thru the summer without splitting at the air pocket. How do you suggest I go about repairing it from the core side? Drill a few small diameter holes, fill with resin , then apply pressure to join the skin and core together? I’d hate to cut out the entire core, but that may be the only way to fix it correctly?
If the skin makes it thru the summer without splitting at the air pocket. How do you suggest I go about repairing it from the core side? Drill a few small diameter holes, fill with resin , then apply pressure to join the skin and core together? I’d hate to cut out the entire core, but that may be the only way to fix it correctly?
Hookup1
GreatGrady Captain
- Joined
- Oct 16, 2007
- Messages
- 3,692
- Reaction score
- 1,046
- Points
- 113
- Age
- 71
- Location
- Cape May, NJ
- Model
- Islander
I doubt it's just a small section that delaminated. Fiberglass will flex enough if there is something underneath it. Probably didn't replace the full core when they did the work.
These hatches tend to get water inside them. The perimeter screw holes are most likely suspect. Possibly the pie plates. If you use wood to repair any water will affect the strength of the repair and eventually delaminate. You could open up the back to see what you got inside but if it's wood and it is wet I would replace it all.
The perimeter holes should be over drilled, filled and re-drilled. I would use epoxy for the repair especially for the DIY'er. Easier to work with.
If you're determined to do something now from the top side look at GitRot epoxy. Drill small holes and inject from the top.
The core is made up of small plywood squares. The bottom of mine swelled up and was pushing the bottom fiberglass layer off. I removed the hatch to look at the tanks and stood it up. Coffee colored liquid leaked out. Removing all the plywood was easy. I vacuum bagged the Coosa board in (epoxy repair) but you don't have to go that far.
Attachments
Last edited:
Sardinia306Canyon
GreatGrady Captain
- Joined
- Oct 11, 2023
- Messages
- 1,040
- Reaction score
- 237
- Points
- 63
- Age
- 62
- Location
- Island of Sardinia
- Model
- Canyon 306
It really depend what the problem is.
My BW 23 Outrage had 3 voids, one was big as the tip of my thumb.
Once it cracked open i removed the loose gelcoat and filled it with 2K epoxy putty, if this is your case you could temporary do the same.
But if the wood and fibreglass is weak then you should repair it from the inside by cutting the weak part out and insert a new piece and glass over it on the inside.
Chris
I assume that since you said there is an 'air' bubble, the area is domed or raised. If so, there is a possibility that the air is a solid mass as would be with a big blister or water intrusion and possible freeze damage if boat is stored in a region that has freezing winters. . Your idea that you can use a hole saw to cut only the gel coat out is not advised.
If you patch the layer with fiberglass or gel coat by just abutting the new are to the old, cracks will almost certainly form around the edge. The proper approach is to dish out a tapered area wider than the original are and layer and apply layers of glass , each layer a bit larger in diameter that the previous with the first layer being the smallest. The area to be tapered is as a ballpark estimate about 4 to 10 to one ratio for each 1/4 inch of depth at the deepest spot(the center) For example, if the depth of the repair area is 1/4 inch, the area to be ground out would be 1 inch to 2/1/2 inched larger. This method is appropriate for the best cosmetics appearance, something that you may not care about.
My suggestion is that you drill a few small diameter holes into the damaged area and probe with a small pick or screwdriver to see what lies beneath. Based on your findings, you will be able to pick the appropriate repair approach.
DennisG01
GreatGrady Captain
- Joined
- Sep 1, 2013
- Messages
- 8,166
- Reaction score
- 1,616
- Points
- 113
- Location
- Allentown, PA & Friendship, ME
- Model
- Offshore
The air pocket is not "just" starting to form - the air void was always there, you're just now starting to the see the effects of it. It was likely formed when a large piece of wood was laid down - it's extremely hard - if not impossible - to avoid air pockets when laying a large piece down... which is why smaller pieces of wood are generally used. Foam is more forgiving as you can bend it as you put it in and even somewhat squeegee it. Vacubagging is nice, too. Me? I used foamboard insulation from Home Depot ") But only because I know I can rebuild it in a few hours if need be (but that was about 7 years ago, now).
But only because I know I can rebuild it in a few hours if need be (but that was about 7 years ago, now).
Yes, do it from the bottom side - doing it from the top side would mean chamfering/beveling the cut on both sides quite a bit to then lay glass down to strengthen the cut - otherwise it will crack open.
And, also, as mentioned... the repair area is going to be larger than you think - it always is. Could easily be 3 times as big as you think it is")
But only because I know I can rebuild it in a few hours if need be (but that was about 7 years ago, now).Yes, do it from the bottom side - doing it from the top side would mean chamfering/beveling the cut on both sides quite a bit to then lay glass down to strengthen the cut - otherwise it will crack open.
And, also, as mentioned... the repair area is going to be larger than you think - it always is. Could easily be 3 times as big as you think it is
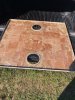
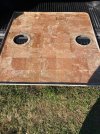
Appreciate all the input here. Here’s a few pictures of when the work was done years back. Im skeptical that there’s water intrusion or the core is bad especially considering the location of where it is appearing (halfway between the edge and in the inspection plate)
I don’t have any finish pics that I can find but here’s some of the work that was done.

Had to create a link because it states the files are too large to upload
I don’t have any finish pics that I can find but here’s some of the work that was done.
Had to create a link because it states the files are too large to upload
Hookup1
GreatGrady Captain
- Joined
- Oct 16, 2007
- Messages
- 3,692
- Reaction score
- 1,046
- Points
- 113
- Age
- 71
- Location
- Cape May, NJ
- Model
- Islander
You need to resize photos on my MAC PC. iPhone can resize them but you have to use the iPhone to post.Appreciate all the input here. Here’s a few pictures of when the work was done years back. Im skeptical that there’s water intrusion or the core is bad especially considering the location of where it is appearing (halfway between the edge and in the inspection plate)
I don’t have any finish pics that I can find but here’s some of the work that was done.
Had to create a link because it states the files are too large to upload
How about a picture of this mysterious "bubble"? How many years ago was it re-cored? Did the original have any braces (like in my photos)? If so were they installed? Everything glassed in from the back?
The wood panel looks good but the screw holes (if not drilled out oversized, filled and re-drilled) are a good source of water intrusion. Inspection plates are another source of water intrusion. Depends on how it was finished.
I’ll take more pictures tomorrow when I’m on the boat fishing with my son. I’ll have to run a level across it so you could tell where the bubble is. It’s really strange. It’s like stepping onto a thin Ziploc bag full of air if that makes sense. I’m not ruling out that it’s water, but I would think if it was water, it would happen at the source of the intrusion whether it be the screw holes or inspection plate but instead it’s happening directly in between those without touching either one directly. I’ll try to grab some photos tomorrow and post them up here. Either way it sounds like I have to wait till the end of the summer and pull the deck.
I just went from android to iPhone a month ago. I’m still getting used to it. Haven’t figured out how to resize photos with it.
I just went from android to iPhone a month ago. I’m still getting used to it. Haven’t figured out how to resize photos with it.
Sardinia306Canyon
GreatGrady Captain
- Joined
- Oct 11, 2023
- Messages
- 1,040
- Reaction score
- 237
- Points
- 63
- Age
- 62
- Location
- Island of Sardinia
- Model
- Canyon 306
Well, this sounds as the dreaded "soft spot" on a boat deck and thats 99% rotten wood below and the movement leads to spider cracks.It’s really strange. It’s like stepping onto a thin Ziploc bag full of air if that makes sense. I’m not ruling out that it’s water, but I would think if it was water, it would happen at the source of the intrusion whether it be the screw holes or inspection plate but instead i
A air void shows up first as spider cracks and then the gel coat is breaking off and expose the void, but not "walking of air cushion"
If you talk about a bubble raising above beside deck level, well then i would guess again wet wood swelling and creating the bubble.
The only thing what grows over time is wet wood, but not voids or bubbles because of a bad fibreglass job.
Again, you need to find out and explain correctly what the problem is to get the correct hints so we are waiting for photos.
The simplest solution to resize iPhone Photos is the Image Size App
Chris
Last edited: