
First Post; Recently smelled fuel in my 2004 Grady 273 Chase. Sure enough the water coming from the rear bilge was not water but fuel. After obtaining ridiculous quotes to remove, fabricate and replace; I decided to do it myself.
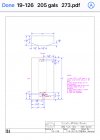
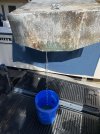
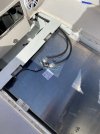
Thankfully, Grady doesn’t foam in their tanks and this was more of a muscle project. The tank weighs about 200lbs and it had a hole in the lower front of the tank. Contacted Grady in North Carolina (252) 752-2111, Eddie Rowe was very helpful and provided the specs for the fabrication of a new tank. The new tank was made in Miami (Sunshine Marine 305-805-9898) for $2400 and asked them to shorten it by 3/4” from the front. The tank was well built with ballast, sending unit and metal fuel pick up tubes.
Changed the fuel fill hose, vent hose, all fuel lines, water fuel separator and primer balls.
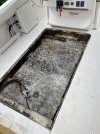
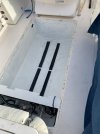
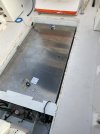
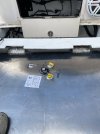
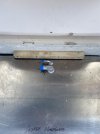
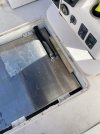
The tank is held in by fiberglass blocks that should be marked to use in the same location. Also opened the bottom of hull compartment that houses the conduit from center bathroom to rear and changed the conduit. A little fiberglass to close it back up. Added 3/4 rubber mat strips for the tank to rest on and allow water beneath.
Lifted the tank with ratchet straps from the front and tipped the tank to the boats edge and into a pickup truck.
Recycled the old tank for $108
Happy to talk about this before anyone else tries this. See photos
Thankfully, Grady doesn’t foam in their tanks and this was more of a muscle project. The tank weighs about 200lbs and it had a hole in the lower front of the tank. Contacted Grady in North Carolina (252) 752-2111, Eddie Rowe was very helpful and provided the specs for the fabrication of a new tank. The new tank was made in Miami (Sunshine Marine 305-805-9898) for $2400 and asked them to shorten it by 3/4” from the front. The tank was well built with ballast, sending unit and metal fuel pick up tubes.
Changed the fuel fill hose, vent hose, all fuel lines, water fuel separator and primer balls.
The tank is held in by fiberglass blocks that should be marked to use in the same location. Also opened the bottom of hull compartment that houses the conduit from center bathroom to rear and changed the conduit. A little fiberglass to close it back up. Added 3/4 rubber mat strips for the tank to rest on and allow water beneath.
Lifted the tank with ratchet straps from the front and tipped the tank to the boats edge and into a pickup truck.
Recycled the old tank for $108
Happy to talk about this before anyone else tries this. See photos
Attachments
-
 A439A85D-69F8-4AAA-81B1-C0B317652B40.jpeg242.7 KB · Views: 49
 -
 2A6DA148-010C-450B-ABD6-08C3685F8495.jpeg1.1 MB · Views: 49
 -
 AC4A2DDE-C730-418C-B022-DA6E918612A5.jpeg1.2 MB · Views: 46
 -
 E62A7A5F-6FB6-4A96-8FDA-0BDA856B9320.jpeg949.3 KB · Views: 43
 -
 A4DE9AA1-55FC-45B2-A765-FBCB6C2E347B.jpeg698.6 KB · Views: 42
 -
 75FBA20D-0628-4A2C-9414-F4F8405D09D7.jpeg699.4 KB · Views: 42
 -
 4AB3E9A0-9E7C-4DCA-A331-718173C362FD.jpeg676.9 KB · Views: 41
 -
 4AF730EB-0665-4990-B6A6-6F7A55545F2D.jpeg679.3 KB · Views: 40
 -
 93C94EEB-B1A7-426B-893F-905F066A26B7.jpeg664.6 KB · Views: 42
 -
 E8295DE9-8E2B-472C-8B0B-9344C06D5BA7.jpeg696.3 KB · Views: 44

