Grady Drive Drain Plug?

DennisG01

GreatGrady Captain
Joined
Sep 1, 2013
Messages
6,838
Reaction score
1,212
Points
113
Location
Allentown, PA & Friendship, ME
Model
Offshore
ROBERTH said:
What do ya think?

I'd probably question the "why" of needing to do that. I mean, there are 1,000's of brackets out there that don't have this problem, nor the need to install a valve. So the question is, why is this one doing it? Is it just the wrong type of sealant for this application? Could the sealing surfaces have been a little dirty (or not as clean as they should be) so that the sealant didn't adhere as well as it should? Or maybe it just as you said where the pressure built up inside the bracket before the sealant was cured. To me, it seems like a solution to a problem that shouldn't be a problem to begin with. Although, I like the out of the box thinking!

Where is that bubble (what part of the bracket)? I can't tell from the picture.
 

ROBERTH

GreatGrady Captain
Joined
Jun 10, 2006
Messages
1,304
Reaction score
120
Points
63
Location
Raleigh, NC
Model
Sailfish
Hi Dennis, so the issue so far is that the caulk has not yet fully cured. That section was where I started and got it on a bit heavier than I wanted, so once it is fully cured, this stuff is very tough and hard to remove.

This is the top of bracket that is next to the transom. It has no bolts there and is fairly thin. It flexes some if you push on it when I had removed the caulk, so this is definately the weak spot.

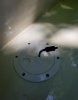
I believe what I have demonstrated here is that pressure definately builds up in a sealed container with the temperature changes. Imagine hot, the cold, causing pressure and then vacuum. That alone would weaken any seal over time.

I have been reading lots of these brackets leaking for folks over time. Some folks I have talked to are not on this forum and have had the issue. So I think it is more of an issue than realized. I wonder how many of them are out there full of water and don't even know it.

When I first got my boat, I decided to try and remove the plugs to see if anything was in there. Man, I could tell no one had likely ever removed the plugs as they were extremely hard to remove without damaging them. That is why I had to replace them due to the damage they took in removal. Then I bet it dumped over 50 gallons of water. It took a long time to drain.

Anyhow, I think I will move forward with the vent, therefore will prevent any pressure from blowing out the sealant over time. I don't think it can hurt by adding it.

Engineer at heart! Mind never stops thinking about improving things.... :mrgreen:

Oh yeah, the surface was just repainted with Perfection, so very clean and pure. No adhesion issue. The caulk never broke the seal, just bubbled up where it was still soft. I was able to mash it back down and likely once it cures, it will be fine. Just need to give it another week to cure out. Will have some 80+ days here rest of week so that might kick it off.
 

DennisG01

GreatGrady Captain
Joined
Sep 1, 2013
Messages
6,838
Reaction score
1,212
Points
113
Location
Allentown, PA & Friendship, ME
Model
Offshore
Oh, I don't disagree that there are brackets out there that have lost their seal and are leaking or retaining water. I fully agree with you that that happens. Where I differ is the "why" that they leak. I think it's simply due to the sealant drying out (or whatever we want to call it) over time and losing it's sealing properties. Just like we ocassionally have to re-caulk other areas of the boat, I think the bracket is just another area that needs maintenance once in a while. I think once your sealant is dry you're good to go as is.

My concern, of course, in this case is the valve being an unknown... at least to me. Since fully cured sealant will solve the issue, I just don't see the need to introduce another "possible" failure point. But don't get me wrong - I'm all for experimentation and trying to improve things - at the very least, it's fun to tinker. In the end, it's really not that big of a deal as if the valve eventually fails it's easy enough to remedy and it's not like water in the bracket is going to do any irreparable damage. If you're comfortable with it, go for it.
 

ROBERTH

GreatGrady Captain
Joined
Jun 10, 2006
Messages
1,304
Reaction score
120
Points
63
Location
Raleigh, NC
Model
Sailfish
Thanks Dennis for the feedback.

I have installed the valve and just so you are aware, these things last forever on the aquarium side of use, so think they are pretty well made and suited for the task at hand. Otherwise, I would try something different. Anyhow, I think that this is a good preventative measure.

You are probably right, if caulk is good and had proper adhesion and is of proper strength, then it should suffice. Just going to give this a go and see where I end up.

Here is what I did so far. Once I install the full width swim platform overtop the bracket, I will connect a longer piece of the silicone hose and let it vent out from under the platform since it will also be sealed to the transom and bracket.
 

Attachments

  • Deck Plate Check Valve.jpg
    Deck Plate Check Valve.jpg
    17.4 KB · Views: 352

handinpalm

Active Member
Joined
Mar 29, 2016
Messages
34
Reaction score
5
Points
8
Location
Tampa Bay FL
Looks good ROBERTH. I think you are on to something with the pressure build up from heat. Keep on rolling!
 

yellowlab

Member
Joined
Nov 12, 2013
Messages
11
Reaction score
0
Points
1
DennisG01 said:
Just out of curiosity, why did you use super glue to seal a gap? And, will the area you sealed see any UV (direct or reflected)? 5200 is not UV stable. For the swim step... same questions - are the mechanical fasteners not strong enough? 5200 is not a better "sealant" than other things - it's primary purpose is gluing... which can cause damage to the gelcoat if you should ever need to remove the things.

Wish I had seen this prior to the application. I am still getting some water inside the drive and will proceed to remove my kicker motor, swim platform and inspect and re-seal with 4000 this time on top. The 5200 was used below the waterline and once dried I applied a coat of bottom paint to match. I picked up a spare Garboard drain plug and fitting from my local Grady dealer, but the one I had was fine, just replaced the O-ring and will apply a thin bead of silicone, what they recommended. I am likely going to have a marine fabricator build me a new aluminum swim step with a built in kicker motor plate and swim step and have it all powder coated to match. The boat performed flawlessly for us two weekends ago with the Halibut opener. We put on over 250 miles offshore, and she handled it like a champ.
 

Attachments

  • Resized_20180513_195239001.jpeg
    Resized_20180513_195239001.jpeg
    146 KB · Views: 280
  • Resized_20180513_150331.jpeg
    Resized_20180513_150331.jpeg
    115 KB · Views: 280
  • IMG_20180513_165627.jpg
    IMG_20180513_165627.jpg
    100.4 KB · Views: 280

ROBERTH

GreatGrady Captain
Joined
Jun 10, 2006
Messages
1,304
Reaction score
120
Points
63
Location
Raleigh, NC
Model
Sailfish
Just an update from my final decision. Instead of the check valve, I decided to run the silicone hose across the bracket, under the platform and through the clamshell that the transducer cables run into the inside of the boat. I ran the hose up very high and looped it and tied it off.
Thinking here is let it relieve all pressure/vacuum with the temp changes.
All done now and sealed up, so think that was the best choice in the end. I put teflon tape on the threads of the aluminum drain plugs, so now time will tell if I get anymore water inside.
Based upon it holding the pressure for a day, I think it is now sealed. :mrgreen: