I fixed my macerator!

Gary M

Well-Known Member
Joined
Jun 2, 2006
Messages
475
Reaction score
10
Points
18
Location
Ft. Lauderdale
Thanks to you guys who gave me advice on how to tackle this job myself. I no doubt saved hundreds $$$$ and it really was not all that bad.

004.jpg


Taking a look, I realized that I only needed to pull off the two hoses, the cap nuts and only two of the wires. The tank was 3/4 full BUT, I knew that it was 95% water and the blue deodarizer from my normal "maintenence". But I also was wise enough to gently pull the grey hose off and give it a light "sniff test" just to make sure that it was safe to proceed! My other option was to run the boat many miles to the nearest pumpout station and I decided to roll the dice....... I won as there was very little smell.

The pump itself is mounted under and onto, the dark brown square panel. I had an old towel wrapped around the panel and a bucket right next to it as I lifted the entire unit straight up to allow it to drain and then quickly placed it in the bucket. I then placed a towel over the holding tank to hold any fumes to a minumum.

I then took the whole thing into the far corner of the yard and blasted it fairly clean with the hose. I soon found that the chopping blade would not turn and that it was frozen. The big question then was, "Can it be loosened, oiled up and put back in action?" You can see the small chopping blade at the very bottom of the second photo below.

001.jpg


002.jpg


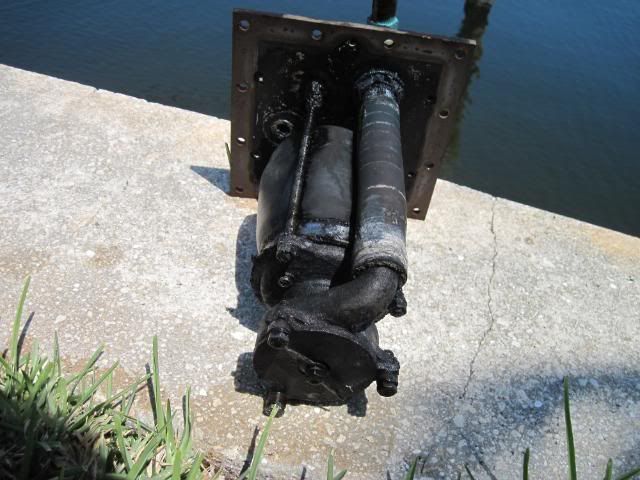
Tools broke out and the blade argued a bit but soon came off. There was not enough of the "blade shaft" to grab with pliers to attempt to turn so the bottom plate soon came off with the three bolts. I was then able to get the shaft to turn, slowly at first, all the while flooding the shaft with 20 weight motor oil. I was able to spin it about 100 times in one direction and then easily in the other. Feeling "hopeful", I put it back together. Taking the opportunity, I sharpened the blade a bit with some sandpaper. Like a knife, the blade is only sharp on one side so care must be taken to ensure that it's reinstalled so that it spins the correct way.-

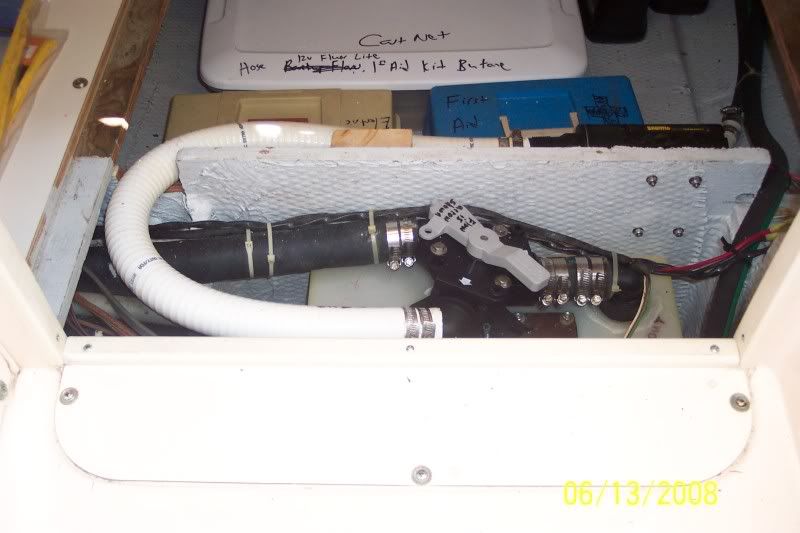
I hooked up the two power wires with the motor laying on top of the holding tank and the blade facing me. I leaned out of the mid-berth, reached up and hit the two buttons and the motor and blade were spinning freely and fast...... ensuring that the blade was spinning in the correct direction. I happily buttoned it all up with the knowledge that I could give it a field test on an offshore boat ride the next day.

003.jpg


However, after giving it the field test (it took about 75 seconds before I could hear the normal "groaning" of the pump running in an empty tank)....the quantity indicator which initially flickered at 1/4 and then went off indicating and empty tank, later indicated 3/4 again! I assume that the indicator is the small grey wire that goes into the white cap and that wire did look a bit frazzeled. I'm assuming that my problem lies there. Anyone know if that's an easy fix? The boat will go into my local Grady yard this Fall and I may get them to fix that.........

All-in-all, it was a simple repair job and the hardest part was working in such a confined area. Total time was under an hour..........

Thanks again for everyone's help! :goodjob
 

Enough Already

Well-Known Member
Joined
Jan 30, 2005
Messages
284
Reaction score
0
Points
0
Location
Boca Raton, FL USA
Hey Gary - congrats on the fix. Speaking from direct experience, you did what I have done several times with the exact same pump. Basically just need to put a wrench on the center bottom shaft nut and work it free. Would be pretty cool if they had a nut or allen-wrench port to do that from the TOP instead of the dunked end! Good news / bad news - You will need to exercise the pump often because I found the fix on mine temporary at best. There seems to be some core design flaw that allows seepage along the shaft which then freezes the whole thing up. My pump access is a lot tighter and after 2 or 3 freeze-ups and fixes as you did, I bit the bullet and bought a new one about two years ago. Unfortunately, about 2 months ago, it froze up AGAIN and I called Groco to complain. They said send it in and they would take a look. After about a week, they said the protective bladder had a tear in it, which allowed water to get inside and corrode things. No matter how much I complained and said no way it was torn, the best I could do was get them to fix and rebuild for another $200. The whole setup and design stinks (no pun intended) in my opinion. I have never in the life of the boat pushed anything but liquids through the system, no paper, no nothing. To have this level of difficulty is very frustrating.

Pop the pump-out switch every time you go out and hopefully you can keep her running for a while.

Regarding the level gauge - it is read from the gray wire that goes to the screw-in sensor between your two hoses. The wire connection is very tiny and very easily damaged. I messed mine up getting them apart and have not fixed yet. Wish I had the easy access you do and maybe wouldn't have that issue. Try carefully disconnecting the wire connection and then unscrewing the white cap. Pretty sure that is just a float mechanism and you may have some special sauce fouling it up.

I found some schematics on the web for the pump and tank gauge. Let me know if you would like a copy scanned and sent.

PS - nice job on all the double clamps. A blow-out down there would be a disaster! Mine was all factory single clamped.
 

Gary M

Well-Known Member
Joined
Jun 2, 2006
Messages
475
Reaction score
10
Points
18
Location
Ft. Lauderdale
Hey, thanks for the nice reply! No doubt, the non-holding tank guys are high-fiving themselves!

Yes, the boat's right behind the house so I'll need to hit the switch every time that I hop on board. I guess that I'm lucky that it lasted this long! Mine's also a 2001 and that's strange that both our boats are the same year, yet my hoses were double-clamped and yours were not...... Unless, people monkeyed with them before we bought them?

The hoses were "stuck" to the pipes and I was VERY careful to slowly work them loo se for fear that I'd rip one and not have enough slack in them to repair them! :-|

As if I hadn't punished myself enough that same day, I then went straight to another job in the mid-berth and that was to try and track down a fresh water leak in the system as I had a constant "brrrrrrrrrrrp" every 10-15 minutes from the water pump re-pressurizing the system. This had happened before and it was from some loose clamps on a 3-way T-valve behind the starboard wall in that cabin. I pulled the wall panel down, found the 3-way valve and sure enough, it was dripping a bit from a broken hose clamp. I had just enough slack to cut about 1/2" off of each hose to freshen the ends up and reconnect. I have my fingers crossed now......

Oh well, at least I'm going fishing tomorrow.......
 

ahill

Well-Known Member
Joined
Jun 13, 2006
Messages
806
Reaction score
2
Points
0
Location
Manatee Pocket, FL
My '98 Sailfish has the same looking holding tank with some wire disconnected and an external macerator pump.
Must have been a retrofit after internal pump failed.
Works great.
 

BobP

GreatGrady Captain
Joined
Apr 27, 2005
Messages
4,746
Reaction score
6
Points
38
Location
Long Island, NY
Model
Sailfish
The difficulty of this design is it is always buried in human waste, even if you kick it on every trip.
The external macerator can be flushed clear with water after each use and sit flushed.
It was obviously easier and less expensive for Grady to mount one device instead of more than one, with no consideration to costly messy $$ service/replacement. Even have to get out the power washer on this one.

Not the case with an external macerator, no mess,150 bucks, and two hose clamps, no power washing.
1/2 that price for pump rebuild kit for it -3 screws and 1 nut.

Reminds me of the car gas tanks now with internal electric fuel pumps, same nonesense when it comes to $$ fix it.
Better yet, I guess we all are driving Porche carreras that require dropping the engine when doing oil/filter changes, or was it spark plugs ?
 

Enough Already

Well-Known Member
Joined
Jan 30, 2005
Messages
284
Reaction score
0
Points
0
Location
Boca Raton, FL USA
BobP - can you post a photo? I've heard the "go external" chant many times but not sure how to convert. If I pull out my Groco, I have a 6x6 inch square hole to deal with on the top of my tank. Does it require a tank swap as well? Can you use the existing tank depth gauge and pump-out switch?
 

ahill

Well-Known Member
Joined
Jun 13, 2006
Messages
806
Reaction score
2
Points
0
Location
Manatee Pocket, FL
This is a pic of mine.
White hose to macerator from y valve.
Brown panel on top of holding tank appears to be the same as yours.

HoldingTank.jpg
 

SilverLining

GreatGrady Captain
Joined
Apr 23, 2008
Messages
99
Reaction score
1
Points
0
Location
Punta Gorda FL
This is from a previous post of mine.....modification is still working very well....

Sorry, no photos as yet....


"First thought of using a 1.5" dip tube into the tank to fit the inlet of the new pump. Hose run is to be about 14". Ever tried to bend 14" of 1.5" sanitary hose???? Not good.

Realizing that the liquid in the holding tank has been macerated by the electric head, had little concern about reducing the suction side of the new macerator pump to 1".

Removed the internal pump from the plastic plate and fitted a 1" ID PVC dip tube through the plate down to about 3/8 - 1/2" off the bottom of the tank. With an elbow on the top of the dip tube fitted 1" ID sanitary hose from the elbow to the 1.5 " inlet to a Jabsco macerator pump located to the port side of the holding tank. Used existing discharge hose to through hull. First trials are O.K."
 

Grady678

Well-Known Member
Joined
Sep 23, 2008
Messages
101
Reaction score
0
Points
0
Location
Atlanta / Hilton Head, SC
Should extend the life.

After discharging, fill up with freshwater through pumpout flush deck port. Then discharge with freshwater.....removes all internal seawater and remaining waste. I do this everytime and takes a whopping 4 minutes.
 

Enough Already

Well-Known Member
Joined
Jan 30, 2005
Messages
284
Reaction score
0
Points
0
Location
Boca Raton, FL USA
Grady678 said:
Should extend the life.

After discharging, fill up with freshwater through pumpout flush deck port. Then discharge with freshwater.....removes all internal seawater and remaining waste. I do this everytime and takes a whopping 4 minutes.

Seems to make a lot of sense but get this - When I was complaining to Groco about the second pump, they said that all of that (which I was doing) plus running head lube through the system and popping the switch for a second before putting her away - all of that does nothing because the part that freezes up is inside the seal. They say great for odor control but does nothing for pump life. Not sure I buy all that and I will continue to flush with fresh water every time it is used. I am a generally unsatisfied and a non-referenceable customer of Groco.
 

ahill

Well-Known Member
Joined
Jun 13, 2006
Messages
806
Reaction score
2
Points
0
Location
Manatee Pocket, FL
I run freshwater from my sink thru the head after emptying the holding tank of waste.
Not a lot, & then empty tank again that flushes the salt out of the head pump and holding tank & macerator.
No odors after doing this.
 

grady33

GreatGrady Captain
Joined
Jun 30, 2008
Messages
727
Reaction score
79
Points
28
Location
Ocean Pines, MD
Model
Express 330
I've had to do the same to mine a few times the past 2-3 years. My grady 272 11 years old. I try and click it a few times every month to keep it loose. Ive also had it freeze up (just a clicking sound) only to have it work a few hours later. Go figure. Will keep this up until the thing quits or I do. HA!
 

mas

Member
Joined
Jun 1, 2008
Messages
9
Reaction score
0
Points
1
Thanks to all of you for all your posts. It gave me the courage to tackle this mission on my 2001 Marlin. Macerator fixed after removal, cleaning, and oiling the shaft. :dance

Now onto the tank level monitor. Cleaned this up and this seems to work. :)

The only remaining piece is the pushbutton switch to activate the macerator. I know that the switch is bad since I can short across the terminals which gets the relay to click and the system works fine. I guess I'm gonna have to invest in a new switch panel (if available) or suck it up and buy a new TLM system. :bang
 

BobP

GreatGrady Captain
Joined
Apr 27, 2005
Messages
4,746
Reaction score
6
Points
38
Location
Long Island, NY
Model
Sailfish
Enough, I didn't get a chance to answer you but I see others have photos.

If needbe, a new tank is actually reasonably cheap way less than new pump and can use a drawout tube supplied with it or the threaded fittings on the side. The company I found on the internet will place the fittings or tubes wherever you want, and have many tank sizes in catalog ver reasoable in price. I called them about the tank I acquired and were very helpful in offering choices in fitting locations I recall at no extra charge, I believe they may make the tank when ordered. The top withdrawel tube they offer is prefab and fits in a hole saw cutout with a big grommet, aka sealand style (they offered to preinstall). I used the standard side threaded fittings on my tank and located the macerator in an adjacent (empty) grind since the new tank was taller. I used some PVC fittings sealand sells with smooth hose surfaces (for the white vinyl sanitation hose) 1- 1/2 inch to adapt to standard 1 -1/2 PVC fittings from the depot. I used one 90 - deg coming out of tank side near bottom to go vertical, one 90 over top of tank to cross tank, bored one hole to get thru stringer, where the macerator is located rigth there in adjacent grid. Could have come out the top with tube but was not sure on th location to be spotted for the hole in the tank at the time.

A little more trickier with the Y valve to go pump out also, but I use sea discharge only and in a pinch if pump dies, can pull off one hose (at macerator inlet) and connect the other coming down from the deck pumpout fitting with a male to male 1-1/2 inch fitting ready top go. Was too lazy and cheap to add the Y valve.

I actually fitted a 14 gallon holding tank in my Sailfish, an impossibility if you ask others, but it's in the same exact stringer grid as original offering in the 10 gal only size.

I bought the tank for more capacity, had a 9 gallon tank bouht at sale at West years back, but always had the seperate macerator as factory equipped.

I hope the OP doesn't take a criticism of my post, as I am a fix-it upper too, but looking at the photos and all the internal hardware and electric, and knowing what it all sits in awash, I want to avoid it.
 

Gary M

Well-Known Member
Joined
Jun 2, 2006
Messages
475
Reaction score
10
Points
18
Location
Ft. Lauderdale
Well, after 18 days of working fine after my cleaning/oiling everything, it's once again dead. I doubt that going through that process will be a long term fix so I'm, planning to buy a new one.

Any suggestions on where to get a new macerator for a fair price? Is mine a 10" or 13"?

While I'm at it, what all is involved in fixing the Quantity indicator? It seems to be stuck on 3/4.

Thanks in advance!!
 

Enough Already

Well-Known Member
Joined
Jan 30, 2005
Messages
284
Reaction score
0
Points
0
Location
Boca Raton, FL USA
Gary, if you want to go OEM or factory repair, you can start here:

John Cly
Groco Mechanical Laboratories, Inc.
Technical Service Manager
jcly@groco.net
(410) 712-4242
7240 Standard Drive
Hanover, MD 21076
 

Kai Lover

Active Member
Joined
Sep 6, 2007
Messages
30
Reaction score
0
Points
0
Location
Tampa, Fl
I am having the same 3/4 full indication with my guage. I can hear my pump working but the guage never goes down. I tried to have marina pump out this weekend and it would not pull anything out of the tank. I positioned the seacocks (inlet and outlets) every possble way. I also tried to fill with water at the deck and the suction from marina would merely suck out the water I put in. My vent on side of the boat sounds like it is working.

Any help as I am getting ready to call the man to have him look at it.... :hmm
 

Gary M

Well-Known Member
Joined
Jun 2, 2006
Messages
475
Reaction score
10
Points
18
Location
Ft. Lauderdale
Enough Already said:
Gary, if you want to go OEM or factory repair, you can start here

Got one already but thanks! I shopped online for a new one, printed off the best Ad, took it to my local West Marine, they met the price ($446) and I had it home the next day! No shipping $$ and I'll end up with a few WM $15 coupons in a few weeks! I'll pop it in this week.

Kai, sounds like you have a stuck indicator (a float?) and that the tank is pumping out Okay. I may try to open mine up (the big white cap with the black wire coming out of it) and see if I can shake it loose when I R/R the pump........

003.jpg