Installing LiFePo house battery on GW 2 + 1 battery setup

Sardinia306Canyon

GreatGrady Captain
Joined
Oct 11, 2023
Messages
897
Reaction score
193
Points
43
Age
61
Location
Island of Sardinia
Model
Canyon 306
Yesterday i finished the installation of my LiTime 140Ah LiFePo house battery and changed 2+1 battery setup to 1+1+1 battery setup.

GW cabled my 306 Canyon (afaik many other models too) with stbd engine and house battery in parallel what is a way to do it, but not the way i am used to and prefer.
However it works for many and makes the use of battery switches simpler as there are only two needed and i don't want to start a tread if this is right or wrong.

When replacing the lead-acid house battery with a LiFePo/LFP battery the parallel engine and house battery will not work anymore so some modifications in cabling are needed.
The reason for that is that LiFePo should not be connected in parallel with other chemistry batteries, same as different Ah and/or type lead-acid batteries.

Surprisingly it was more easy to do as i expected, most time i lost was to put some order in the cable mess previous owners have made and still a lot to do.

What you need to start and finish this job is:
  • one LiFePo battery what fit the battery compartment space
  • one ampere draw limiting DC-DC charger (i used the Victron Orion XS)
  • one ON-OFF battery switch for the new LiFePo battery
  • 3 60A fuses (i used automatic ones)
  • about 7 ft of 16 mm/6 AWG cable
  • 6 AWG cable lugs with different hole size
  • about 7ft 0/2 or 1 AWG cable to make battery cables, use the same size as battery cable coming from outboard
  • a bag of screw on zip tie bases to secure the new cables
  • cable lug crimper, cable stripper or cutter, scissors, heat shrink tubes, zip ties, etc
  • a hexagonal cable ferrule crimper if you want to use ferrules, Victron write that they are not needed
Below the steps i have taken
  1. disconnect all cables from battery posts
  2. cover positive battery posts to avoid get zapped or remove them till you need to have measure the cables
  3. remove the battery switch box and disconnect the thicker now obsolete MAIN written on it house battery cable running from there to +12V bus bar under dash
  4. remove obsolete MAIN cable from +12V bus bar under dash
  5. mount DCDC charger, the 3 60A fuses and the battery switch in a convenient location
  6. start with routing the new cables, cut to length and crimp the correct size cable lug on the cable ends
  7. connect the cables to the respective bolts, double check if correct bolt is used
  8. connect battery post again, first +12V and then -12V
  9. switch on battery switch and fuses and all should work
Considerations:
  • it is more work than expected and in my case in a uncomfortable position, use a kind of seat to stay more comfortable
  • buy a Dymo label printer and stick on labels to mark what is what for later use and less confusion, before removal and while cables are connected
  • take photos of the existing electrical system before you change something, that helps if doubts arise
  • LiFePo batteries have usually 8mm bolts, not battery posts, so battery cable lugs should have 8mm hole size lugs
  • Amazon sells pairs of battery posts with 8mm tread to use instead batteries 8mm bolt, i ordered them but have not arrived
  • i left the disconnected and obsolete MAIN cable in place for hypothetic later use and taped off the lugs
  • there is a small risk that the BMS of the LiFePo battery switch off the battery to protect her what will lead to no power on house devices a
    On-1-2-ALL-OFF switch instead of a ON-OFF switch can be used and connect on 1 the LiFePo and on 2 the house battery so house power can be pulled from either LiFePo or from engine battery.
  • i mounted the battery switch on the inside of the panel, just beside the opening hatch as i don't wanted to drill thru the inside console panel.
    yes, not very comfortable as i need to enter the console and open the hatch to turn the battery switch, but it's hidden and electronics box can't be opened without breaking the console door and then find the battery switch.
Regarding the use of a DCDC charger
The reason to use one is that LiFePo batteries can pull a massive amount of amps when charging and this may damage the outboard/s charging system.
The Victron Orion series limits how much ampere the battery can draw , Orion-Tr to a fixed amount while the Orion XS can be programmed freely between 1-50A and he heats up much less than the Orion-Tr series.
There are many emotionally treads in forums regarding if it's necessary or not to use a DCDC charger between LiFePo and charging system and i don't want to go in that.
My new Honda BF350 outboards have automobile kind alternators and it seems that they react more sensible to high power demand than the usual flywheel driven outboard alternators. Same is probably true for owners with onboard generators!
For me its fine to invest 300$ for the Victron Orion XS and have peace of mind that i can program it to a correct power draw and correct output amps for the LiFePo used.
There are other brands who produce DCDC chargers, i choose Victron as they have a lot of experience in marine/home/solar power regulating devices and are very common here in Europe.

Chris
 
Last edited:
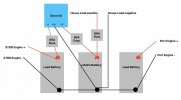
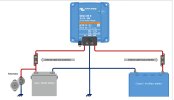
This is the schematic how my new system is connected.
It does not matter if DCDC charger IN is connected to house or port battery, i choose stbd battery as i had space there and did not needed to make more, longer cables.
Bildschirmfoto 2025-07-20 um 12.46.56.jpg

To be honest, mine is different as i have also 3 Victron SmartShunts, one for each battery and that makes the cabling more complex
Should someone be interested to install SmartShunts he can ask me for the schematic as it's more complicated, so i eliminated them to make it more understandable for most users without SmartShunts.

Chris
 
Last edited:
Some more remarks regarding the tools i used

Cable lug Crimper
I bought years ago a 50$ hydraulic crimper and he is working well, but the inserts for different cable diameter are not very precise and i guess that size is for AWG what is slightly tighter than square milimeters we use here, so maybe not a problem in US. This year i bough a bigger one, but same "problem" but can be solved to apply very strong pressure.
However, even a cheap hydraulic crimper is worth the investment as even 0/2 AWG cable can be crimped without excessive force and space a plyer kind crimper needs.
If many crimps have to be done then a rented/borrowed electric crimper would make the job much more easy as crimping inside the electronic compartment is possible and they can be used using one hand, and the other to hold cable and cable lug in place. Hydraulic ones need both hands to pump what makes the use in small spaces more complicated.

Ferrule crimper
Victron states that a hexagonal crimper is need to be used as the usual square shaped 6AWG ferrules will not enter the cable hole on the Orion XS.
I bought a 41$ LyTool crimper from Amazon and it worked well.

Other tools
In general: Invest in good tools, not necessary to buy expensive Hazet tools, but many very cheap ones are prone to fail and/or make damage
having several pliers is good, combination plier, long nose plier, side cutter, slip joint plier and a small end cutting nipper for zip ties
a quality electric multi tester with auto off function, same as above a expensive Fluke is a overkill but a 20$ one can be unreliable
a sturdy cable cutter makes cutting thick cables much easier, the new hydraulic crimper i bought had one included
a small blade cutter with new replacement blades
a garbage bag/bin
a label writer like a DYMO
Sharpie pen
Buy quality tinned cable lugs, short ones work better in tight places
Don't use normal ring terminals for low amp application, full output is 50A and thats too much for cheap ones
buy correct cable diameter for amp draw of the device you connect

Chris
 
I've been wanting to do something similar for a while. I need to review your details more closely when it isn't so late at night! I think my starboard bank finally died tonight, so now is the time to do something.
What I was considering was to use the smaller 18 amp Orion chargers, but one from each engine to a single house LiPo. I'm not sure if that is possible.
The 2 other issues I'm struggling with are how to set up the switches and how to isolate the house. I can't find a diagram that gives enough detail on how my switches are wired. The wire feeding what I believe is the house seems way too small. I need to get some photos this weekend.
 
Yes, you could use two Orion Tr model, but be advised thats a older model and can become very hot.
However i consider the Orion XS as the better solution and need less changes and work to install as Orion XS is connected to stbd engine battery, so basically your remove the actual +12V link cable between stbd engine and house battery and replace it with a +12V cable to the Orion XS and from it to the new house battery.

As written, my battery switch is between new house battery and +12V bus bar, just run a 6AWG cable to the convenient location.
Option would be to use a solenoid with screw poles and connect it to starter battery switch, so house power will switch on as soon you switch on engine battery.
So you don't have to install a additional manual battery switch, but cant switch off the house battery if a problem occurs what i think should be necesssary.

I have no idea how your cables are, however just unscrew the battery switch panel and then you see the house battery cable,
mine was a 6 AWG as well, had MAIN printed on it and run directly to the house bus bar.

Chris
 
  • Like
Reactions: family affair
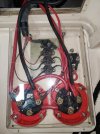
Here is my panel. I think my house is powered off the 8 ga wire shown at 12:00 in the photo and attached to the "main" breaker. If that is correct, I'm shocked it is so small.
1074bc1c-05bd-4847-ae4c-19a011f7033a.jpg
 
Check the labels of the breakers where the two mid-size wires go.
Yes, the main breaker is 99% the right one, in your panel i would just disconnect the link cable from Battery Switch to breaker, the house power is gone.
Same on the bus where this cable arrives first bar in your battery/cable compartment and then you can cut and crimp a new cable from new house battery to house battery switch and from there to same place at the bus bar. In my case that worked perfectly, but try all functions before you tighten down and close the compartment.
The most important, the automatic bilge pumps are probably the 3 (1 red and the 2 brown) cables going to dedicated breakers below main breaker so they should still work if power to main breaker is interrupted.
Every time i work on the electric system i apply a label what makes it much more simple to find the correct cable years later.
Chris
 
Moving down from the "main" are 2 bilge pumps and 1 "memory". Would that be for the am/fm radio, or something else?
I follow what you are saying, minus the "bus". Are you referring to the bus at the helm? If so, are you referring to the ground coming back from the bus?
The 8 ga wire coming off the main goes directly to the helm.
 
Would that be for the am/fm radio, or something else?
No idea, i don't have this, but you are probably right, radio memory and for all what need 24/7 power and is not bilge pumps.

Yes, sorry the BAR was missing:
Same on the bus bar where this +2V cable arrives first , the bus bar in your battery/cable compartment

I have no idea how the Marlin's cable are routed and i guess my cables are mostly non OEM as rather messy.
I had under the transom wall a bolt thru a wooden bulkhead connecting all -12V cables (engine and bilge pumps), but installed a bus bar to make that better.
If your engine cables are long enough and can arrive to the batteries the -12V one is most likely directly from outboard to Battery while the +12V goes to the battery switch and from there with a new cable to the battery compartment. But that was on mine, yours may be different and you need to verify that.

The 8ga wire is the one to disconnect on each side of the cable (battery switch and bus bar) to cut power from battery switch to house connected devices.
Connect same or 6ga wire from house battery to a new battery switch and from new house battery switch to the +12V bus bar where the 6ga wire was previously connected.

What I was considering was to use the smaller 18 amp Orion chargers, but one from each engine to a single house LiPo. I'm not sure if that is possible.
You should verify by a pro if two Orion XS from two engines can be connected to same battery as the Orion XS is not isolated while the Orion Tr can be isolated, or not However the Orion XS must have a diode or similar inside to avoid power flowing backwards and putting batteries in parallel.
My Orion XS is 24/7 connected to stbd starter battery and does not drain it nor putting it in parallel, but need to be set to Engine Running Detection ON to switch off if battery voltage falls below 13.2 volt.

Also, you need to check what is manufacturer recommended Amps to charge the LiFePo and not exceed that as charging over recommended Amps may shorten LiFePo's life. My 140Ah LiTime should be charged with 28A so i set my Orion XS to that output but may need to raise it if the 28A is too slow to charge and i could charge with full 50 amps if Orion is set to that.
Worst case scenario would be that LiFePo last only 10 years instead of 15 what i would consider as irrelevant at the actual cost of them.

Chris
 
Chris,
Couple questions:
  1. I consulted BOE Marine technicians and purchased what was needed. No one said I needed fuses. Why are the fuses "recommended?"
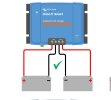
  2. I'm wondering if it is an issue to link my batteries with a common ground? I would think this is not an issue, because ground is ground. However, no diagram in the Vi tron manual shows this.
  3. Lastly, the Victron charger has a negative for the input and negative for the output. If they share the same ground, should I need to run 2 negatives off the charger?
Screenshot_20250810_182248_Drive.jpg
 

Attachments

  • Screenshot_20250810_182248_Drive.jpg
    Screenshot_20250810_182248_Drive.jpg
    72.6 KB · Views: 1
Turns out the info was easier to find than I thought.
A isolated charger can be used in an unisolted application. The grounds are connected.
For reasons I can't understand, the "experts" did not tell me anything about the need for fuses. They are on order.
 
Ok, glad that you solved your questions.
I could not answer as i have the not isolated Orion XS as more powerful and heat up less plus i have 3 SmartShunts (not shown on my diagram) what makes cabling more complicate.

Yes, there should be 3 fuses/breakers as i show in my original diagram, two breakers to protect the Orion XS and the third is main house breaker to substitute the GW one in the battery switch panel what became obsolete.

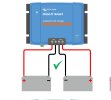
This is the wiring diagram from Victron Installing Manual and i mostly follow what manufacturer states.
Bildschirmfoto 2025-08-11 um 10.07.54.jpg
 
I'm now part of the club! My Ionic is in and all is well. I love the ability to look at my battery to see what I'm using and SoC. Game changer! My inverter seems happier as well.
Thank you for the help and paving the way!
 
  • Like
Reactions: Sardinia306Canyon
Good News Family Affair!
Congratulalions to be part of the GW 3x1 LiFePo club! :cool:

Just a the numbers i got a few days ago deep deep dropping with my buddy.
Left Marina at 11 am with all 3 batteries at 100%
14 nm ride at 3800 rom / 29 knots to fishing ground
Deep Deep dropping from 12 am - 01.00 am with outboards mostly stopped, just on for short boat movements to start over drift
radar always on from 9 pm to 01.30 for safety (more than usual traffic) and test purposes
14 nm ride at 3200 rpm / 22 knots home

Unfortunately i forgot to check LiFePo house battery SOC before we left back to marina :-(
However, back at marina house battery was at 86& after about 30 minutes of charging house battery with 30A

This a extremely much better SOC than i had ever, before with stbd and house batteries tied together i would have deployed them to no start level and would have needed to run the engines for several hours to top them up.
The above is a for me extreme use, usually after a day of bottom fishing -without radar always on- at night i enter the marina and LiFePo house battery is 100% full.
Next test will be to add livewell pump too what would lower SOC a lot.

BTW: both engine batteries are now always at 100%, after cranking about 99% and then full again after a minute or so,
before the modification the single port engine battery was obviously same always at 100%, but stbd much lower deployed by house electronics.

It took me much more time than i expected due the cable mess ex owners and installers made but i am also totally happy with it.

Chris

Just to be clear i repeat:
There is basically nothing wrong with GW's 2+1 battery setup and if one drain his stbd engine house and house batteries he will be able to start the stbd engine using the battery switch taking the power from the port engine battery what should be full.
It's just that i am used and prefer to have 3 completely separated batteries for peace of mind.
 
Last edited:
  • Like
Reactions: family affair
I suspect that in time GW may change their battery configuration once Yamaha blesses the use of LiPos.
Looks like you have created a game changer for yourself.
Working in my bilge is a major PIA. I was so happy to button everything up and be done with fresh batteries that should last me a long time...until my Noco was throwing up to 23 amps at my LiPo. I contacted Noco and now I have to rip my charging system out and send it back for a warranty replacement! #$%! Yeah. It never ends with a boat!
 
Yes, fortunately my canyon has the batteries in a well accessible position so it could work seating inside the console, but remeber well when i rigged my BW 23 Outrage.
Yes, i was reading your tread in THT regarding the NOCO charger, but i did not replied as i don't have one and it seems that you got assistance from NOCO.
Yes, it never ends with a boat ...
Chris
 
sounds to me that you could use another Li battery and a second dc dc charger. being at 86% after a 45 min run and 30 min of charging on shore power? likely 50% SOC when you started running home? what's the max charge rate for the Li battery? Id want both batteries charging the li battery equally. otherwise that left lead acid will be living a shorter life then the right one
 
sounds to me that you could use another Li battery and a second dc dc charger. being at 86% after a 45 min run and 30 min of charging on shore power? likely 50% SOC when you started running home? what's the max charge rate for the Li battery? Id want both batteries charging the li battery equally. otherwise that left lead acid will be living a shorter life then the right one

Thanks for your reply.

I can not fit another battery in my 306 Canyon battery compartment nor do i have shore power as my discounted 1500$/year slip has no.
My new BF350 outboards have a amazing charging system, they will charge at 28A the LiFePo + 2 x 10A the AGM starter batteries when idling and 50A at 1300 rpm when trolling at 7 knots.

I could charge full 50A but battery manufacturer recommends 28A so i set the Orion Xs to 28A and then battery was most likely almost full when arriving at the marina.
I need to get used to use my phone to change Orions in and output Amps in such cases to load with full 50A and should not do any harm if not used continuously.
However, the 86% SOC is not a problem, next time i go out at day the radar will be off and i expect that LiFePo will be full when i arrive at fishing spot even if leaving charging rate at 28A.

Left and right batteries are always at 100%,
just after starting then engines they drop to 99% and after a minute they are again at 100% as all starter batteries do if they are in a good shape. So i don't expect any higher degradation of the stbd engine starter battery over the port engine starter battery where the Orion XS is connected.

Chris