Installing the new Hardtop

Ky Grady

GreatGrady Captain
Staff member
Joined
Mar 1, 2006
Messages
2,934
Reaction score
1,275
Points
113
Location
Berea, KY/Cross, SC
Model
Seafarer
To much weight for the trailer???? If you keep having bearing issues I'd say you're overweight for that trailer. Six lug wheels, you should be fairly good for the weight. Just tossing ideas out. By the way, the top looks fantastic on there. Brings out the true beauty and great lines of the Grady!!
 
  • Like
Reactions: RussGW270

RussGW270

GreatGrady Captain
Joined
Mar 5, 2019
Messages
1,761
Reaction score
253
Points
63
Age
57
Model
Islander
I did not have one handy till I got home. The tires were hot, but it was 101 outside and a 125 mile drive, so inconclusive.

Bottom line is, I do not trust the trailer, so going to see what I can do to trade it in on a new one.

I also need to find some odd and end parts, some shorter stainless screws/bolts for the things I added up top and some buttons for the rocker panels. etc.

Almost ready. Debating what to do about the coming weekend. With the bearings exposed, dropping it in the water will not help, so.. need to either find time to fix them this week or cancel the coming weekend. We will see.

Russ
 

Legend

GreatGrady Captain
Joined
Jun 29, 2006
Messages
1,423
Reaction score
194
Points
63
Location
Southern New England
Model
Sailfish
Hardtop looks great - Did you remove strips and decals from the hul? I like the look but wonder if I would get bored with it eventually. The stripes and decals look good when they are new but once the fading and nicking set in they can drag down the look of the boat.
 
  • Like
Reactions: RussGW270

RussGW270

GreatGrady Captain
Joined
Mar 5, 2019
Messages
1,761
Reaction score
253
Points
63
Age
57
Model
Islander
Hardtop looks great - Did you remove strips and decals from the hul? I like the look but wonder if I would get bored with it eventually. The stripes and decals look good when they are new but once the fading and nicking set in they can drag down the look of the boat.

Yes, I did and I like it without, but am adding them back for exactly the reason you stated. I just cannot add them back till I get the hull really clean and ready for the new stickers as they cost me like 160 bucks.. heh

I like the stripes better, because the white... while sleek and nice.. needs the "zing" of the stripes.. heh

I am super freaking tired atm.. and at work, so going to type up a summary of what we did and what we learned and update the thread with it. It may be repetitive when done, but should...I hope...aid people in the future that may be looking for a hard top.

Right now, almost falling asleep at the keyboard heh

R
 

RussGW270

GreatGrady Captain
Joined
Mar 5, 2019
Messages
1,761
Reaction score
253
Points
63
Age
57
Model
Islander
To much weight for the trailer???? If you keep having bearing issues I'd say you're overweight for that trailer. Six lug wheels, you should be fairly good for the weight. Just tossing ideas out. By the way, the top looks fantastic on there. Brings out the true beauty and great lines of the Grady!!

Thanks KY. I think this trailer should be fine, but I just have a feeling I cannot kick that it is not up to par. We will see. I am not taking it on the road till I figure it out, so that is my focus this week. I will update when I can type without forgetting what I was thinking to say lol. We got the top to my friend's place at like 10:30pm...stayed up "planning" till like 12:30, I was back up at 4:30am because I cannot sleep late...ggrrrrr... and we worked on this from about 5:30am till like midnight straight, stopping for lunch and a fast dinner. Then got back up at like 5:30 am and worked till around 2, then drove home.

I am dragging today so, may ramble a bit.. so waiting till tomorrow to do the summary.. but will draft it. There is a ton of info folks thinking of doing this will want to know.

R
 

lapmd1

Member
Joined
Sep 7, 2012
Messages
14
Reaction score
2
Points
3
Russ, this is hugely helpful; I was curious the process/cost for a WMW after-market hartop. Good luck man; looks awesome!
 

wahoo33417

GreatGrady Captain
Joined
Feb 28, 2005
Messages
1,188
Reaction score
211
Points
63
Location
West Palm Beach, FL
Model
Sailfish
Russ: You are one resourceful guy to take this on and make it work. Nice job. Looks great. Something to be proud of.

Rob
 

RussGW270

GreatGrady Captain
Joined
Mar 5, 2019
Messages
1,761
Reaction score
253
Points
63
Age
57
Model
Islander
Thanks guys. I have pictures and a write up to add, but trying to get it honed so it is not too wordy but also...someone can search and find out what to expect.

We made mistakes, but nothing major and nothing that was more than "messier than need be"... lol.. that dang 5200 was a nightmare.. but...our fault for not wearing the dang disposable gloves heh.

Anyway, will type it all up and add it later today.

R
 

RussGW270

GreatGrady Captain
Joined
Mar 5, 2019
Messages
1,761
Reaction score
253
Points
63
Age
57
Model
Islander
Okay, got tired of typing.. but here is as much as I could imagine you would want to know.

Okay, this is a summary of what we did. Before I start, a few disclaimers:

1 – If you see our legs, no.. you cannot have them… we are taken. No, you cannot make fun of them, we are old enough we do not care. Lol

2 – We did not do it “right”.. we “did it”. Anyone cares to add tips, awesome. Anyone cares to critique, first go buy an airline ticket to Texas, then rent an expensive car… PM me.. I will give you my address, so I can laugh at the money you spent to be told to kiss my grits.. lol. Seriously, give tips and improve the process, that is what this is for…but it is on, it is done, please remain positive.

3 – Lastly, if you are finding this, ask away…but please read first. We do not have all the answers, just an example.

So, we bought a Grady…but the “deal” I made with my wife (lol…) was I needed a hard top… Daddy liked his shade, and, fortunately for me, momma wanted one too.
So, we started looking for ideas on how to add a hard top. We had a bimini top, but it had been removed.

I add lots of “Disclaimers”.. so.. forget numbering them, just know they are spread throughout all this.

--- You will get lots of advice and tips on “do it this way or pay someone to do it right”. Stick to what the manufacturing people tell you to do.. i.e. use 5200 sealant. It is a major pain in the back to deal with, but it is the best. Some will say a different type, ignore that.
We looked at local places, i.e. in Texas. They originally quoted around $8k (this is 2019 in case you stumbled on this in 3022 or something lol)…When we finally got down to “Okay, I am ready to bring this in”, it turned into closer to $15k. If you buy in state, you are going to pay taxes. If you buy out of state, you may pay taxes AND you will pay shipping.

--------There are ways to get a “top”… you can order from companies that make “tops” or you can order from a company that can “make YOU a top”…or you can order from WMW Marine, that makes “Grady Tops for the boat you own”…i.e. OEM.

I called WMW Marine in Winterville, NC. They make the tops for all the Grady White OEM models. They have done so for years. I spoke with Jerry Stotesbury and he sent me a quote via email.

--------- BIG DISCLAIMER – if you buy from them, they do NOT need the business. They are not going to negotiate or bend the rules. Be prepared to write a check or send a money order for the ENTIRE amount right off the bat. They DO NOT do Credit Cards, period.. end of story, no exceptions. CASH, Check, Money orders.

--------- Factor twice the shipping costs. They told me maybe $800, turned into $1,600. Not their fault, it was a quote. When I decide to pay, they get a real price and you pay it. Expect to pay $600 for the crate. They hand make the crate to ship it in for the top you buy.

Now, pick what options you want…. Rockets (I picked 9)…Do not skimp on the things that you cannot skimp on. The top itself, done, the frame, done, the electronics box and fuse panel, done. You “can add” rockets later, you “can add” an enclosure (albeit MAKE SURE to ask them to add the channel for the enclosure.. that cannot be added after the fact.

------ ADD AN EXTRA ELECTRICAL CHASE. They run the power down the right side. Ask them to add one on the left side also…you will need it, guaranteed.

------- IF they can run the cables for radar and nmea2000, maybe the vhf if you do not have it in the electronics box, let them do it as they make it.. you will not regret it. If they will not, research how to do that before it gets to you. KNOW all the electronics you will end up with after the top is on and add the wires for them EVEN if you do not buy it yet…. You cannot run the wires after the fact near as easy as when installing it or building it.

Okay, so we got the buying out of the way. Final price to ME was $9,850-ish. That was with:

1) 2004 Grady White 270 Hardtop Frame/Fiberglass Top $4,353.00
2) Hardtop Electronics Box $ 785.00
3) 5 Hole Rod Holder $ 780.00
4) Electronics Box Dome Light $ 160.00
5) LED Spreader Lights $ 365.00
6) Navigation/Anchor Light $ 160.00
7) Electronics Box Fuse Panel/Wiring Harness $ 410.00
8) Installation Package (IF SHIPPED) $ 160.00
9) Storage Bag $ 450.00
10) Crate for Motor Freight Delivery $ 600.00
11) Shipping $1,600.00


Total - $9,823 to my door
 

Attachments

  • IMG_2047.jpg
    IMG_2047.jpg
    158.9 KB · Views: 19
  • IMG_2058.jpg
    IMG_2058.jpg
    202.6 KB · Views: 20
  • IMG_2059.jpg
    IMG_2059.jpg
    185.9 KB · Views: 20
  • IMG_2073.jpg
    IMG_2073.jpg
    157.5 KB · Views: 21
  • IMG_2064.jpg
    IMG_2064.jpg
    139.9 KB · Views: 21
  • IMG_2063.jpg
    IMG_2063.jpg
    146.8 KB · Views: 21
  • IMG_2075.jpg
    IMG_2075.jpg
    113.1 KB · Views: 21
  • IMG_2077.jpg
    IMG_2077.jpg
    138.8 KB · Views: 22
  • IMG_2087.jpg
    IMG_2087.jpg
    121.6 KB · Views: 22
  • IMG_2094.jpg
    IMG_2094.jpg
    60.3 KB · Views: 22

RussGW270

GreatGrady Captain
Joined
Mar 5, 2019
Messages
1,761
Reaction score
253
Points
63
Age
57
Model
Islander
YOU ARE REQUIRED to ship it somewhere they can remove it from the truck. That means a forklift.. and it NEEDS to be a looooong forklift. A standard one will not work as this thing is over 6ft deep.
Now, you have it purchased, sent your check, and have a place to have it shipped to (they may charge you as well).

Now.. you wait…. And wait…. And wait.. and wait more. They are working hard, but you are a one-off and so they will get it done. Go eat a few dinners, play with your kids, enjoy life.
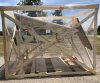
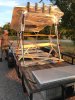
Next.. it arrives, and you install it:

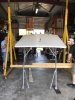
-------Okay, this thing weighs like 350lbs. Think you and your buddies can lift it? Think again. 350lbs behind held 18ft in the air ain’t easy. Have a plan on how to get it into your boat without breaking IT or yourself or the boat. We used a lift, in the shade of a building that was 18ft tall, and we still barely got it over the windshield. Why? Because once you lift it up, it is still limited by the width, so lifting it is step 1, step 2 is tilting it, without breaking the legs off or bending them, or breaking the windshield and that easy 350lbs has to maneuver around the chairs, cockpit, people, and all that.

------We lifted it with the lift, and then slid it down the side.

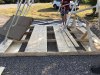
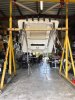
REMOVE THE CHAIRS, they will get in the way and they will get torn. We tilted the front upwards, as we pushed it sideways along the starboard walk around, then we tilted the back side upwards, to put the back pole where it needed to be and push the entire thing to port.

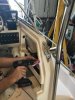
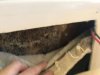
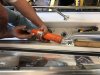
--------See the photos: If you have the cockpit hand rails, you need to remove them as the middle pole goes right there.

-------Once it is in place, make sure you did not crimp the wires… and you start the measuring, measuring, measuring.. and then, lunch and come back and measure… heh.. you get the idea.

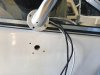
The holes must, really, be done without a lot of marking. The reason is, you cannot mark and drill them all as you will be off, not may.. you will. Maybe you are a master driller, maybe not, heh… but two of three holes go in good, but the third will be off. It happened to us each time. The issue was the holes have to be perfectly straight or the bolts, as they go in, will move the entire thing just enough for the third to be off. Expect it. Drill all 3, and just expect to re-drill 1 of them. On the middle support, going where the hand rails were, will go on easy. I suggest you set that one first. Then the back pole, then the front two for that side. THEN, move to the other side and do the same thing.

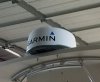
The new anchor light comes installed a bit too far forward for us, but it was there, so the radar ended up a little more forward than we wanted, but fine. ASK THEM to move it back about a foot.

TIP: If you try to do both sides, moving forward, you could end up with the entire front being “off”. It may not make a difference, but it seemed to be a better move for us.

------ BIG TIP ---- WEAR DISPOSABLE GLOVES! When you set the backer plates, the 5200 sealant gets eeeeeverywhere. Have Mineral Salts available and/or other solutions for removing it from your hands, legs, arms, whatever lol

The front legs:

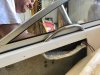
The ROOF of the cabin is glued like a MOFO… expect to pry at it eeeeasily… so as not to break it.. and it will break. Have a putty knife and use it to get under it. There are a lot of screws. These will not go back in as easy as that is soft above it in areas.. so get some new wider but not longer screws.

The BACK legs :

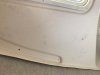
Access them from the fish boxes etc for the backer plates. If you do not use 5200, those will deteriorate the part between them.

The SIDES and middle support:

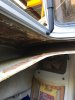
There is carpet behind the sides. Pull that back. People will say you can drill through it. Carpet is not a lock washer and it is not something sealant can adhere to. Pull the carpet back… get under it.

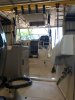
Running cables through the poles:

See those bolts holding the top on? When running cables, you WILL run into those. Watch how you back them out and put them back the same way. Go one hole at a time or it will be harder and you will get frustrated. Don’t try to fish the entire run in one “swoop”.

Run a NMEA 2000 backbone kit from the console/dash to the electronics box. Then you can hook anything ya want up.
ME…? We decided to put both VHF in the box, why? Because two more VHF wires down the tubes would have been a royal pain in the back end. Keep an open mind. Better to put a temporary plate over a dashboard hole and run the VHF to the box, than to deal with one more huge wire going down. Besides.. if you are sinking.. that adds 3 more feet of “help! I am sinking!” right? Lol

The cable run:

We had a REALLY hard time running cable on the port side, up to the window of the cabin and then up. Right as the cabin goes up… there is a “jig”.. and we spent a couple hours on it. Finally.. we decided that a $7 piece of cable hiding material of like 1ft long was worth the hassle. Home Depot sells a plastic piece that you can run cables along a wall with and hide them. It comes in like 5ft sections. We cut a foot and drilled a hole and ran the cables tightly along the roof, and covered them with that. Easy, looks awesome.

Power:

The top has 2 power runs. One goes to the anchor light switch on the dash, the other goes to the main power, we ran it to the “accessories” button….now, when we turn on the Fish Finder, it also powers the electronics box.

That is about it!

Anyone can do it….I am proof
Russ
 

Attachments

  • IMG_2096.jpg
    IMG_2096.jpg
    96.9 KB · Views: 15
  • IMG_2102.jpg
    IMG_2102.jpg
    111.1 KB · Views: 16
  • IMG_2103.jpg
    IMG_2103.jpg
    352.4 KB · Views: 16
  • IMG_2105.jpg
    IMG_2105.jpg
    99.8 KB · Views: 16
  • IMG_2106.jpg
    IMG_2106.jpg
    110.1 KB · Views: 16
  • IMG_2107.jpg
    IMG_2107.jpg
    109.8 KB · Views: 16
  • IMG_2115.jpg
    IMG_2115.jpg
    107 KB · Views: 15
  • IMG_2117.jpg
    IMG_2117.jpg
    105 KB · Views: 14
  • IMG_2123.JPG
    IMG_2123.JPG
    104.7 KB · Views: 14

CJ7Rob

Well-Known Member
Joined
May 13, 2018
Messages
157
Reaction score
23
Points
18
Came out looking nice. I so want a hardtop for mine one day. I may have missed this but that was a new top you ordered or was from another boat? Wondering if you deep sixed the brand new top idea..Also F150 sits pretty level with that big a boat behind it.
 
  • Like
Reactions: RussGW270

RussGW270

GreatGrady Captain
Joined
Mar 5, 2019
Messages
1,761
Reaction score
253
Points
63
Age
57
Model
Islander
Thanks for the compliments heh... The F-150 is the 2018 V8 with the 3.55 axle ratio. I wanted the 3.73, but this one does good and tows it pretty dang well. I have air bags on it, but plan to install a WD hitch I already own. the secret is.. if you do not have the WD hitch you have GOT to install a Curt after market receiver because if you read underneath, it is only rated above 5000 if you have a WD hitch and comes from the factory like that.

Brand new top. This was the original boat:
 

Attachments

  • 6945942_0_080120190856_1.JPG
    6945942_0_080120190856_1.JPG
    1.6 MB · Views: 15