
- Joined
- Jan 31, 2005
- Messages
- 1,907
- Reaction score
- 43
- Points
- 48
- Location
- Fort Myers Beach, FL
- Model
- Islander
Shortly after we purchased our Islander 270 in 2002, I installed a Horizon 500 windlass on the pulpit. I used the factory installed wiring from the helm to the bow, but added separate wiring (#6 AWG) from the batteries to the helm area. Had a 50-amp breaker back aft for overall circuit protection, and then the Lewmar-provided 25-amp breaker and windlass control toggle switch at the helm. That windlass wiring was direct, with no contactor. It looked like this:

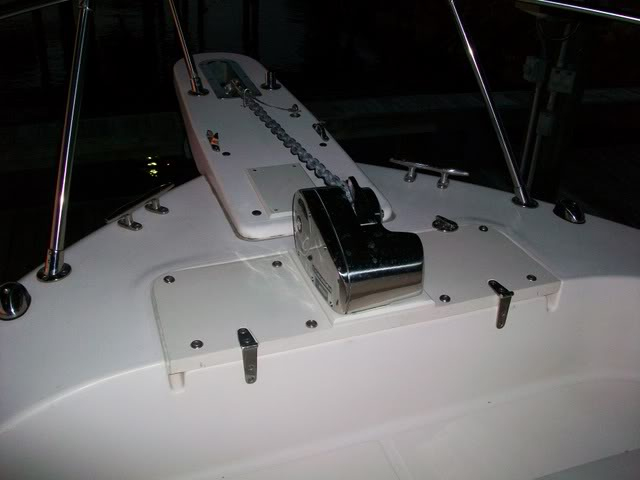
Well, the windlass has been getting tired for a while, and finally became useless on a fishing trip in October. We decided to upgrade to a Lewmar ProFish 700FF and I started doing research. I found out everything I needed to know, and decided I wanted to mount it further aft as Renovator posted in Sep 2008. His looked like this on a Sailfish:
Many threads discuss the need for access to the locker to clear "hockles" in the rode, etc. Some use the small access from the V-berth, but we don't have a mid-berth for all our junk so it is usually filling the V-berth. I looked at one video here starting at the 9:10 http://youtu.be/K79s6BJfT30, but I didn't want to cut the locker cover like that, so looked for an alternative solution and you will see it in the photos below.
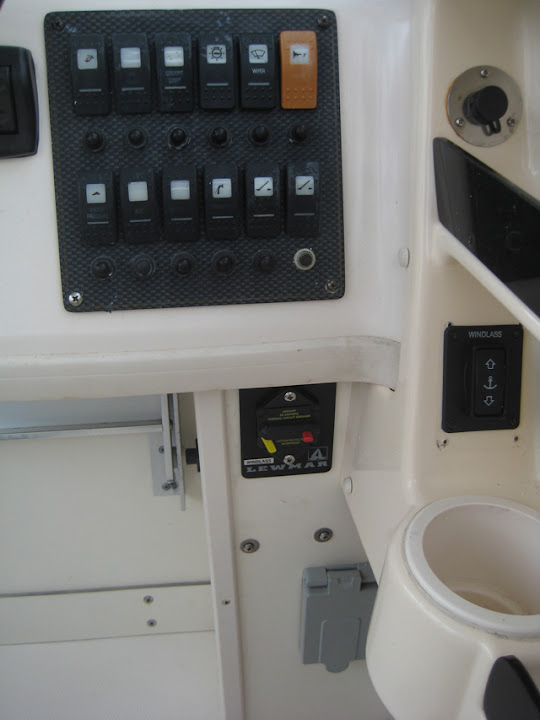
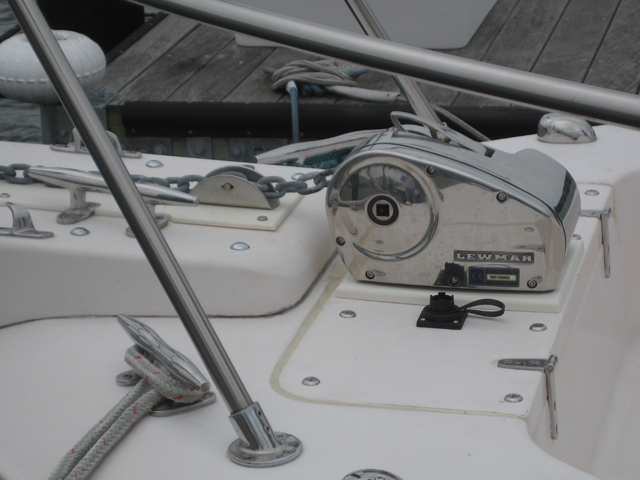
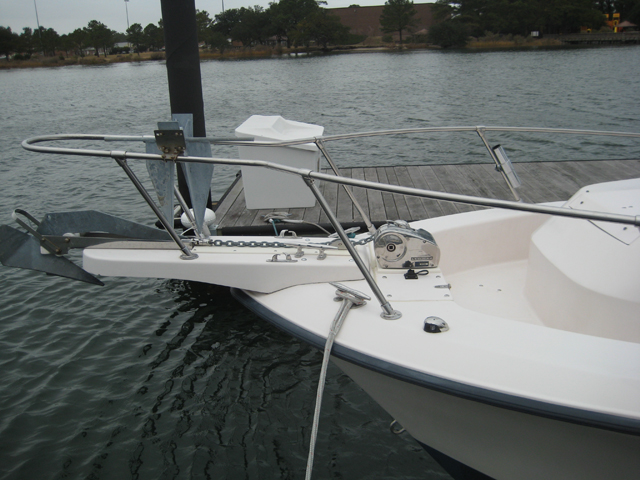
For the run on the Islander, we are just at the maximum run for #6AWG, but I didn't want to rerun #4 unless needed. I rerouted some of the existing cabling to make it as direct as possible, cutting several feet off of the factory-installed wiring from the helm to the bow. I removed the 50-amp breaker aft and installed a 120-amp for circuit protection (within the required two feet from the battery). I removed the original 25-amp windlass breaker and installed the Lewmar-provided 50-amp breaker. I also removed the original windlass toggle switch and installed the new rocker switch for the contactor circuit. Both the breaker and the rocker switch were installed in the same locations as the units they replaced. I installed the contactor inside the wiring area at the helm. In addition to control from the helm, I also wanted remote operation, but not at the cost of the wireless remote. For half the price I purchased the Lewmar handheld remote, and installed the waterproof connection plug just to the left of the windlass. The handheld has a coiled six-foot cable, and allows free movement around the bow while controlling the windlass. With the windlass now over the larger section of the anchor locker, I have no problem with 400-feet of rode and 30-feet of chain falling nicely into place. The rode is 600-feet long, so the last 200-feet is led down into the center forward storage area under the V-berth. Easy enough to use it if needed. The access port to the right of the windlass allows excellent access to the entire area under the windlass, so it would be easy to clear any jams.
Here are the photos of the installation, once I completed it yesterday.


The two bolt heads below the breaker and above the AC outlet show where the contactor is mounted on the opposite side.
A lot of work but I have always done all the mechanical, electrical and electronic work on the boat. Mostly because I can't afford to pay someone else, but I also like my own work better.
Happy to answer any questions about this installation.
Brian
Well, the windlass has been getting tired for a while, and finally became useless on a fishing trip in October. We decided to upgrade to a Lewmar ProFish 700FF and I started doing research. I found out everything I needed to know, and decided I wanted to mount it further aft as Renovator posted in Sep 2008. His looked like this on a Sailfish:
Many threads discuss the need for access to the locker to clear "hockles" in the rode, etc. Some use the small access from the V-berth, but we don't have a mid-berth for all our junk so it is usually filling the V-berth. I looked at one video here starting at the 9:10 http://youtu.be/K79s6BJfT30, but I didn't want to cut the locker cover like that, so looked for an alternative solution and you will see it in the photos below.
For the run on the Islander, we are just at the maximum run for #6AWG, but I didn't want to rerun #4 unless needed. I rerouted some of the existing cabling to make it as direct as possible, cutting several feet off of the factory-installed wiring from the helm to the bow. I removed the 50-amp breaker aft and installed a 120-amp for circuit protection (within the required two feet from the battery). I removed the original 25-amp windlass breaker and installed the Lewmar-provided 50-amp breaker. I also removed the original windlass toggle switch and installed the new rocker switch for the contactor circuit. Both the breaker and the rocker switch were installed in the same locations as the units they replaced. I installed the contactor inside the wiring area at the helm. In addition to control from the helm, I also wanted remote operation, but not at the cost of the wireless remote. For half the price I purchased the Lewmar handheld remote, and installed the waterproof connection plug just to the left of the windlass. The handheld has a coiled six-foot cable, and allows free movement around the bow while controlling the windlass. With the windlass now over the larger section of the anchor locker, I have no problem with 400-feet of rode and 30-feet of chain falling nicely into place. The rode is 600-feet long, so the last 200-feet is led down into the center forward storage area under the V-berth. Easy enough to use it if needed. The access port to the right of the windlass allows excellent access to the entire area under the windlass, so it would be easy to clear any jams.
Here are the photos of the installation, once I completed it yesterday.
The two bolt heads below the breaker and above the AC outlet show where the contactor is mounted on the opposite side.
A lot of work but I have always done all the mechanical, electrical and electronic work on the boat. Mostly because I can't afford to pay someone else, but I also like my own work better.
Happy to answer any questions about this installation.
Brian

")