Lower unit is out

Bloodweiser

Well-Known Member
Joined
Feb 10, 2020
Messages
650
Reaction score
168
Points
43
Age
51
Location
Northern Cal
Model
Seafarer
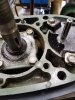
Lower unit is in the bench.
Quick recap.

5psi to verify which seals are leaking.
How much vacuum after I replace the seals to verify lower unit is sealed?
 

Attachments

  • 20200610_183720.jpg
    20200610_183720.jpg
    1.6 MB · Views: 39

Sparkdog118

Well-Known Member
Joined
Apr 8, 2020
Messages
629
Reaction score
134
Points
43
Age
53
Location
Ft Myers, fl
Model
Offshore
I do 7 to 10 lbs both ways with all new seals. 5 if there are any used seals in the housing.
 

Sparkdog118

Well-Known Member
Joined
Apr 8, 2020
Messages
629
Reaction score
134
Points
43
Age
53
Location
Ft Myers, fl
Model
Offshore
Spray soapy water (dawn n water)on all the seals and o rings during pressure test. If any leaks, it will bubble up.
 

seasick

Well-Known Member
Joined
Aug 19, 2008
Messages
9,149
Reaction score
1,312
Points
113
Location
NYC
Spray soapy water (dawn n water)on all the seals and o rings during pressure test. If any leaks, it will bubble up.
True for pressure test. For vacuum test, soap foam and/or liquid will get sucked into the seal area.
 

Bloodweiser

Well-Known Member
Joined
Feb 10, 2020
Messages
650
Reaction score
168
Points
43
Age
51
Location
Northern Cal
Model
Seafarer
I figured on the vacuum test I will just watch the gauge for a drop
 

Bloodweiser

Well-Known Member
Joined
Feb 10, 2020
Messages
650
Reaction score
168
Points
43
Age
51
Location
Northern Cal
Model
Seafarer
Not seeing any bubbling, small bubbles are from my dispenser. Does it need more time on the test? I'm at 6psi
 

Attachments

  • 1591920737818472292986711119871.jpg
    1591920737818472292986711119871.jpg
    1.7 MB · Views: 13

Bloodweiser

Well-Known Member
Joined
Feb 10, 2020
Messages
650
Reaction score
168
Points
43
Age
51
Location
Northern Cal
Model
Seafarer
Soap showed no evidence of a leak. Unit didn't hold vacuum either. Noticed the water jacket on the midsection looked like it had some residual oil. Cleaned that. Noted oil level on motor dipstick. Check it tomorrow afternoon. Doesn't look good
 

Sparkdog118

Well-Known Member
Joined
Apr 8, 2020
Messages
629
Reaction score
134
Points
43
Age
53
Location
Ft Myers, fl
Model
Offshore
Did you check the o ring areas around the prop shaft carrier and driveshaft carrier for a pressure leak. The one around the driveshaft housing and the one around the prop shaft carrier likes to leak sometimes if there is no sealer on the o ring. I use 847 3m for all the o rings for insurance. While pressure testing and the prop shaft pointing up, spray a generous amount of soapy water into The back of the carrier behind the prop hub. Look in with a flashlight for bubbles. Also check the drain screw o rings with soap.
Also wiggle and turn the prop shaft and drive shaft while testing for bubbles. Pull driveshaft and a prop shaft in and out also.
 

Bloodweiser

Well-Known Member
Joined
Feb 10, 2020
Messages
650
Reaction score
168
Points
43
Age
51
Location
Northern Cal
Model
Seafarer
Remember I had oil coming out of that weep hole. I did use soap around the carrier on the prop shaft. This is were I checked the prop shaft. No not inverted, but used heavy soap, no issues. Did turn drive shaft and prop shaft
 

Attachments

  • 15919277054402283058818100097661.jpg
    15919277054402283058818100097661.jpg
    1.5 MB · Views: 10

Bloodweiser

Well-Known Member
Joined
Feb 10, 2020
Messages
650
Reaction score
168
Points
43
Age
51
Location
Northern Cal
Model
Seafarer
This worries me, oil residue around the water jacket. Picture won't upload
 

Bloodweiser

Well-Known Member
Joined
Feb 10, 2020
Messages
650
Reaction score
168
Points
43
Age
51
Location
Northern Cal
Model
Seafarer
This worries me, oil residue around the water jacket. Picture won't upload
 

Bloodweiser

Well-Known Member
Joined
Feb 10, 2020
Messages
650
Reaction score
168
Points
43
Age
51
Location
Northern Cal
Model
Seafarer
Found small crack shift shaft plate.. Doesn't appear to go through.. Maybe it's a v
 

Attachments

  • 15920085756758355675778092259101.jpg
    15920085756758355675778092259101.jpg
    1.1 MB · Views: 23

Bloodweiser

Well-Known Member
Joined
Feb 10, 2020
Messages
650
Reaction score
168
Points
43
Age
51
Location
Northern Cal
Model
Seafarer
Drive shaft seal out. I think most of the moisture is from my testing. Some Nasty stuff packed in the lip of the seal
 

Attachments

  • 15920113212228904935830415628493.jpg
    15920113212228904935830415628493.jpg
    1.5 MB · Views: 15

Sparkdog118

Well-Known Member
Joined
Apr 8, 2020
Messages
629
Reaction score
134
Points
43
Age
53
Location
Ft Myers, fl
Model
Offshore
Make sure you clean the housing up good after you get the seals out. Put the housing in the vise. The back of this type breaker bar handle works great for getting the seals out of the housing without damage. Don’t dig any deeper than you have to image.jpg
then use emery cloth to clean the salt from the aluminum housing. You can wire wheel the o ring groove if it needs it. Brake cleaner to finish the clean and you are ready to install the seal.
 

Bloodweiser

Well-Known Member
Joined
Feb 10, 2020
Messages
650
Reaction score
168
Points
43
Age
51
Location
Northern Cal
Model
Seafarer
Thanks spark that’s what I did. Both drive and shift are done. Vacuum test was vastly improved but still leaked off, not sure if I need to apply more vacuum over time ??? Seriously contemplating the prop seals ,, should that cover that houses them pull rather easily?
 

Sparkdog118

Well-Known Member
Joined
Apr 8, 2020
Messages
629
Reaction score
134
Points
43
Age
53
Location
Ft Myers, fl
Model
Offshore
It could be a project if the carrier is salted. I have a special tool for the removal of the carrier. I made a tool before I was able to get the factory one out of a flywheel puller and a set of trailer chain hooks. 2CAF46FF-DB5D-4546-B012-C47530FCF330.jpg
left side is what the puller was and I just replaced both sides with a chain n hooks to pull the carrier.That tool and some heat will get it out.