Marlin 300 Aft Deck Cover Repair

Fishtales

Well-Known Member
Joined
Jan 31, 2005
Messages
7,690
Reaction score
1,196
Points
113
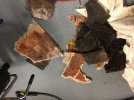
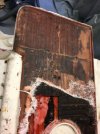
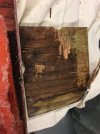
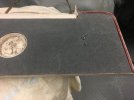
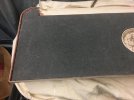
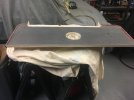
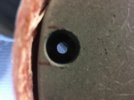
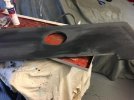
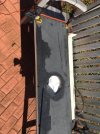
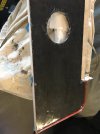
I noticed a little brown water dripping from my small cockpit deck piece that resides under the rear seat (when seat folded down) when putting the boat away for the season. The deck piece has an access port as well as a vertical door that swings down to allow access to the aft bilge area. It is about 4' by 18" or so in size. I knew what it was - water intrusion and made a mental note to pull the deck and investigate the coring. On the back side of the deck cover, there is a single layer of glass that is put down over the core (XL Greenwood plywood) but the core is in pieces with some V notches to put them together like a puzzle. Not sure why this is done maybe someone can chime in. When I got the piece home today, I could see some mold under the layer of glass and what looked to be some minor delamination maybe due to the cold winter and the wood core being wet.

The good.
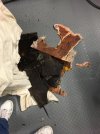
- I could remove most of the single layer of glass with a hammer and a pry bar. Near the rounded edges, it popped out around the top side structure. I've got to clean up an edge but other than that, it came out pretty clean.
- The top side is undamaged. I can install a new core and glass it in to make it solid again.
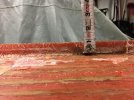
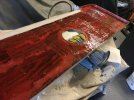
- The XL Greenwood was wet thru and didn't show any signs of rot. It was dark brown from the water and mold but really not bad structurally for wood. Most pieces popped out with the bar and hammer.
- The repair should be fairly straight forward and easy to execute.
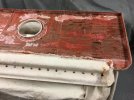
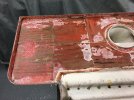
- The deck plate does not screw into the core. The screws go into fiberglass on the deck cover.

The bad
- Cover easily weighed 2X dry weight. If the color of the glass and core didn't scream wet, the weight did.
- The screws that attach the piece to the deck go through the core in places. This was likely one source of water entry. Water gets behind the screw head, gravity takes over and it gets into some of the pieces of wood. Unsure if it migrates to other pieces, my guess is yes. Once in there and if it goes through a few freeze/thaw or maybe just migration it gets into all the pieces. While pieces they are tightly fitted so water could easily move to adjacent core pieces.
- The screws that hold the deck plate frame to the glass are simply screwed through the fiberglass. No backing material. The frame is caulked, but I'm sure water can get into these screws. This water should not get in the core.
- The screws that hold the deck cover to the cockpit floor are the same. They screw into fiberglass on the cockpit floor only. Pretty crappy design. There are small pieces of rubber that sit between the deck cover and the cockpit floor to mitigate noise and the edge is caulked to keep water out. This caulk also helps to hold the cockpit cover in place.
- The wood core came out pretty easy and was solidly attached to the top in about 15% of the coring surface area.

The scary.
- After seeing this, I'm wondering what else is lurking. I hear the stories of scuppers being under water and boats being slower than previous years and wonder if this is a symptom of a bigger wet boat problem. If the core gets wet, she'll be real heavy.

All in all, not a difficult fix. I will recore and ensure deck screw holes are cut around. I'll secure the deckplate frame with stainless bolts with backside washers and nyloc nuts to better secure the plate to the deck.
I'm guessing a gallon of the west system, some marine plywood or potentially new coring material and a layer or two of glass will do the job. I'll post some pics later.
 
  • Like
Reactions: Viking88rd

Fishtales

Well-Known Member
Joined
Jan 31, 2005
Messages
7,690
Reaction score
1,196
Points
113
Pics
 

Attachments

  • Aft Deck1.jpg
    Aft Deck1.jpg
    130.9 KB · Views: 44
  • Aft Deck2.jpg
    Aft Deck2.jpg
    122.1 KB · Views: 42

Fishtales

Well-Known Member
Joined
Jan 31, 2005
Messages
7,690
Reaction score
1,196
Points
113
Pics
 

Attachments

  • aft deck6.jpg
    aft deck6.jpg
    123.8 KB · Views: 30
  • aft deck7.jpg
    aft deck7.jpg
    157.1 KB · Views: 30
  • aft deck8.jpg
    aft deck8.jpg
    133.6 KB · Views: 30

Fishtales

Well-Known Member
Joined
Jan 31, 2005
Messages
7,690
Reaction score
1,196
Points
113
pics
 

Attachments

  • aft deck9.jpg
    aft deck9.jpg
    98.8 KB · Views: 26
  • aft deck4.jpg
    aft deck4.jpg
    137.9 KB · Views: 25
  • aft deck5.jpg
    aft deck5.jpg
    174.1 KB · Views: 25

Fishtales

Well-Known Member
Joined
Jan 31, 2005
Messages
7,690
Reaction score
1,196
Points
113
All cleaned out and ready for cleaning, glass trimming (need an oscillating multi tool) and coring. Chisel did the trick. If anyone has any ideas what to use, pls advise. The removed coring was 1/2" Greenwood plywood pieces.
Some pics...
If you look close you can see the screws of the deck plate protruding. I'm going to look for something plastic to use as a backer plate and then used screws with nyloc nuts.
Going to replace some of the screws and nuts on the folding hinge as they are rusting. Fun on a Sat night...
 

Attachments

  • aft deck 10.jpg
    aft deck 10.jpg
    118.5 KB · Views: 24
  • aft deck 11.jpg
    aft deck 11.jpg
    143.1 KB · Views: 24
  • aft deck 12.jpg
    aft deck 12.jpg
    161.9 KB · Views: 24
  • Like
Reactions: Meanwhile

Meanwhile

Well-Known Member
Joined
Feb 16, 2014
Messages
566
Reaction score
105
Points
43
Location
Warren, OR
I've been trying to think of a way to use stainless nutserts instead of the stainless screws on that hatch. Mine are loose. I've epoxied around the holes once already. You have to take up the hatch to do any bilge work.
Interesting that you have a rubber strip down along the edge. Mine doesn't have that.
Now I'll take a closer look at my hatch.

Are you installing Coosa or plywood?
 

Fishtales

Well-Known Member
Joined
Jan 31, 2005
Messages
7,690
Reaction score
1,196
Points
113
Not sure what I'll use. I have to see what is locally available. Looking for recommendations.
Found a local small quantity representative not too far from my house for Coosa. Will check out and see what they can provide.
 
Last edited:

SkunkBoat

Well-Known Member
Joined
Oct 12, 2017
Messages
4,280
Reaction score
1,484
Points
113
Location
Manasquan Inlet NJ
Website
www.youtube.com
Model
Express 265
been there, done that.. https://www.greatgrady.com/threads/deck-hatch-re-core-265.32638/
I wasn't able to find any marine grade ply (AB exterior Douglas fir). Lowes used to stock it years ago but no luck.
I was under a timeline and couldn't wait for special order stuff
so I had to use a good piece of 1/2" AC exterior pine. They have 2' x 4' pieces at HD & lowes. Dig thru them all and find a piece thats clean on both sides.
Will it last as long...NO.. but it will last as long as I own it.

The reason to use small squares is so they press in flat. A large piece will have twist or bend. It may pop up in spots and leave an air gap or it may cause the finished piece to twist.
Don't run the wood to the edges like Grady did. Use glass and High density filler around the edge so screws go thru glass not wood. This will also bury the edge of your glass. Grady ran the glass to the edge and then ground it clean. It separates and lets water in.

My tailgate has a panel that needs a new core so I'll be doing this soon also.
 
Last edited:
  • Like
Reactions: Meanwhile

Fishtales

Well-Known Member
Joined
Jan 31, 2005
Messages
7,690
Reaction score
1,196
Points
113
Update.
I decided to go with the Coosa bluewater board (1/2") as the core. Got it this afternoon and got to it after getting some things off the honey do list.
I replaced some of the piano hinge screws and nyloc nuts. For some reason some rusted a little.
Coosa is the way to go. Lighter than wood, very strong and easy to work with. Downside is it is expensive, just under $400 a 4X8' sheet and the guy told me it would be going up $30-40 next order. Nuts.
I cut a cut the board at the lumberyard into (2) 4' sections to get it home then cut one down to 17" wide to fit the underside. Trimmed it up and cut a 6" hole with a hole saw (biggest I had). Then used the jig saw to open it up to the required diameter. Pictures show the test fit. I'm going to hole around each screw prob 1/2" and fill with solid glass so the deck floor mounting holes go through 100% glass not the Coosa.
I decided to glass around the port inspection hole so the edge facing the base plate is waterproof. This allows me to bring the Coosa right up to the base plate.
I'll seal the inspection port base plate with 4200 and thru bolt it (versus the standard phillips screws) through the Coosa and top and bottom layers of glass. I think if I execute it correctly, I can ensure no water gets into the glass or Coosa. Even though Coosa doesn't absorb water, if it gets in and it gets cold I'd expect delamination to occur.

If anyone has other ideas, I'm all ears.
 

Attachments

  • coosa1.jpg
    coosa1.jpg
    114.4 KB · Views: 30
  • coosa2.jpg
    coosa2.jpg
    94.1 KB · Views: 29
  • coosa3.jpg
    coosa3.jpg
    93.3 KB · Views: 30
Last edited:

Jrspawn

Well-Known Member
Joined
Sep 4, 2021
Messages
60
Reaction score
17
Points
8
Age
42
Location
Delaware
Model
Marlin
Update.
I decided to go with the Coosa bluewater board (1/2") as the core. Got it this afternoon and got to it after getting some things off the honey do list.
I replaced some of the piano hinge screws and nyloc nuts. For some reason some rusted a little.
Coosa is the way to go. Lighter than wood, very strong and easy to work with. Downside is it is expensive, just under $400 a 4X8' sheet and the guy told me it would be going up $30-40 next order. Nuts.
I cut a cut the board at the lumberyard into (2) 4' sections to get it home then cut one down to 17" wide to fit the underside. Trimmed it up and cut a 6" hole with a hole saw (biggest I had). Then used the jig saw to open it up to the required diameter. Pictures show the test fit. I'm going to hole around each screw prob 1/2" and fill with solid glass so the deck floor mounting holes go through 100% glass not the Coosa.
I decided to glass around the port inspection hole so the edge facing the base plate is waterproof. This allows me to bring the Coosa right up to the base plate.
I'll seal the inspection port base plate with 4200 and thru bolt it (versus the standard phillips screws) through the Coosa and top and bottom layers of glass. I think if I execute it correctly, I can ensure no water gets into the glass or Coosa. Even though Coosa doesn't absorb water, if it gets in and it gets cold I'd expect delamination to occur.

If anyone has other ideas, I'm all ears.

Lookin good!
 

Fishtales

Well-Known Member
Joined
Jan 31, 2005
Messages
7,690
Reaction score
1,196
Points
113
Not planning to - open to ideas... I was planning to coat the Coosa and hatch with resin then lay a layer of chopped mat on the hatch and woven layer on the Coosa. Then I'll sandwich and apply pressure to the backside ofthe Coosa. Finish it up by filling in the screw holes with resin/filler and then a woven layer on top of the Coosa. Prob will gelcoat over as well. Prob way better than what was there....
 

SkunkBoat

Well-Known Member
Joined
Oct 12, 2017
Messages
4,280
Reaction score
1,484
Points
113
Location
Manasquan Inlet NJ
Website
www.youtube.com
Model
Express 265
Not planning to - open to ideas... I was planning to coat the Coosa and hatch with resin then lay a layer of chopped mat on the hatch and woven layer on the Coosa. Then I'll sandwich and apply pressure to the backside ofthe Coosa. Finish it up by filling in the screw holes with resin/filler and then a woven layer on top of the Coosa. Prob will gelcoat over as well. Prob way better than what was there....
IMO don't think the woven on that side of the coosa will help any. You are trying to bond. chopped mat is better than woven for that.
Wet chopped mat to the glass, butter the coosa and press it into the chopped mat while everything is wet.
You might consider knocking a 45deg on the edges so your finish glass can angle down, then fill the angle. that will keep the edge from separating like all the grady hatches did.
 

Fishtales

Well-Known Member
Joined
Jan 31, 2005
Messages
7,690
Reaction score
1,196
Points
113
Finally got back at this project. I drilled out areas in the Coosa board where the deck hatch screws go through it. Plan to fill the areas with a mix of filler and glass exoxy and then drill out so there is no chance the Coosa gets wet. Cleaned all surfaces well and let dry. Coated one side of the Coosa and the backside of the deck cover. Then layed a layer of chop mat and glassed on the hatch backside. Wet both sides again and sandwiched the Coosa on the back side of the deck cover. Put blocks on top and let harden up overnight. Letting it sit in the sun to hopefully fully cure. Ordered 4 new beckson screw in deckplates. Will replace the 3 on the Eurotransom this year and the one on this hatch. Going to 4200 and thru bolt the plates thru the Coosa.
 

Attachments

  • thumbnail (1).jpg
    thumbnail (1).jpg
    128.5 KB · Views: 22
  • thumbnail (2).jpg
    thumbnail (2).jpg
    59.6 KB · Views: 22
  • thumbnail (3).jpg
    thumbnail (3).jpg
    104.5 KB · Views: 22
  • thumbnail.jpg
    thumbnail.jpg
    132 KB · Views: 22

Fishtales

Well-Known Member
Joined
Jan 31, 2005
Messages
7,690
Reaction score
1,196
Points
113
Latest - Took Skunks input and soaked the chopped mat well wet the backside of the Coosa and sandwiched together. After hard, I glassed the top the same way and rolled out any air pockets.
I will trim up the edges and the deck plate hole and add another layer of resin and then it will be done. Waiting on the Beckson deckplate. Will use 4200 to seal it and then thru bolt it. Finally seal the back side (between Coosa and deckplate) and call it done.
 

Attachments

  • thumbnail (4).jpg
    thumbnail (4).jpg
    80.8 KB · Views: 17
  • thumbnail (5).jpg
    thumbnail (5).jpg
    102.8 KB · Views: 17
Last edited: