New 1996 Grady White Islander 268 with twin 200 V6 Mercs

greauxpete

Well-Known Member
Joined
Sep 14, 2021
Messages
114
Reaction score
103
Points
43
Age
50
Location
Tha Bayou (Youngsville, LA)
Model
Islander
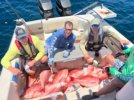
Ran her for a 2nd time on sunday.
Gained some speed, up to 45 mph without trimming up.

Also, I was able to use an old cover I had bought years back for my center console. It was too big for my Robalo 2320, but seems to fit the Grady ok:

20220406_100806.jpg
 
  • Like
Reactions: PointedRose

greauxpete

Well-Known Member
Joined
Sep 14, 2021
Messages
114
Reaction score
103
Points
43
Age
50
Location
Tha Bayou (Youngsville, LA)
Model
Islander
Progress..

1. Installed radar radome to hard top.
Had to install garmin ethernet plug to old cable which had to be cut.
2. Caulked old holes in hard top.
3. Installed Garmin 741xs and 742xs mfd's to radio box.
4. Installed VHF radio and 8 ft antenna. Had to splice/solder plug end. Recieving signal.
5. Reinstalled and caulked fuel tank panel and cockpit panel.
6. Changed out both voltage regulators on starboard motor which cleared up the erratic tachometer problem.
7. Installed amp, speakers, and bluetooth transmitter.

20220501_155215.jpg
Screenshot_20220501-204039_Gallery.jpg
 

greauxpete

Well-Known Member
Joined
Sep 14, 2021
Messages
114
Reaction score
103
Points
43
Age
50
Location
Tha Bayou (Youngsville, LA)
Model
Islander
The maiden voyage for the opening day of snapper was a baptism by fire. Very rough, but the Grady performed.

BTW, the fried snapper pic is actually fried snapper throats - very good..
 

Attachments

  • IMG_8486.jpg
    IMG_8486.jpg
    42.2 KB · Views: 44
  • IMG_8494 (1).jpg
    IMG_8494 (1).jpg
    208.1 KB · Views: 44
  • IMG_8901.jpg
    IMG_8901.jpg
    322.6 KB · Views: 44
Last edited:

Fishtales

Well-Known Member
Joined
Jan 31, 2005
Messages
7,496
Reaction score
1,161
Points
113
Nice project and you seem up to the task. Good luck bringing her back.
 

greauxpete

Well-Known Member
Joined
Sep 14, 2021
Messages
114
Reaction score
103
Points
43
Age
50
Location
Tha Bayou (Youngsville, LA)
Model
Islander
We are reupholstering the seats and bolsters. See pics below showing how the bolsters are clipped to the sides of the gunnels, in case any one is wondering.
Note: there are miscellaneous screws which also need to be removed before pulling up on the bolsters to remove them from the clips.

20220702_133309.jpg
20220702_133343.jpg
 
Last edited:
  • Like
Reactions: family affair

family affair

Well-Known Member
Joined
Jul 31, 2010
Messages
1,283
Reaction score
283
Points
83
Location
Ohio
Model
Islander
I take it the screws had to be removed from the back side?
Was the backing material for the the bolsters rotted? If so, what do you plan to replace them with?
 

greauxpete

Well-Known Member
Joined
Sep 14, 2021
Messages
114
Reaction score
103
Points
43
Age
50
Location
Tha Bayou (Youngsville, LA)
Model
Islander
The screws went through the bottom of the bolsters through the vent netting into the fiberglass cap. The backing material is thankfully made of a plastic material with the exception of a small corner piece on the port side bolster. I plan to replace the small wood piece with starboard or some other plastic material. See pics below of port bolster with rotten wood.

20220702_133321.jpg
 
  • Like
Reactions: family affair

greauxpete

Well-Known Member
Joined
Sep 14, 2021
Messages
114
Reaction score
103
Points
43
Age
50
Location
Tha Bayou (Youngsville, LA)
Model
Islander
I was able to remove the rear bench seat back as well, which was held in by long stainless screws with carbon steel t nuts on the back side of the plastic backing. Of course the carbon steel touts have rusted and will be replaced with stainless tnuts. The rusted tnuts caused some of the screws to turn while attempting to unscrew the nuts, but I double nutted the studs and was able to get the nuts loose enough to spin them off. A couple of the nuts on the starboard side required some gymnastics to access from the seat bottom/battery access hatch, but I was able to get em done. See pics below:
20220630_170135.jpg

20220630_170409.jpg
 
  • Like
Reactions: PointedRose

Hookup1

GreatGrady Captain
Joined
Oct 16, 2007
Messages
2,546
Reaction score
709
Points
113
Age
69
Location
Cape May, NJ
Model
Islander
The screws went through the bottom of the bolsters through the vent netting into the fiberglass cap. The backing material is thankfully made of a plastic material with the exception of a small corner piece on the port side bolster. I plan to replace the small wood piece with starboard or some other plastic material. See pics below of port bolster with rotten wood.

View attachment 26377
Replace that corner piece with something compost - not wood. Mine was staining the boat from water leaking. I use stainless rod 1/8" thick to form a radius and used an epoxy wood filler to fabricate the corner piece.
 

greauxpete

Well-Known Member
Joined
Sep 14, 2021
Messages
114
Reaction score
103
Points
43
Age
50
Location
Tha Bayou (Youngsville, LA)
Model
Islander
Yep, we went with 2 seperate bolsters on the port side corner. This eliminated the corner which is right below the bait table. Also should help with cleanup.
 

greauxpete

Well-Known Member
Joined
Sep 14, 2021
Messages
114
Reaction score
103
Points
43
Age
50
Location
Tha Bayou (Youngsville, LA)
Model
Islander
Probably a combination of: remnants from filling the tank with water when I flushed it, condensation when it was left empty for a few months prior to fill-up, and trace amounts of water in gas from running AT LEAST 600-700 gallons of fuel.

It's extremely humid in South Louisiana. I'll bet we don't see this much water next season now that its been polished and tanks are kept full of gas.
 
Last edited: