New dash for 208 Grady

mtcfish

Member
Joined
Mar 21, 2007
Messages
9
Reaction score
0
Points
0
Location
Cohasset, MA
Needed room to mount a Raymarine so I made this dash. I will put photos of the finished product tomorow

img_0370.jpg.w560h747.jpg
 

Workdog

Well-Known Member
Joined
Feb 25, 2005
Messages
242
Reaction score
0
Points
0
Location
NE Ohio
I'm working on my electronics cubby in front of the helm right now too, and using Makrolon also. I'm really interested in how your fabrication job went. I haven't cut mine yet... :wink: I plan to hinge my panel at the top and set at an angle so I can see the flushmount units better. This will allow me to access the cubby for storage. The current cubby door is vertical. To do what I want will require bending the bottom edge of the Makrolon and fashioning wings on the sides to close it in.
 

mtcfish

Member
Joined
Mar 21, 2007
Messages
9
Reaction score
0
Points
0
Location
Cohasset, MA
I have found it is the best stuff to work with. Paint your screw heads black and contersink them for a nice finished look...

I put the sounder black box and the Lenco control inside so there was not a lot of room for other stuff so I just closed it up.

208dash.jpg.w560h420.jpg
 

Workdog

Well-Known Member
Joined
Feb 25, 2005
Messages
242
Reaction score
0
Points
0
Location
NE Ohio
What did you use to cut the poly? I'm planning on using a table saw for the straight edges and a hole saw and jig saw for interior radiuses and straight aways for the instrument cutouts. Did you have any edge melting from the saw? I'll post before and after pics when I finish.
 

mtcfish

Member
Joined
Mar 21, 2007
Messages
9
Reaction score
0
Points
0
Location
Cohasset, MA
I used a table saw and Belt sander for the radius corners . Then I ran a Radius router bit around it. Sand with 320, 600, 1200 and buff...
 

Walkers Edge

Well-Known Member
Joined
Oct 17, 2008
Messages
164
Reaction score
0
Points
0
Location
Jupiter, Fl
That install looks great!
I went back and forth when I did mine (A60) and the conclusion was that due to my location in S. FL I was better off being able to remove the unit from the boat entirely.

As you know the unit itself won't fit untill I fabricated little angle brackets so that my Raymarine mount is angled forward at about a 45 deg angle. With a little outer-edge overlap I was able to fit both the A60 and my old backup garmin FF/GPS side by side.
PC230045.jpg
 

Sal

Member
Joined
Aug 17, 2008
Messages
9
Reaction score
0
Points
0
Location
san francisco
new dash

hi, nice job if i may say so. i have been thinking about doing the same. what is that material called? will home depot sell? thanks, sal
 

Workdog

Well-Known Member
Joined
Feb 25, 2005
Messages
242
Reaction score
0
Points
0
Location
NE Ohio
Sal,
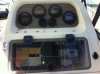
Makrolon is a polycarbonate. I got a piece from interstateplastics.com (12" X 24" X 3/8" for $17, then they added on $15 for minimum charge and another $15 for shipping). I would be interested in hearing where mtcfish got his from. Makrolon is like Lexan (GE's proprietary name for its polycarbonate). It comes with paper on both sides so you can work it without scratching the plastic. I wanted a black shiny surface to match the hardtop electronics door, cabin entry door cover, and tackle door. I also used a table saw to cut mine (interstate wanted an outrageous $300+ to make 4 cuts), and it looked smoother than the factory cut. This poly cuts well and routes well, without edge melting (I used a carbide tipped blade with 3 teeth/inch).
 

Parthery

GreatGrady Captain
Joined
Jan 31, 2005
Messages
2,587
Reaction score
220
Points
63
Location
Atlanta, GA
If you don't have the tools to work with Lexan or Macrolon, consider using Starboard. There are a number of vendors that will take your measurements, layout the templates for the electronics you are installing, make all the cuts for you, and deliver a finished panel to your door via UPS for not too much $$$.

I used Fin Addict Marine for mine....they did everything (and have both black and the matching GW color) for less than $50. All I had to do was remove the door, mount the electronics in the panel, and mount the panel on the dash.
 

Brad1

Well-Known Member
Joined
Feb 24, 2005
Messages
615
Reaction score
0
Points
0
Location
Monroeville, PA
LOL, That looks almost exactly like my flushmount panel. I guess it's true what they say about great minds :D

I used a router on the edges of my panel. Made for a nice, smooth round edge.
 

mtcfish

Member
Joined
Mar 21, 2007
Messages
9
Reaction score
0
Points
0
Location
Cohasset, MA
I will get you the exact name. It is the only stuff I have used that will not chip or break when drilling it. I had to buy a 96"X48" sheet. J.Freeman in Boston is where I got it. I have made 8 dashes out of the sheet, (I have a boat Business) as I install a lot of Electronics...


img_0340.jpg.w560h420.jpg


this is on an older one... we wrapped it over the top to cover up some previous sins....
 

surfpirate

New Member
Joined
Jun 20, 2009
Messages
1
Reaction score
0
Points
0
Location
South Shore, Long Island NY
wow

that is some nice work!

I have a 1991 Overnighter that has units mounted all over, (I am into redundancy) I could use a new dash.

let me know where you are MTCFISH, I can do it with TLC but I will support the community
 

RAINMAKER

Well-Known Member
Joined
Mar 3, 2005
Messages
286
Reaction score
2
Points
0
Heres a tip that might help on the edges. I've done this on plexi-glas before and don't see why it wouldn't work here . Try taking a butane torch and GENTLY heating the edge and the melting will turn the edge as smooth as glass. It doesn't take alot of heat and it'll turn super smooth.
Of coarse I'd test this on a scrap piece first. "RAINMAKER"
 

mertzy

Member
Joined
Aug 15, 2011
Messages
5
Reaction score
0
Points
1
Bringing back this old thread to see if anyone has any pics/ideas they can share since my winter project will be to upgrade my dash.

Thanks!
 

aa331

Well-Known Member
Joined
Nov 27, 2010
Messages
51
Reaction score
0
Points
6
Model
Canyon 306
Moved the GPS down from the alum electronics box on the top. Was uncomfortable to use, and almost impossible to see the depth numbers (no way to change the font size).

Took about 6 total hours of work, had to cut the alum bracket lower so the GPS would fit. Cut and re-spliced the NMEA 2000 network wire to the GPS antenna (was about 20 feet long, only needed 5 feet). Considered making everything flush mount but went with putting everything inside the glove compartment, easier, cleaner, and doesn't expose the equipment. Also, things are much cleaner on the wiring end.

Just need to connect the VHF to the GPS via NMEA 0183 for the DSC and it's done.

Now the "electronics" box is completely empty, will close all the unused screw holes (used to have 2 GPS and the VHF up there), seal it as much as possible and use it for storage.

:D
 

Attachments

  • dash1.JPG
    dash1.JPG
    29.2 KB · Views: 403
  • dash2.JPG
    dash2.JPG
    28.8 KB · Views: 400
  • dash3.JPG
    dash3.JPG
    27.3 KB · Views: 399

Jzeno186

Well-Known Member
Joined
Sep 16, 2019
Messages
191
Reaction score
23
Points
18
Age
39
Location
NY
Model
Gulfstream
Any one know what the corner radius on the 208 Adventure is ?