OEM Grady White Beige 1-3/8 x 1/4 Vinyl Trim

Joined
Jan 27, 2021
Messages
7
Reaction score
5
Points
3
Age
70
Location
Melbourne Beach FL
Model
Seafarer
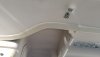
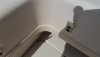
Grady White Vinyl Trim - Color is Grady Beige. Dimensions are 1.375 x .250
I just re-trimmed my Grady White Seafarer 228 with this flexible trim. This trim is used on a variety of Grady models in various locations. Attached are pictures of the finished re-trim. I had to buy in bulk so I'm selling the left over trim. I have 47'9" that I am selling at $6.50 per foot plus shipping. This is well below the retail price if you were to order through a dealer.
OEM Part Number 10-47. USPS Priority Shipping $13.50 for CONUS

Contact Mike (321) Four32- O99O20210127_103915.jpg20210127_103451.jpg20210127_103425.jpg
 
  • Like
Reactions: handinpalm

seasick

Well-Known Member
Joined
Aug 19, 2008
Messages
9,145
Reaction score
1,312
Points
113
Location
NYC
What did you use to attach the vinyl?
 
Joined
Jan 27, 2021
Messages
7
Reaction score
5
Points
3
Age
70
Location
Melbourne Beach FL
Model
Seafarer
The trim has adhesive tape on the back. Very Good adhesive tape I might add! If you buy the trim I can give you some tips on removal and install.
 

Attachments

  • 20210129_104505[1].jpg
    20210129_104505[1].jpg
    1.1 MB · Views: 26
  • Like
Reactions: handinpalm

handinpalm

Active Member
Joined
Mar 29, 2016
Messages
34
Reaction score
5
Points
8
Location
Tampa Bay FL
Good job on the install. Just curious, did you replace it because of the mildew looking stains on this vinyl trim that do not seem to come off? I have tried a lot of different cleaners/bleach w/o luck.
 

Punchline Cap

GreatGrady Captain
Joined
Jan 16, 2021
Messages
132
Reaction score
41
Points
28
Age
66
Location
Sea Isle City NJ
Model
Fisherman 236
When it comes to cleaning I have found that the combination of Spray Nine and a Mr. Clean Magic Eraser cleans almost everything but rust stains.
 

seasick

Well-Known Member
Joined
Aug 19, 2008
Messages
9,145
Reaction score
1,312
Points
113
Location
NYC
Like rub rails, I found that acetone does a decent job. Also like rub rails, you have to apply a sealant or wax after cleaning. I haven't tried but would think something like 303 Protectant would do a decent job too.
 
Joined
Jan 27, 2021
Messages
7
Reaction score
5
Points
3
Age
70
Location
Melbourne Beach FL
Model
Seafarer
To Handinpalm et al,
I replaced the trim after trying a lot of different products. It still looked "stained". But the boat is well seasoned and it was time. Looks great now. Glad I did it. FYI...I used this trim on lots of places other than under the bunks. This is a very good deal for this trim. Another seller on eBay is selling the exact same product for $10.00 a foot. No brainer if you're thinking about it...And I can tell you the process I used to remove the old trim that made it very easy. It took me about two hours to do all my trim. And I'm a perfectionist.
 

Aquanut2

Well-Known Member
Joined
Feb 23, 2016
Messages
77
Reaction score
10
Points
8
Location
Beaufort NC
Model
Marlin
Is this the same trim that Barbour Marine sells for $2 a ft? unfortunately you have to purchase 105'
 

Aquanut2

Well-Known Member
Joined
Feb 23, 2016
Messages
77
Reaction score
10
Points
8
Location
Beaufort NC
Model
Marlin
Hi Capt Overkill would you be willing to share your tips to the great grady group on how you removed and applied your trim?
Thanks
 
Joined
Jan 27, 2021
Messages
7
Reaction score
5
Points
3
Age
70
Location
Melbourne Beach FL
Model
Seafarer
Okay...first you need a good heat gun, sharp putty knife, plyers and a razor knife (new blades), and last but most important is patience.
Heat the vinyl and slowly pull away using the plyers. The vinyl will be too hot to grab with your hand. If you have a second person you can slide the putty knife under the old glue at the same time. I did not have help. The old trim will come right off with minimal pulling if you have the right amount of heat and pace. If you pull too soon you will start pulling up fiberglass fiber. When that happens just add more heat. Then I used the razor knife to "shave" off any residual glue and GooGone for any left over glue. Final step is to clean with Acetone.

When applying the new vinyl I started under the seats and worked my way aft. I used binder clips every six to eight inches to hold the vinyl in place. When I came to a curve or corner I got out the heat gun again and applied heat until the trim was soft ( be careful, it will burn you). I held the trim in place until it cooled, then moved on.
Once I finished one side I went back with the heat gun over the the entire length (minus corners) and warmed it up to seal the glue on the back side.
Repeated the same for the other side. This is a labor intensive process when done correctly. Have a beer in between sides. Word of caution...DO NOT APPLY HEAT TO THE FOLDER CLIPS !!! They will burn the vinyl.
Hope this helps

mike
 

Attachments

  • trim.pdf
    2.2 MB · Views: 41
  • Like
Reactions: Aquanut2

glacierbaze

Well-Known Member
Joined
Jul 6, 2012
Messages
2,344
Reaction score
599
Points
113
Age
75
Location
Chapel Hill and Pine Knoll Shores, NC
Model
Seafarer
My trim is in good shape, but it has pulled out of the corners above the step up to the walkaround, from shrinkage. My guess is, like most things, cold causes the shrinkage. I would suggest that you keep the trim in a warm room in the house, and do the work on a warm to hot day.
 

wspitler

GreatGrady Captain
Joined
May 16, 2011
Messages
1,319
Reaction score
295
Points
83
Location
Inglis, FL
Model
Express 330
I just did mine and I thought that sticking it down when it is cooler would be best. It would not then shrink and pull away at the inside corners. The only risk would be buckling after it was applied if it expanded too much as it heated up. If it is too cool when applied it wouldn't conform properly, but if you heat it up and it is too warm, it will shrink when cooled and pull away from inside corners. My old trim had shrunk over time and pulled away at the ends and inside corners. So far my new stuff looks good and has not pulled away despite temps from 32F to 80F.
 

Ky Grady

GreatGrady Captain
Staff member
Joined
Mar 1, 2006
Messages
2,918
Reaction score
1,272
Points
113
Location
Berea, KY/Cross, SC
Model
Seafarer
Glacier,, my boat is out of Florida and I have the same shrinkage as yours,, in the corners above the steps. That's the only place mine has pulled away.
 

Blaugrana

Well-Known Member
Joined
Sep 16, 2019
Messages
703
Reaction score
107
Points
43
Age
40
Location
Bayville, New Jersey
Model
Seafarer
Mine has always been in the NE and I have had shrinking. By the helm you notice it as rather than laying flat and going into the various indentations/ steps, it shortcuts them and there is a gap behind it. Curious if that’s age or just was poorly done during fabrication
 

Aquanut2

Well-Known Member
Joined
Feb 23, 2016
Messages
77
Reaction score
10
Points
8
Location
Beaufort NC
Model
Marlin
Okay...first you need a good heat gun, sharp putty knife, plyers and a razor knife (new blades), and last but most important is patience.
Heat the vinyl and slowly pull away using the plyers. The vinyl will be too hot to grab with your hand. If you have a second person you can slide the putty knife under the old glue at the same time. I did not have help. The old trim will come right off with minimal pulling if you have the right amount of heat and pace. If you pull too soon you will start pulling up fiberglass fiber. When that happens just add more heat. Then I used the razor knife to "shave" off any residual glue and GooGone for any left over glue. Final step is to clean with Acetone.

When applying the new vinyl I started under the seats and worked my way aft. I used binder clips every six to eight inches to hold the vinyl in place. When I came to a curve or corner I got out the heat gun again and applied heat until the trim was soft ( be careful, it will burn you). I held the trim in place until it cooled, then moved on.
Once I finished one side I went back with the heat gun over the the entire length (minus corners) and warmed it up to seal the glue on the back side.
Repeated the same for the other side. This is a labor intensive process when done correctly. Have a beer in between sides. Word of caution...DO NOT APPLY HEAT TO THE FOLDER CLIPS !!! They will burn the vinyl.
Hope this helps

mike
Great info thanks so much for sharing! As soon as it warms up a bit here in NC I will be trying your approach.
 
Joined
Jan 27, 2021
Messages
7
Reaction score
5
Points
3
Age
70
Location
Melbourne Beach FL
Model
Seafarer
Glad I could help. The "heat" really helped going around bends without having to cut the trim. Attached are pictures where I was able to make turns without joints. There are small gaps in some corners behind the seats. I just filled the gaps with White 3M 4200. NOT the 5200!!!
Good luck !
 

Attachments

  • STB Bend.jpg
    STB Bend.jpg
    1.9 MB · Views: 74
  • Stb Corner.jpg
    Stb Corner.jpg
    1.9 MB · Views: 79
  • Port Corner.jpg
    Port Corner.jpg
    2 MB · Views: 70

seasick

Well-Known Member
Joined
Aug 19, 2008
Messages
9,145
Reaction score
1,312
Points
113
Location
NYC
Glacier,, my boat is out of Florida and I have the same shrinkage as yours,, in the corners above the steps. That's the only place mine has pulled away.
I had the same issue in the corners. As the material ages, it apparently shrinks and the corner gets the most strain from the shrinking. Instead of installing new trim, you have two options: Remove the entire strip and reinstall being aware that it will not reach as far back as it originally did because it has shrunk, or option two, cut the strip someplace hidden and just reinstall with a gap between the two pieces. On my 208 this is possible because the trim runs under the bolsters and a gap doesn't show unless you are looking for it. I am in the process of trying both approaches, one side I cut and One side I removed the whole strip. Note that I tried reattaching the pulled away corner section (with the arch) and reattaching with 3M molding tape but it pulled away after a short time. If the molding does not fit snug against the fiberglass, I don't think the 3M tape will work as you would like.
Also note that the entire tape should make contact with the fiberglass and not sit too low leaving a section of the tape mounted below the fiberglass edge. I'll let you know how my experiments work out but it will be a few weeks until I get to work on that boat.