Soooooooo . . . spring's coming soon in RI, t- 45 or so to target launch date for the 282 Sailfish, and a good bit of work to do before then.
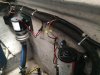
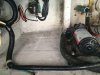
One of our primary work items is to replace and re-wire the original thru-hull mounted, plastic, live well pump, with a more robust, bulkhead mounted pump. I think ultimately for a lot of Sailfish owners in the 1996-2004 range, this is going to be a common "challenge," where on one hand you can find a 3/4" NPT screw mount pump to attach directly to the thru-hull OEM style, or upgrade to a more substantial Rule stainless steel cyclone, which should be bulkhead mounted, without question.
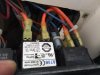
1) You can't up-grade an existing wire that runs into the original manufactured wiring cluster: The OEM wiring harness for your boat was likely built on a rigging bench (like a car) and is taped and built/taped into the split loop casing in a way that makes it not only impossible to remove an abandoned wire, but is also impossible to pull a new wire into the existing bundle.
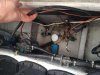
2) Where the split looming is accessible, it is DEFINITELY there for a reason! Take a lot of pictures, and plan on replacing and incorporating your new wiring into the loom casing, because it provides invaluable, low cost, visually attractive protection to your wiring for long term durability. While I definitely conceded defeat in my original plan to "blend in" to the existing cable routing, I will still make it look as OEM as possible.
3) It looks impossibly busy behind and under the helm of a boat the size and complexity of a Sailfish, similar and larger models. If you are not the sort to research, plan, conform to standards, and execute at a MINIMUM of manufacture standards for connections (which I'd call average), PAY SOMEONE to do the work. Simply replacing a pump and failing to scale your wiring appropriately not only endangers you and your passengers, it immediately devalues your boat. Do it right. The first time.
4) For anyone who doesn't automatically start replacing fasteners on their 2004 and earlier boat, I'll tell you based on the mild winter I've seen, on our 282 I'm seeing more rust peeking around those beige painted stainless screw heads in a lot of places. Either start replacing those fasteners now, bit by bit, or suffer the consequences when they either can't be removed without being broken (PITA), or suffer the impact to your boat's value as the rust stains start to dominate your field of view. Just because they used pretty good hardware to start with doesn't mean it's "forever." Nothing on a boat is forever, including bedding/bonding compounds, seals, and stainless fasteners (stainless means "stain resistant").
5) Unscrew those deck plates, re-bed them, and while you're at it order 7 new gaskets from whichever manufacture built your deck plates. If you can't say for certain what condition they're in, I guarantee they leak!
It's March! Happy March! Reality is knocking!
Bob.
One of our primary work items is to replace and re-wire the original thru-hull mounted, plastic, live well pump, with a more robust, bulkhead mounted pump. I think ultimately for a lot of Sailfish owners in the 1996-2004 range, this is going to be a common "challenge," where on one hand you can find a 3/4" NPT screw mount pump to attach directly to the thru-hull OEM style, or upgrade to a more substantial Rule stainless steel cyclone, which should be bulkhead mounted, without question.
1) You can't up-grade an existing wire that runs into the original manufactured wiring cluster: The OEM wiring harness for your boat was likely built on a rigging bench (like a car) and is taped and built/taped into the split loop casing in a way that makes it not only impossible to remove an abandoned wire, but is also impossible to pull a new wire into the existing bundle.
2) Where the split looming is accessible, it is DEFINITELY there for a reason! Take a lot of pictures, and plan on replacing and incorporating your new wiring into the loom casing, because it provides invaluable, low cost, visually attractive protection to your wiring for long term durability. While I definitely conceded defeat in my original plan to "blend in" to the existing cable routing, I will still make it look as OEM as possible.
3) It looks impossibly busy behind and under the helm of a boat the size and complexity of a Sailfish, similar and larger models. If you are not the sort to research, plan, conform to standards, and execute at a MINIMUM of manufacture standards for connections (which I'd call average), PAY SOMEONE to do the work. Simply replacing a pump and failing to scale your wiring appropriately not only endangers you and your passengers, it immediately devalues your boat. Do it right. The first time.
4) For anyone who doesn't automatically start replacing fasteners on their 2004 and earlier boat, I'll tell you based on the mild winter I've seen, on our 282 I'm seeing more rust peeking around those beige painted stainless screw heads in a lot of places. Either start replacing those fasteners now, bit by bit, or suffer the consequences when they either can't be removed without being broken (PITA), or suffer the impact to your boat's value as the rust stains start to dominate your field of view. Just because they used pretty good hardware to start with doesn't mean it's "forever." Nothing on a boat is forever, including bedding/bonding compounds, seals, and stainless fasteners (stainless means "stain resistant").
5) Unscrew those deck plates, re-bed them, and while you're at it order 7 new gaskets from whichever manufacture built your deck plates. If you can't say for certain what condition they're in, I guarantee they leak!
It's March! Happy March! Reality is knocking!
Bob.