
You are using an out of date browser. It may not display this or other websites correctly.
You should upgrade or use an alternative browser.
You should upgrade or use an alternative browser.
plastic wood trim looks lousy
- Thread starter ric2352
- Start date
Reelman5703
Member
- Joined
- Nov 24, 2015
- Messages
- 17
- Reaction score
- 0
- Points
- 0
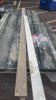
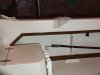
Took mine off and had replicated with a white plastic, not quite Starboard. The cut all the pieces to size and rounded the sides off for me. Used a thick Starboard for the bottom rails of my 94 seafarer. Putting it on in a few weeks and will have better photos then.
Here is a photo of the pile in my office and a piece of the old trim. Little dusty but I think it will look great.

Here is a photo of the pile in my office and a piece of the old trim. Little dusty but I think it will look great.
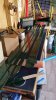
Mine post painting with Pettit Jade Green topsides paint. They look pretty good for my personal painting ability. There are some fuzzes but, they're 1000% better than what was there.
What I was originally working with....
After a thorough sanding and painting...
What I was originally working with....
After a thorough sanding and painting...
Attachments
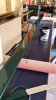

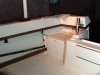
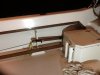
Ok....got sick and tried of looking at the faded, sunburned duratrim. Seemed like finding a suitable product to replace it was going to be difficult. I like what a lot of you guys did, so decided to take it all off. I sanded off the ugly wood grain to see what was underneath...hmmm...interesting. This stuff reminds me of layered Formica. After sanding, I applied a dark walnut stain, letting it sit for 20 minutes and wiped it down. Two coats of marine varnish and this was the result....I think it's cool! I like the how the edges are darker....can't see from the pic so well but looks like a wood grain because of sanding the layers at abit of an angle. Fast fix...we'll see how it holds up.
Attachments
artodea
Well-Known Member
Did this as a winter project - went with TotalBoat single stage polyurethane, Hatteras White. I removed the trim, sanded and primed followed by two coats finish using the roll/tip method.


gw204
Well-Known Member
When using long pieces of Starboard, you have to elongate the mounting holes and not fully snug down your fasteners to account for the expansion/contraction.
Finest Kind
GreatGrady Captain
artodea said:
Nice job on the trim, but it's your new motor that really makes her special!
SC Adventure 208
Well-Known Member
- Joined
- Jan 4, 2011
- Messages
- 63
- Reaction score
- 0
- Points
- 6
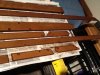
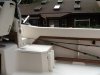
I just finished mine. Only changes were that I didn't wipe off the stain as it didn't really penetrate all that well. Let it dry overnight and then put on 7 coats of marine varnish. My wife hated getting on the boat now she loves it. Looks much better. Only problems I had were at the helm and passenger bulkhead...could not get those pieces off so tried to do them in place but sanding was a bitch. Would rather just leave them unsanded and varnish. Same with the place by the rocker switches as I do not want to mess with the wiring. Overall an A-ric2352 said:Interesting..826 views and no comments....anyone else try fix? Just curious
I didn't do anything under the hard top or around the helm...still in good shape. Sanding in place had to be tough. I added a coat of polyurathane over the top of the vanish for added durability. Post a pic of what you did...love to see.
SC Adventure 208
Well-Known Member
- Joined
- Jan 4, 2011
- Messages
- 63
- Reaction score
- 0
- Points
- 6
Topjimmy
Well-Known Member
Yep I tried the Boe-ShieldT9 and it looks a "little" better but I love what ya did there ric2352 and will do the same this winter :goodjob
ric2352 said:I didn't do anything under the hard top or around the helm...still in good shape. Sanding in place had to be tough. I added a coat of polyurathane over the top of the vanish for added durability. Post a pic of what you did...love to see.
Ric, that looks great. I'm going to remember this post if I ever get around to doing something similar.