Re-glassing Fuel-tank Hatch

Joined
Jan 17, 2023
Messages
22
Reaction score
3
Points
3
Age
54
Model
Seafarer
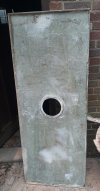
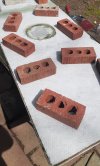
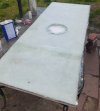
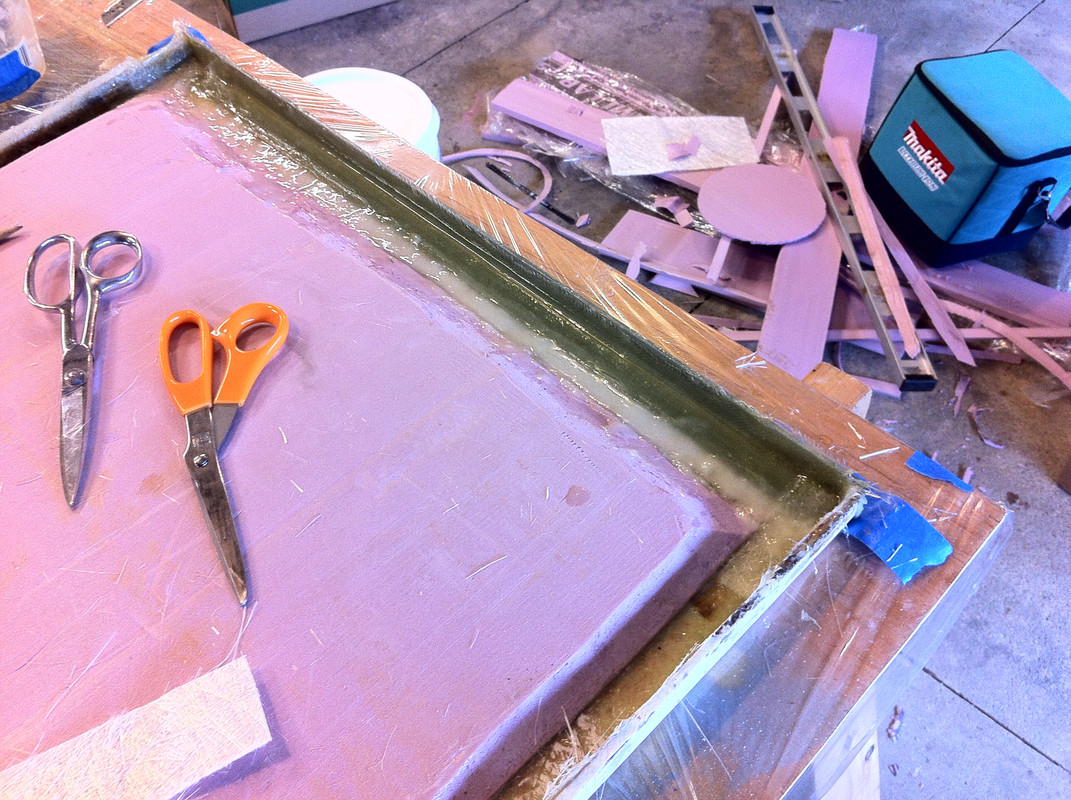
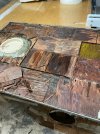
I plan to reglass the underside of the fuel-tank hatch on my 89 Searfarer. The previous owner stored the boat outside without cover and the plywood became saturated and the glass has delaminated. When I removed the delaminated fiberglass layer, I noticed that Grady had used small plywood squares (about 6 in x 6 inch) to stiffen the panel. I was planning to cut one solid piece (with holes for the deck plates of course) and then glass this to the bottom of the hatch, glassing over the plywood, with 2-3 layers of 10 oz fiberglass cloth.

Does anyone know why Grady used these small squares? I thought maybe it was a cost-saving measure, so they could use scraps from other cuts, but there may be some structural reason. This is my first glassing project, and I don't want to screw it up.
 

Attachments

  • IMG_4878.jpg
    IMG_4878.jpg
    96.3 KB · Views: 22

DennisG01

GreatGrady Captain
Joined
Sep 1, 2013
Messages
6,859
Reaction score
1,218
Points
113
Location
Allentown, PA & Friendship, ME
Model
Offshore
FYI, beign left outside is not the root cause of the problem. Unsealed screws/etc (or not being re-sealed as normal maintenance) which ALLOWED water to get in is the issue.

There's a bunch of threads on here about this project... a bunch! :) Use the search function and you'll get lot's of reading material - and that will avoid typing the same stuff all over again since the info hasn't changed.

But, to answer your question... in my opinion the reason to use those squares (floors are the same way) is ease of install. It's easier ot avoid air being trapped underneath with small pieces than it would be with a larger piece of plywood.

Yes, you could use a larger piece of plywood. Or Coosa/Divinycell. Or... I used a piece of $10 pink foamboard from Home Depot as an experiment since it's easy enough to redo. That was about 6 or 7 years ago, now.
 

Hookup1

GreatGrady Captain
Joined
Oct 16, 2007
Messages
2,676
Reaction score
729
Points
113
Age
69
Location
Cape May, NJ
Model
Islander
On the new plywood overdrill the deck screw holes from the underside. Tape off topside. Fill with resin. Re-drill. This is a big source of water intrusion.

I did mine as one piece Coosa board. Good plywood and squares are up to you. I also vacuum bagged the hatch to squeeze together and get air out so epoxy can flow.
 

basspirate

Member
Joined
Apr 18, 2023
Messages
8
Reaction score
3
Points
3
Age
46
Model
Overnighter
I did mine with nidacore last year. The weight difference was incredible, im guessing about 70lbs down to 25lbs. A few pics.
 

Attachments

  • 20220425_145146.jpg
    20220425_145146.jpg
    2.1 MB · Views: 28
  • 20220426_151604.jpg
    20220426_151604.jpg
    2 MB · Views: 28
  • 20220427_103810.jpg
    20220427_103810.jpg
    2 MB · Views: 28
  • 20220427_123859.jpg
    20220427_123859.jpg
    2.3 MB · Views: 28
  • Like
Reactions: SkunkBoat

SkunkBoat

Well-Known Member
Joined
Oct 12, 2017
Messages
4,288
Reaction score
1,486
Points
113
Location
Manasquan Inlet NJ
Website
www.youtube.com
Model
Express 265
If you have the time to get nidacore or coosa, thats the way to go. If you use wood, the proper wood is untreated 1/2" AB exterior Douglas fir (aka "marine grade"). That is NOT pressure treated CDX that you get at home depot. AB plywood has more layers and NO voids. Its getting hard to find. I had to settle for BC exterior pine. CDX is full of knot holes and voids.
 

Hookup1

GreatGrady Captain
Joined
Oct 16, 2007
Messages
2,676
Reaction score
729
Points
113
Age
69
Location
Cape May, NJ
Model
Islander
My son works at Lowes as Pro Desk Manager. At one point they had marine grade plywood. Not sure after Covid and supply chain problems but worth a check. They may have to order it. If you want Coosa board Mesco (big marine distributor in my area) has it. Your marina probably does business with them.
 

Patsandsox

New Member
Joined
May 10, 2016
Messages
4
Reaction score
0
Points
1
Location
New England
Model
Explorer
Just did mine with Divinyl cell. Can buy through Fiberglass Supply Depot. Got it in less than a week.
 
Joined
Jan 17, 2023
Messages
22
Reaction score
3
Points
3
Age
54
Model
Seafarer
Thanks, all. I really appreciate the feedback, links, and tips. I'm still trying to figure out what kind of core to use, but I've scrapped my idea of using 10 oz fabric in favor of chopped strand mat. I also plan to use epoxy resin...will probably p/u West System 105 with 206 hardener, based on the links and feedback. There were suggestions too about overdrilling the screw holes, filling with epoxy, and then redrilling...easy enough and should keep the core material (whatever I end up using) isolated from any water that might make its way through the screw holes.
 
  • Like
Reactions: PointedRose

Hookup1

GreatGrady Captain
Joined
Oct 16, 2007
Messages
2,676
Reaction score
729
Points
113
Age
69
Location
Cape May, NJ
Model
Islander
Use the West 206. It's not that slow this time of year. Gives you some time to work on a larger piece. You really want to fill the edges and the over drilled screw holes.

I also did a half-assed vacuum bagging job as well. Stickey stuff tape from Fiberglast, Home Depot 10 mil clear plastic and a A/C vacuum pump. A vacuum at sea level is about 15 psi of pressure. It forces the pieces together and draws the air to the top. Not required but it really did a nice job.

Hatch 1.jpeg Hatch 3.jpeg Hatch 2.jpeg
 
Last edited:

basspirate

Member
Joined
Apr 18, 2023
Messages
8
Reaction score
3
Points
3
Age
46
Model
Overnighter
I wouldnt bother with epoxy. Its not really structural. Polyester works fine but if using a honeycomb use 1708 instead of mat.
 

Hookup1

GreatGrady Captain
Joined
Oct 16, 2007
Messages
2,676
Reaction score
729
Points
113
Age
69
Location
Cape May, NJ
Model
Islander
There is a 209 harder as well - extra slow.
 

SkunkBoat

Well-Known Member
Joined
Oct 12, 2017
Messages
4,288
Reaction score
1,486
Points
113
Location
Manasquan Inlet NJ
Website
www.youtube.com
Model
Express 265
Thanks, all. I really appreciate the feedback, links, and tips. I'm still trying to figure out what kind of core to use, but I've scrapped my idea of using 10 oz fabric in favor of chopped strand mat. I also plan to use epoxy resin...will probably p/u West System 105 with 206 hardener, based on the links and feedback. There were suggestions too about overdrilling the screw holes, filling with epoxy, and then redrilling...easy enough and should keep the core material (whatever I end up using) isolated from any water that might make its way through the screw holes.
use 1 thin layer of chopped strand on the inside skin, then the core, then 1708. If you have cross members, tab them in with lite chopped strand. Chopped strand bends better than cloth. Then go over it with 1708. 1708 conforms pretty well and just lays out nice and smooth. I know nobody will ever see it so, yes, you could just use all chopped strand. Just remember to leave a gap around the edges and tuck the cloth and fill with high density filler.
Grady ran the wood to the edge and glassed over, then ground the edge off. Left a weak connection at the edges and it popped loose.

If you make more than a few pumps, you have to pour it out quick or it will cook in the pot. Once its poured out, you get more time.
 
Joined
Jan 17, 2023
Messages
22
Reaction score
3
Points
3
Age
54
Model
Seafarer
I don't have any cross members. I just ordered some 1708 and plan to do 2 layers of that over the core. I understand leaving a gap around the edges but I'm not sure what you mean by "tuck the cloth". I can see the weakness in how Grady did it originally and don't want a repeat of the weak connection at the edges
 

DennisG01

GreatGrady Captain
Joined
Sep 1, 2013
Messages
6,859
Reaction score
1,218
Points
113
Location
Allentown, PA & Friendship, ME
Model
Offshore
1 layer of 1708 is plenty.

Cut the core edges at an angle and run the 1708 to the vertical rim.


IMG-4076.jpg
 

Hookup1

GreatGrady Captain
Joined
Oct 16, 2007
Messages
2,676
Reaction score
729
Points
113
Age
69
Location
Cape May, NJ
Model
Islander
The hatch rests on it's edge on the supports of the deck. That gap you have all around should be packed with filler and glass. Actually it should be plywood or composite to within 1/4" and packed with glass cloth and resin. What is that pink stuff?
 

DennisG01

GreatGrady Captain
Joined
Sep 1, 2013
Messages
6,859
Reaction score
1,218
Points
113
Location
Allentown, PA & Friendship, ME
Model
Offshore
The hatch rests on it's edge on the supports of the deck. That gap you have all around should be packed with filler and glass. Actually it should be plywood or composite to within 1/4" and packed with glass cloth and resin. What is that pink stuff?
Although it's fine to do so, there's really no reason for the core (or filler material) to go all the way to edge. It doesn't need to go all the way for strength. It is such an extremeley short span that the strength of the area is not compromised in the least. Grady may have done that - but it's absolutely not needed. I've seen plenty of hatches built (from the manufacturer) like mine.

I re-built that hatch about 6 or 7 years ago. It is still as rock solid now as it was back then.

Because re-doing the hatch is an easy enough project, I decided to use a product that most would never dream of using. I did some experimenting first, though, to prove to myself that it would work. As some of you likely know, the strength of a hatch does not come diretly from the core material. It's more about the core's ability to retain solid separation between the top and bottom layer of glass. The reason rotten wood causes a hatch to feel weak is not because the wood is now weak, per se. It's because it can no longer tie the top and bottom layer of glass together solidly. It now allows them to flex independently of each other.

Ready for it? That pink stuff is a cheap piece of foamboard insulation from Home Depot!
 
Last edited:

DennisG01

GreatGrady Captain
Joined
Sep 1, 2013
Messages
6,859
Reaction score
1,218
Points
113
Location
Allentown, PA & Friendship, ME
Model
Offshore
Here's one of the key experiments I did to prove the bond between the foamboard and the epoxy/glass. Note that the glass is ONLY on the top and bottom of the piece of foam. If I had wrapped it on the sides it would immensely stronger. The first pic is 15lbs on a piece of foam (control) and you can see the bend compared to the straight ruler. An addditional 10lbs bent the foam enough to where the plates where then resting on the foam. The second pic is 55lbs on the same size piece of foam with a single piece of cloth top and bottom. It did fail when I got to 75lbs - but that was because I wasn't able to balance the weight properly and the edge of the little piece of plywood spacer ended up point-loading the foam and created a crease/weak spot.


IMG-4054.jpg


IMG-4058.jpg


IMG-4030.jpg