Removing aux tank on 1999 268 islander

family affair

Well-Known Member
Joined
Jul 31, 2010
Messages
1,283
Reaction score
283
Points
83
Location
Ohio
Model
Islander
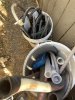
It wouldn't be the 1st Grady that I've heard of with a drain tube that was glassed over.
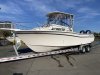
I'm likely stating the obvious, but my forward compartments won't drain to the back unless the boat is on a significant incline. Are you sure you have enough slope to get the compartment to drain back to the bilge?
 

efx

Well-Known Member
Joined
Jun 19, 2018
Messages
261
Reaction score
85
Points
28
Location
Los Angeles
Model
Islander
I’ll jack up my trailer as high as it goes and add 5 gallons of water to the front bilge and see the drain path. Should be interesting. I had a marlin that was just a confusing as the islander and it would hold water and transfer water from one compartment to the next, but I do believe the drain path via the pipes bypasses the tank compartments.
 

Hookup1

GreatGrady Captain
Joined
Oct 16, 2007
Messages
2,544
Reaction score
709
Points
113
Age
69
Location
Cape May, NJ
Model
Islander
From Carolyn @ GW

Here’s the basic hull stringer/ pvc layout for the 268 Islander. The arrow shows a long 1 ¼” pvc drain pipe that runs under the fuel tank compartment and drains the forward bilge area to the aft bilge on this boat. The 2nd small piece of PVC that is circled is the fuel tank compartment drain tube. Both tubes run in the bottom of the keel on our boats. To drain the fuel tank area we recommend elevating the bow up so that the water will drain out the aft of the boat.

268 tubing layout.jpg

I have a few more question back out to Carolyn at GW....

How does the water get out of the forward fuel tank? Are there two drain tubes, one for each fuel compartment, that run to the aft bilge?

Should the fuel compartment drains always be open or should they be plugged after draining? Seems to me you would not want a leaking fuel tank to drain into the bilge!

Edit: Added a image of my aft bilge. It looks like a 1 1/4" PVC pipe that Carolyn said should be from the forward bilge. Also it looks like a smaller PVC pipe to the aft fuel compartment. I have a endoscope type of camera about 6' long that I will snake the 1 1/4" tube and see if I can get thru to the forward bilge. Stay tuned...

Aft bilge 268.jpeg Forward bilge 268-1.jpeg Forward bilge 268.jpeg

Edit: Added photo of the forward bilge under the shelf for the shower sump. In the center of the photo you can see the 1 1/4" PVC tubing coming thru. I tried to snake the tube aft to forward but it seemed to turn about 6 feet in. I did put some pink antifreeze in the aft bilge and lowered the bow of the boat on the trailer. Pink water did flow forward. Apparently my boat was pretty level and both bilges had water. I blocked the trailer jack 4 1/2" and put the bow back up. I tried to snake it back forward to aft but could not get the snake started. My endoscope camera is now in the garbage can.

Also the little hose coming out next to the 1 1/4" in the first picture is actually a reinforced vinyl hose with at plug in it. This would make sense because it is the fuel compartment drain. In my case, if I washed the fuel tanks I would have to pull the plug to drain the compartment. This matches what I found when inspecting my tanks. I had to vacuum the water out of the compartment.
 
Last edited:
  • Like
Reactions: efx

efx

Well-Known Member
Joined
Jun 19, 2018
Messages
261
Reaction score
85
Points
28
Location
Los Angeles
Model
Islander
efx, I hope you are going to replace that seacock hose while you're in there.
Yes, every hose on the boat is being replaced. You should see the scupper hoses! I’m replacing the engines, gauges, filters, pumps,electronics. It’s a full rebuild.
 

Attachments

  • image.jpg
    image.jpg
    2.4 MB · Views: 15

efx

Well-Known Member
Joined
Jun 19, 2018
Messages
261
Reaction score
85
Points
28
Location
Los Angeles
Model
Islander
From Carolyn @ GW

Here’s the basic hull stringer/ pvc layout for the 268 Islander. The arrow shows a long 1 ¼” pvc drain pipe that runs under the fuel tank compartment and drains the forward bilge area to the aft bilge on this boat. The 2nd small piece of PVC that is circled is the fuel tank compartment drain tube. Both tubes run in the bottom of the keel on our boats. To drain the fuel tank area we recommend elevating the bow up so that the water will drain out the aft of the boat.

View attachment 17632

I have a few more question back out to Carolyn at GW....

How does the water get out of the forward fuel tank? Are there two drain tubes, one for each fuel compartment, that run to the aft bilge?

Should the fuel compartment drains always be open or should they be plugged after draining? Seems to me you would not want a leaking fuel tank to drain into the bilge!
Great. This helps. The diagram makes sense.
 

Hookup1

GreatGrady Captain
Joined
Oct 16, 2007
Messages
2,544
Reaction score
709
Points
113
Age
69
Location
Cape May, NJ
Model
Islander
I edited my post 4 up from here to keep the info in one place. Investigation done for now. I'm going to move on...
 
Last edited:

efx

Well-Known Member
Joined
Jun 19, 2018
Messages
261
Reaction score
85
Points
28
Location
Los Angeles
Model
Islander
Here is a list of what has been done. Shes done for now.

1. Removed 72 gal aux tank
2. drained and cleaned main 128 gal main tank
3. All new fuel hose throughout
4. cleaned and rebuilt yamaha fuel flow meter
5. new water / fuel seperators
6. Plugged and reused the existing fuel valves to work as on and off for a single tank
7. Added two new old stock 2019 yamaha 150 4 strokes. Standard and counter rotating. Mounted at the highest hole
8. Power tech props 3 x 15.25 x 16 - stainless
9. reused seastar ram and added a new HO6001 tie bar. Parallel setting
10. 2 new yamaha tachs
11. new rule 1500 gpm bilge pump and float switch
12. All new LED lights- spreader and nav
13. new seachoice pop on deck plates on deck-- nuts and bolts, not screws
14. two new benson screw on deck plate at transom - nuts and bolts, not screws
15. New flares and PFD
16. All mercury marine oils
17. two Garmin 742
18. Rebuilt yamaha 704 binnicle
19. Reused 10 pin main wire harness
20. new trim and tilt harness
 

Attachments

  • islander 268 repower.jpg
    islander 268 repower.jpg
    997.7 KB · Views: 10
  • islander 26 repower 2.jpg
    islander 26 repower 2.jpg
    93.9 KB · Views: 10
Last edited:

seasick

Well-Known Member
Joined
Aug 19, 2008
Messages
9,071
Reaction score
1,292
Points
113
Location
NYC
What kit did you use to rebuild the 704?
 

efx

Well-Known Member
Joined
Jun 19, 2018
Messages
261
Reaction score
85
Points
28
Location
Los Angeles
Model
Islander
What kit did you use to rebuild the 704?
Purchased a new shroud, new end caps, one new neutral position sensor and pretty much went through each moving part and cleaned and lubed up. The metal housing had this odd galvanized dust on it. I sanded it down and washed it off and it was perfect. All the parts on the inside were in good shape. I did have to drill out one snapped off screw and really clean all the wires from the tape residue.
 

KS1

Active Member
Joined
Sep 20, 2020
Messages
28
Reaction score
18
Points
3
Model
Islander
Here is a list of what has been done. Shes done for now.

1. Removed 72 gal aux tank
2. drained and cleaned main 128 gal main tank
3. All new fuel hose throughout
4. cleaned and rebuilt yamaha fuel flow meter
5. new water / fuel seperators
6. Plugged and reused the existing fuel valves to work as on and off for a single tank
7. Added two new old stock 2019 yamaha 150 4 strokes. Standard and counter rotating. Mounted at the highest hole
8. Power tech props 3 x 15.25 x 16 - stainless
9. reused seastar ram and added a new HO6001 tie bar. Parallel setting
10. 2 new yamaha tachs
11. new rule 1500 gpm bilge pump and float switch
12. All new LED lights- spreader and nav
13. new seachoice pop on deck plates on deck-- nuts and bolts, not screws
14. two new benson screw on deck plate at transom - nuts and bolts, not screws
15. New flares and PFD
16. All mercury marine oils
17. two Garmin 742
18. Rebuilt yamaha 704 binnicle
19. Reused 10 pin main wire harness
20. new trim and tilt harness
Just curious - did you go with 25" or 30" shafts on the motors?