I've searched all over trying to find information on removing the floor on an 1989 19' tournament, but can't find anything. the inside port side stringer is bad and the bulkhead in front of the tank. I am going to replace the tank so I figured I'd go ahead and fix the stringer(s) and bulkhead(s). I'm pretty sure the foam is wet on the port side so I at least want to get the port side floor up, but would like to pull the whole thing in 1 piece and hopefully use the sole over. I don't want to fabricate the whole floor over again with the tank cover and fish box hatch. I was hoping when I get it up, I can replace the wood on the back of it the same way the access hatches are done. Has anyone out there removed the floor on a 19' tournament? where did you cut it? Can it be pried off the top of the stringers once the perimeter is cut free? If I didn't have the tank access and the fish box access cover in the floor, I wouldn't worry about it. I replaced the floor in my 17' grady a few years ago, but that was just a solid floor so I cut it up in pieces and replaced the whole thing. I was thinking possibly removing the cap, so I could cut the floor back under the rear seats and pull it up in 1 piece, replace bad stringers, bulkheads, foam and wood on the underside of the sole and replace in 1 piece. Transom seems solid, but I need to check that more. There is no flex when I hang on the motor and no water seepage when I remove screws in the transom. I contacted Grady White customer service but they couldn't tell me anything. They did give me a copy of the tank drawing and stringer layout. Any ever remove a tournament floor?

You are using an out of date browser. It may not display this or other websites correctly.
You should upgrade or use an alternative browser.
You should upgrade or use an alternative browser.
removing floor on 89 19' tournament
- Thread starter crabbydad
- Start date
DennisG01
GreatGrady Captain
- Joined
- Sep 1, 2013
- Messages
- 8,164
- Reaction score
- 1,616
- Points
- 113
- Location
- Allentown, PA & Friendship, ME
- Model
- Offshore
Haven't done it on a Tourney, but I did it on my Offshore and did a little post on this forum. Assuming your construction is basically the same, you can cut the bottom skin of the floor off the stringers (some may already be loosened up) once you take the top skin and core off. I think it will be quite a chore to try and remove the whole top skin in one piece. But that's just me. Here's the thread I did that should give you some ideas http://greatgrady.com/forum/viewtopic.p ... ff#p129651 There's others on this forum that have done this, too - try doing a search for those.
Thanks Dennis,
I actually read thru your post a couple months ago when I started searching for information. Looking at your pictures, it looks like the floor is constructed the same way the access panels are. I'd like to cut the top of the sole and use that over. I'm hoping someone out there has actually done this with a tournament. Trying to figure out the best way to do this and put it back together and have it look as close to original as possible. I'm gonna reread thru your post and hopefully come up with a good plan because once I start cutting, that's it.
Tony
suzukidave
Well-Known Member
- Joined
- Sep 24, 2013
- Messages
- 383
- Reaction score
- 9
- Points
- 18
DennisG01
GreatGrady Captain
- Joined
- Sep 1, 2013
- Messages
- 8,164
- Reaction score
- 1,616
- Points
- 113
- Location
- Allentown, PA & Friendship, ME
- Model
- Offshore
It was a fun, winter project. I shrink-wrapped it high, like a big box, so I could move all around inside. Added a few shop lights suspended from the wood, spine support - even had a heater in there! It was a nice, cozy place to be if things got a little too hectic in the house.
Crabby, I think you'll find that trying to remove the whole floor in one piece is going to be really tough - regardless of what boat model we're talking about. Not saying it can't be done, but it's a HUGE chore (GIGANTIC) to separate the top skin from the wood core and the bottom skin. And, I think it would be a safe bet that there's a good chance that somewhere along the line you'll end up bending the floor too far and splintering the glass, anyways. It was A LOT easier to cut the floor into manageable pieces. You don't necessarily need to cut them as small as I did, though. For me, I was planning on repainting the floor anyway as the non-skid had been worn down over the years. So in my case, it really made no difference how small the pieces were.
Crabby, I think you'll find that trying to remove the whole floor in one piece is going to be really tough - regardless of what boat model we're talking about. Not saying it can't be done, but it's a HUGE chore (GIGANTIC) to separate the top skin from the wood core and the bottom skin. And, I think it would be a safe bet that there's a good chance that somewhere along the line you'll end up bending the floor too far and splintering the glass, anyways. It was A LOT easier to cut the floor into manageable pieces. You don't necessarily need to cut them as small as I did, though. For me, I was planning on repainting the floor anyway as the non-skid had been worn down over the years. So in my case, it really made no difference how small the pieces were.
Dennis, how hard was it to separate the non skid surface from the core? Maybe if I do that in 4 manageable pcs, It will be easier to rip up the rest of the floor. I was hoping for less noticeable seems to fix when I put it back down. I've read other posts where the poster said the floor was not glassed very good to the top of the stringers and came off pretty easily. I'm hoping that is the case since I have to get it all up and replace at least 1 stringer and bulkhead and probably water logged foam.
DennisG01
GreatGrady Captain
- Joined
- Sep 1, 2013
- Messages
- 8,164
- Reaction score
- 1,616
- Points
- 113
- Location
- Allentown, PA & Friendship, ME
- Model
- Offshore
It all depends on how solid the wood core is. If it's been completely saturated for years, it will separate easier. But because it's marine plywood (or at least it appeared to be so in my case), it can withstand being wet for quite some time before it even starts to give way. I think there were a couple pictures in that thread of the various tools I was using, so you can see what I had to do. In the end, the "seams" were only the width of whatever tool I used to cut the floor into pieces. You could easily dye the resin to closely match the floor color and probably be pretty darn close. Of course, you'll lose the pattern of the non-skid and epoxy should really be topcoated (painted, or protected in some way) since it is not UV stable.
The bottom skin of fiberglass (which as you probably saw in some of the pictures, is extremely thin) could be stuck quite well to the stringers, or it could be loose. In my case, I had a couple spots where it wasn't stuck at all, so I added some thickened epoxy between the bottom skin and the top of the stringer before putting the floor back on.
For what it's worth, you may not have to do anything with the stringers. The glass on the stringers acts sort of like an I-beam in that it's vertical. As long as the glass seems solid, I would think long and hard about how far into this you want to go. You could simply add some more glass to the inboard side of the stringer, running the glass from the the underside of the floor, down the stringer, and onto the bilge floor a bit. Once it's all tied together again, the wood is not needed as much.
suzukidave
Well-Known Member
- Joined
- Sep 24, 2013
- Messages
- 383
- Reaction score
- 9
- Points
- 18
could he do a patch repair leaving the floor intact. cut the rotten stringer section out leaving laps at each end. excavate the wet foam. then build up a replacement stringer in two pieces using tongue in groove and dowels to get a good join (after thoroughly soaking the pieces in epoxy). after you get the first half installed and tabbed on the inside you can install new foam, then install the second half of the stringer except for the deck/stringer bond. finally attach a temporary ledger to the stringer and use furniture clamps to glue the deck to the stringer.
i've never done that by the way. i've replaced about 2' of rotten stringers at the transom on a smaller boat using a lap joint is all. i also reused a lot of the old fibreglass tabbing because i didn't know any better. it seemed to work fine.
i've never done that by the way. i've replaced about 2' of rotten stringers at the transom on a smaller boat using a lap joint is all. i also reused a lot of the old fibreglass tabbing because i didn't know any better. it seemed to work fine.
DennisG01
GreatGrady Captain
- Joined
- Sep 1, 2013
- Messages
- 8,164
- Reaction score
- 1,616
- Points
- 113
- Location
- Allentown, PA & Friendship, ME
- Model
- Offshore
There's definitely more than one way to skin a cat. Often what determines which way to go will be the location of the needed repair, the severity, blah, blah, blah - you get the idea - lot's of variables. If you're doing a lap joint, the dowels really aren't even needed. The bond between wood-epoxy-wood is stronger than the bond between the other layers of wood. Once you add the glass (and ideally bevel the joint with a couple thin strips of glass in there), you've now made a super strong joint. Coating the pieces of wood ahead of time (like you mentioned), but keeping them wet, adds to the strength even more.
The problem (for lack of a better term) with piecing it together like this is that it's hard to know "when to stop". Which is the reason I mentioned just overcoating with glass. Unless the entire stringer is just totally gone and the glass seems weak, the easiest thing to do would be to drill some hole to allow the wood to dry out for a month or two (heat helps), then fill the holes and over glass the entire stringer with heavy woven or 1708.
But again, there's really no one best way.
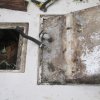
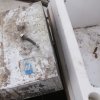
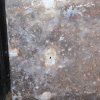
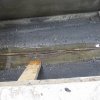
I removed the tank access cover yesterday. the tank is 64" long x 23" wide. the opening is 23" x 62". no room to move the tank long ways, there are 2x2 blocks between the tank and stringer, bulkheads. Looks like the 2x2 wood are fastened to the sides with neoprene strips tight between them and the tank. I'll know for sure once the tank is drained. I don't know if I can grind a little of the flange to get it out. Even though it is a lot of work, I may go with my first thought. I may remove the rub rail and unscrew the top of the boat and remove. that way I can cut the floor up in one piece. I really want to get a good look underneath to make sure everything is good. The transom feels solid, but I'm prepared to replace that as well if needed. I just hope I can remove the non skid surface from the core once I have it all cut out. I'm glad I didn't place the order for the tank yet. I will have it made a little smaller so it will lift out of the opening if needed. the original drawing I got from grady has it written on the drawing if making a replacement tank, make it a little smaller. I will post pictures of my progress along the way in case anyone else needs to do this, they can learn from my mistakes.
DennisG01
GreatGrady Captain
- Joined
- Sep 1, 2013
- Messages
- 8,164
- Reaction score
- 1,616
- Points
- 113
- Location
- Allentown, PA & Friendship, ME
- Model
- Offshore
If your construction is like mine, the floor is separate from the top deck - meaning the floor is a "cockpit liner" glued in place to the hull sides. Also, I'm pretty sure the top deck is glued, as well as screwed to the hull. Regardless, that is A LOT of work you're planning on. A LOT.
yeah, I'll have to think about. The first thing is to get the tank out and see how the stringers and bulkheads in the area feel. I may try removing the stringers without removing the floor and checking the foam behind it, then go from there. I don't want to make more work for myself then necessary , but I want to do it right. I have it in my garage, but its not heated. Once it gets cold i will have to use space heaters to lay up fiberglass. I want to have this boat done for next spring.
DennisG01
GreatGrady Captain
- Joined
- Sep 1, 2013
- Messages
- 8,164
- Reaction score
- 1,616
- Points
- 113
- Location
- Allentown, PA & Friendship, ME
- Model
- Offshore
Well, you're a step ahead of me! I had to do mine outdoors with only the shrinkwrap to try and keep heat in.
I'd probably just drill a bunch of exploratory holes - including the lower corner of aft bulkhead, just on the outboard side of the stringer as that is where the water, if any, would probably pool. A few more along the stringer (once the tank is out). Let any water drain out, try a few more exploratory holes... and then maybe you can let it be just as it is.
I'd probably just drill a bunch of exploratory holes - including the lower corner of aft bulkhead, just on the outboard side of the stringer as that is where the water, if any, would probably pool. A few more along the stringer (once the tank is out). Let any water drain out, try a few more exploratory holes... and then maybe you can let it be just as it is.
If I understand you correctly, if I just cut thru the non skid layer on the floor, it will come up easily from the core? I'd like to cut 3" from all the edges and across between the access covers and remove in 2 pcs. that way I could cut only the sections of floor that I have to.
I rebuilt the transom on my 17' grady several years ago outside. I removed the top of the boat and slid it up to gain access to the transom. once I removed the rub rail and all the screws, it was held together by caulk. wasn't too bad, but it was a pita working outside. putting the top back on was like putting on a shoe and needing a shoe horn.
I rebuilt the transom on my 17' grady several years ago outside. I removed the top of the boat and slid it up to gain access to the transom. once I removed the rub rail and all the screws, it was held together by caulk. wasn't too bad, but it was a pita working outside. putting the top back on was like putting on a shoe and needing a shoe horn.
DennisG01
GreatGrady Captain
- Joined
- Sep 1, 2013
- Messages
- 8,164
- Reaction score
- 1,616
- Points
- 113
- Location
- Allentown, PA & Friendship, ME
- Model
- Offshore
Yes, the non-skid will "peel" off of the wood core. But the condition of the wood will determine how easy it will be. Chances are, the wood is going to come off in chunks - some will stick to the non-skid layer, some to the bottom layer. If you go gently and carefully, with the right tools, you might be able to get the non-skid layer to come off "cleaner". Any way you look at it, I wouldn't say that this is going to be "easy".
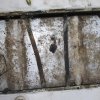
finally had time to get back to it. removed the panel supports above the tank and siphoned out around 20 or so gallons of fuel. there are 2 nice size holes in the top of the tank where the panel supports were. Unfortunately I can't use the fuel I removed because it dissolved all the varnish that must have accumulated in the tank, so all the fuel is orange. The recycling center nearby takes old gas so i'll have to go dump it in their tanks then hopefully get the rest out in 1 more trip. When I bought the boat I asked the guy if the tank leaked and he said it didn't, but there wasn't much gas in the tank, but it ran ok. On the way home from buying it, I put 30 gallons of gas in the tank. I ran the boat at my house and it ran fine. The first time I took the boat out, It didn't want to stay running at the ramp, but I left the ramp anyway, I made it 300' and it shut off and I couldn't get it to stay running, it was starving for gas.
I attached pics of the tank
I attached pics of the tank
Attachments
DennisG01
GreatGrady Captain
- Joined
- Sep 1, 2013
- Messages
- 8,164
- Reaction score
- 1,616
- Points
- 113
- Location
- Allentown, PA & Friendship, ME
- Model
- Offshore
Hmmm, yeah, that doesn't look so good. From the second picture, unless it's just dirt, it looks like there's more than just two holes, too. Chances are, there could be other places that are getting ready to open up.
"Starving for fuel"... with the bad gas you pumped out, you obviously found the culrpit! I would probably go ahead and replace not only the tank (unless it can be repaired), but replace the fuel lines, too. Check your fill and vent while you're at it - if they're original, it's probably time to do them, too.
See what happens when you want to go and do a silly thing like fixing your boat? You find more problems! :roll:
I'm definitely replacing the tank and lines. I got quotes a few weeks ago using the drawing I got from Grady White customer service. I want to see how hard it is to get it out. I'll probably have it made a little smaller since it looks like its going to be a pita getting it out. I'm most likely going to be cutting up some(if not all of the floor) to replace rotten stringers and wet flotation foam. I could just replace the tank and lines and put it back together, but just knowing what's under there, I'd rather tear it up and know its right. the boat was sitting crooked on the trailer so I asked the guy if the boat listed to one side or the other and he said no it just loaded crooked on the trailer. When I took it out the first time, I meant to check that, but I was too busy trying to find someone to tow me 300' back to the ramp. When I loaded it on the trailer, the side with bad stringer is up higher, so if that side was sitting lower in the water, it would have contacted the bunk first making it sit higher on the trailer, so I'm pretty sure the floatation foam is waterlogged on that side. It really bugs me to look back and see the boat crooked on the trailer.
My 17' Grady listed really bad port side, when I pulled up the floor, the flotation foam was saturated. Once I replaced the foam and the floor, it sat perfect in the water
My 17' Grady listed really bad port side, when I pulled up the floor, the flotation foam was saturated. Once I replaced the foam and the floor, it sat perfect in the water
DennisG01
GreatGrady Captain
- Joined
- Sep 1, 2013
- Messages
- 8,164
- Reaction score
- 1,616
- Points
- 113
- Location
- Allentown, PA & Friendship, ME
- Model
- Offshore
Even with a perfectly dry boat, they can sometimes load unevenly depending on how far the trailer is in the water and the wave/wind action. I suspect if it was severely heavy on one side that you would have noticed it right away when you were in the water.
If you felt the need, you lift the boat off the trailer, move the trailer and then put it back down. But there's an easier way that usually works: Make the stern tie down on the high side nice and tight. Leave the low side loose or off. Take it for a drive and be sure to go over a bumpy road. Often times the boat will level itself out.
If you felt the need, you lift the boat off the trailer, move the trailer and then put it back down. But there's an easier way that usually works: Make the stern tie down on the high side nice and tight. Leave the low side loose or off. Take it for a drive and be sure to go over a bumpy road. Often times the boat will level itself out.
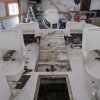
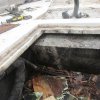
I finally drained all the gas and removed the tank. ended up removing the forward bulkhead in the tank coffin since it was rotten anyway, and pushed the tank forward so I could pull the back of the tank up and out. looking at the stringer drawing I have, this bulkhead does not go all the way across. it only spans the coffin and goes between a splice on each side. Now I can order a new tank. definitely a little smaller so it will fit out of the existing opening. I found another hole on the end where the fill is and a hole on the bottom where it sat on the rubber pad, I'm surprised all the fuel didn't leak out. the rubber pad must have sealed it, but as soon as I started moving it, all the remaining fuel in the tank leaked into the boat. i did grind just a little off the sides of the opening , it was a snug fit. the drain tube was also broken. I attached some pics, hopefully this will help the next guy who has to remove a tank from a tournament.
Attachments
-
 grady tank removal 1.jpg246.8 KB · Views: 2,240
 -
 grady tank removal 2.jpg293.5 KB · Views: 2,239
 -
 grady tank removal 3.jpg298.2 KB · Views: 2,237
 -
 grady tank removal 4.jpg283.2 KB · Views: 2,235
 -
 grady tank removal 5.jpg389 KB · Views: 2,234
 -
 grady tank removal 6.jpg307.4 KB · Views: 2,239
 -
 grady tank removal 7.jpg278.3 KB · Views: 2,238